New features
of version 4.37
(click here for download the version)
Version 4.37b - May 11, 2005
GRADIENT REMOVAL PROCEDURE (or BACKGROUND FIT)
The gradient removal procedure is improved (see Background fit... command of Processing menu). The function can now use a binary mask for a precise selection of the sky region and for exclude objects, like stars, galaxies, nebulae, ... It is an easy to use and really works function (can process directly 16-bit or 48-bit RGB color images).
The full automated method is also selectable from the dialog box, very useful then the images contains only stars and contrasted objects (the algorithm is very efficient for differenciate background and this type of objects). The equivalent command line is SUBSKY (and SETSUBKY for adjust some parameters).
The entirely manual method for estimate the sky
is also available, by placing small markers on the image with the aim of the
mouse pointer. For a tutorial concerning these methods, click
here.
Here an example of use of the improved gradient dialog box.
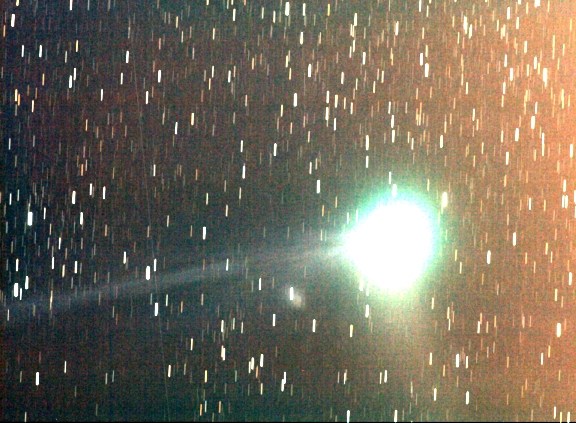
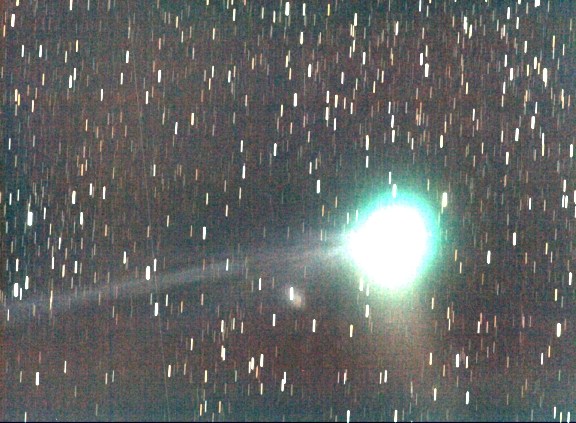
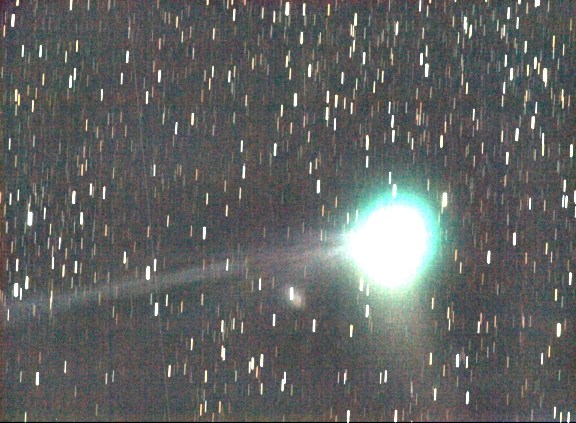
Consider this image of comet C/2004 Q2 Machholz taken in urban condition (see here for details). The light pollution produce a significant and unpleasant large-scale gradients:
Note: do not mistake this default with a flat-field error (i.e.sensibility variation along image). We correct here only additive errors (light added by the pollution for example). For correct a spatial sensitivity problem, like vignetting, it is preferable to divide the image by a classical flat-field map.
You can download the demonstration image COMET.PIC here (800 kb).
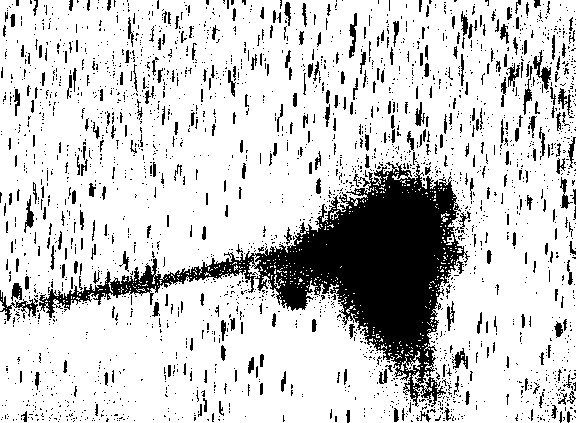
STEP 1. Load the image and compute a mask for insolate the sky. The appropriate command for this is BIN_DOWN. The only one parameter of this command is the typical value of the sky background (use the mouse or the BG command for a first estimate). At this stage try some values. For example
LOAD COMET
BIN_DOWN 620
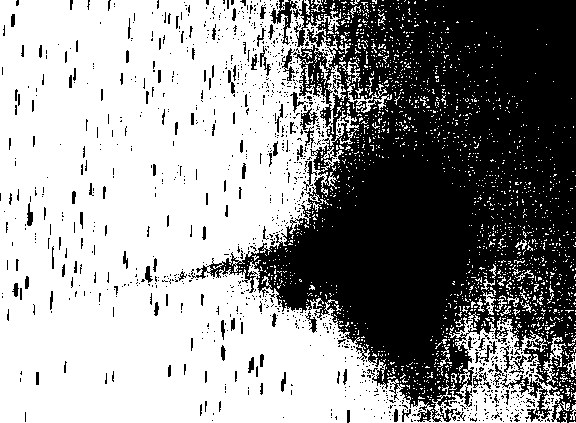
A large part of the image is not used for the gradient calculation (dark part of the mask). The background noise is also in excess.
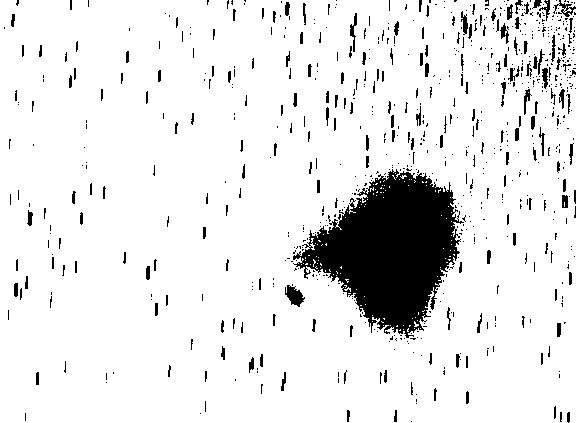
Try higher value for the sky level
LOAD COMET
BN_DOWN 750
Now the threshold is too high because faint stars and faint extension of the coma faint are included in the computation.
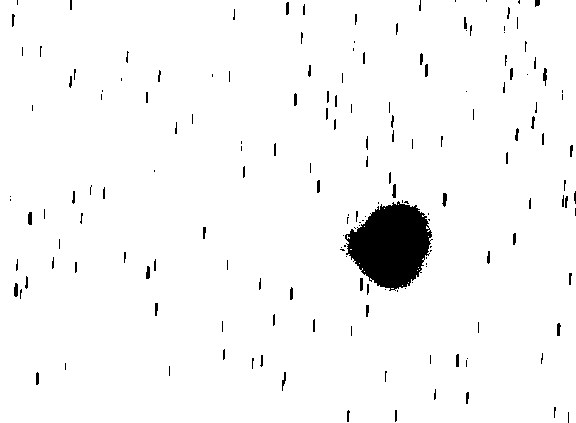
Now, the final tuning value for the mask
LOAD COMET
BIN_DOWN 660
The background selection is optimal at this stage. Save the binary mask image on the disk. For example SAVE MASK
STEP 2. Load the image to process and open the "Remove gradient" dialog boxes (Processing menu). Check the "Use a mask" option and enter the mask name:

The procedure now ignore the null values of the mask image during the computation of the synthetic background.
The "Background detection" parameter define the degree of differentiation between he sky region and the objets of the images. A low value correspond to a less sensitivity to subtle gradients near bright objects. But a low value reduce also the risk that a local feature, such as a faint arm of the galaxy or faint nebulae, will be flattened by the mathematical function. A high value can detect discrete gradients, but the algorithm can also include faint extension of a galaxies in the process, not selected by the mask. At this stage it is recommended to choose the medium value.
The "Fit precision" parameter define the precision of the fit of the sky (i.e. the degree of the polynomial function). For a first estimation, it is recommended to select the medium value (3rd degree polynomial function). So, only medium scale gradient are corrected.
Check "Balance background color" option if it is not checked because we process a RGB image. This option adjust each color channel so that the background is an even neutral tone (by adding or subtracting a constant value to each pixels in the image and for each color layer).Click OK. After computation modify visualisation threshold for see the result
Now the gradients have mostly been corrected. But if some residual is present it is possible to run a second passes of the procedure with this new images. This second stage is potentially more precise because it is more easy to define a representative and detailed mask of the sky background. First, save the first stage comet processing and compute a new mask image
SAVE COMET2
BIN_DOWN 655
Save this new mask : SAVE MASK2 (for example). Reload the first stage processed image : LOAD COMET2
Now we're ready to run gradient function again 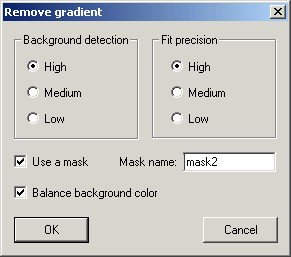
Setting the "Background detection" to high for detect faint gradient variation.
Setting the "Fit precision" to high ensures that small-scale gradients will be corrected.
Click on OK
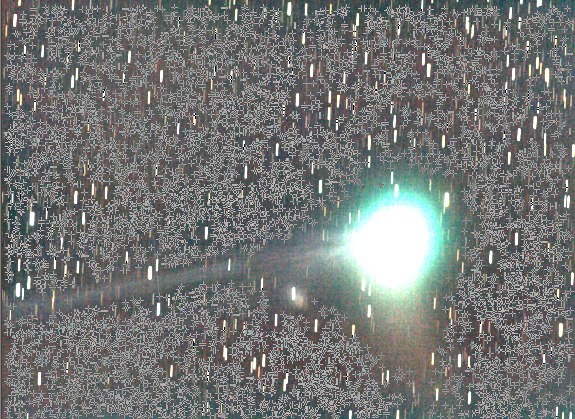
This
image shows the selected points for background computation. The rejection
of the comet and stars is satisfactory.
Modify the visualisation threshold value for see the final result. The background is now a flat neutral tone and faints details are now visible (compare to the start image)
Click here for another example.
EXPORT
RAW 48-BITS FILES TOWARD PHOTOSHOP
A solution for export RGB 48-bits (16-bits per color plane) images is to use the SAVEPSD command (PSD format of Photoshop). An alternative solution is to use the EXPORT command. This command can now write 48-bits files.
For example, to export COMET image
LOAD COMET (warning,
it is a PIC format image for 48-bits capability)
EXPORT COMET.RAW 0 2 0
The first parameter is the file name for the exported image, the 2nd is the size of the header block, the 3rd indicates a two byte per pixel format, and the 4th specifies IBM byte order (as opposed to the Motorola, reversed, order).
In Photoshop do File, Open, select the Photoshop RAW format, and load the image. The Raw Options box opens.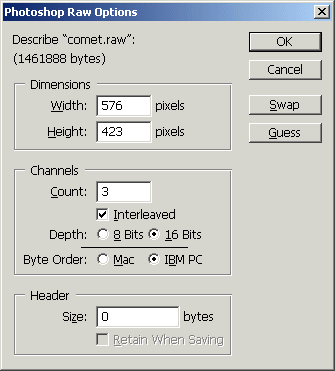
In general the image is very dark. Use the Levels... function of Photoshop for adjust the histogram (many time if necessary).
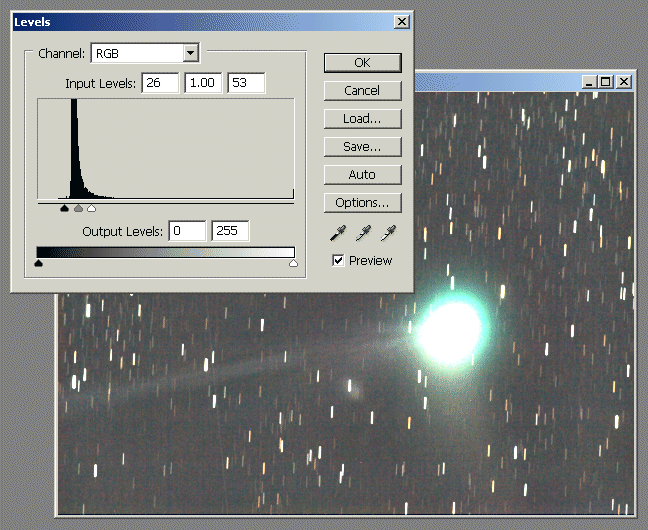
Note: Remove negative value is necessary (Photoshop do not accept this values). A solution is CLIPMIN 0 0. For force positive intensities you can also run the OFFSET command. For example "OFFSET 300" if the most important negative valeur of the entire image is -300 (the STAT command return this information for the three layers of the image).
NEW COMMANDS (release 4.37b)
EXPORT2 [NAME] [HEADER] [BYTE PER PIXEL] [REVERSE]
Same as EXPORT, but the natural
internal coding of Iris [-32768..32767] is mapped into [0..65535].
SAVEPSD2 [NAME]
Same as SAVEPSD, but the natural
internal coding of Iris [-32768..32767] is mapped into [0..65535].
Version 4.36 - April 16, 2005
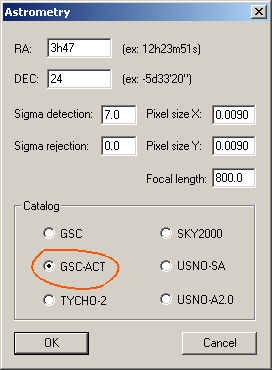
Bugs corrected concerning the use of Tycho-2 and USNO catalogues for astrometrical application. Iris can now use a compressed version of the GSC-ACT. The catalog can be download from the address:
ftp://cdsarc.u-strasbg.fr/pub/cats/I/255/GSC_ACT/

NEW COMMAND
LOADDSI2 [IN] [OUT] [NUMBER]
Converted a sequence of RAW image Meade DSI (generic name [in] and .fts exension) to a sequence of color 48-bits images (generic name [out] and .pic extension). The number of images in the sequence is [number]. The geometrical transformations are carried out by this command. See also the commands LOADDSI, CONVERTDSI and CONVERTDSI2.
Version 4.35 - April 10, 2005
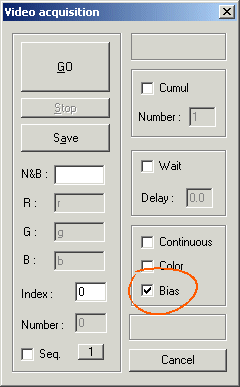
Bug concerning the file size of real time cropped AVI is fixed. Improved video acquisition method (webcam, grabber, ...).
Add of the possibility to subtract a bias map for each acquired video frame (only for black and white video). The method:
1) take a dark frame from the video source
2) save
this frame under the name BIAS in the working directory
3) check the button
bias in the dialog box
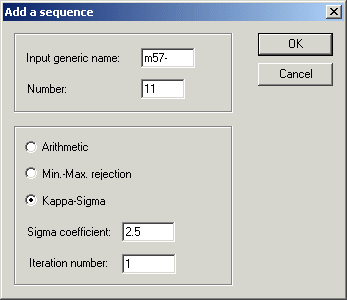
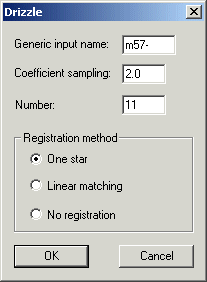
The Kappa-Sigma addition method and Drizzle method (see Processing menu) are now compatible with 48-bits images (true colors):
NEW COMMANDS
BIN_UP [VALUE]
The pixels having an intensity higher than [value] take value 255. The other pixels take value 0.
BIN_DOWN [VALUE]
The pixels having an intensity lower than [value] take value 255. The other pixels take value 0.
COUNT_DOWN [VALUE]
Return the number of pixels having an intensity lower than [value]. The symmetric command COUNT_UP is also available.
Example of application: calculation of the area of the sunspots (tips: for a precise result, not hesitate to flatness the photosphere image by use the command SUBSKY if necessary).
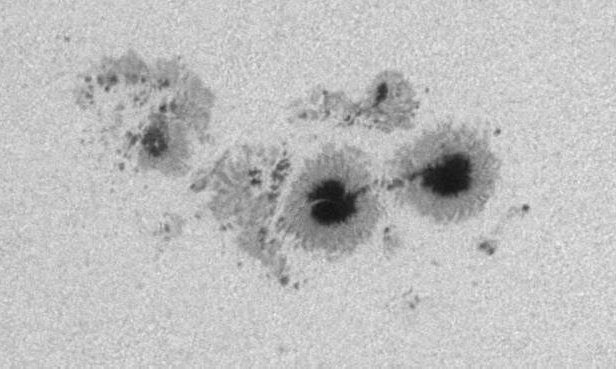
A
sunspot group (image Valerie Desnoux, click
here for more informations)
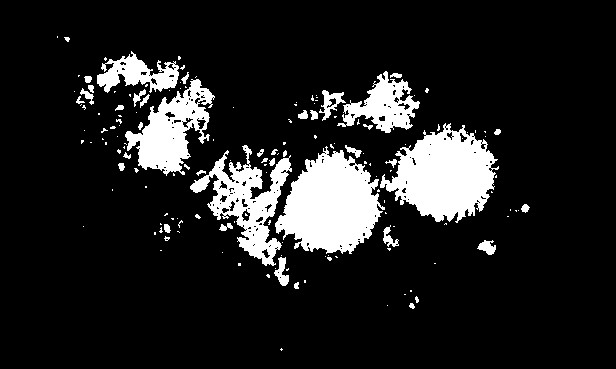
The
group after command BIN_DOWN 165 (umbra
+ penumbra).
Reload the original. The command COUNT_DOWN 165 give the area of isophotal selection (here 29470 pixels).
Version 4.34 - April 2, 2005
Support of RAW format of the Digital SLR Canon EOS 350D (select the option 20D/350D in the camera settings dialog box and PIC format (proprietary) in Setup dialog box).
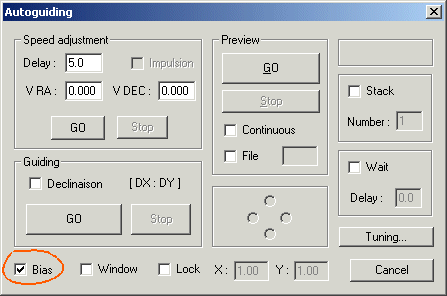
Version 4.33 - March 6, 2005
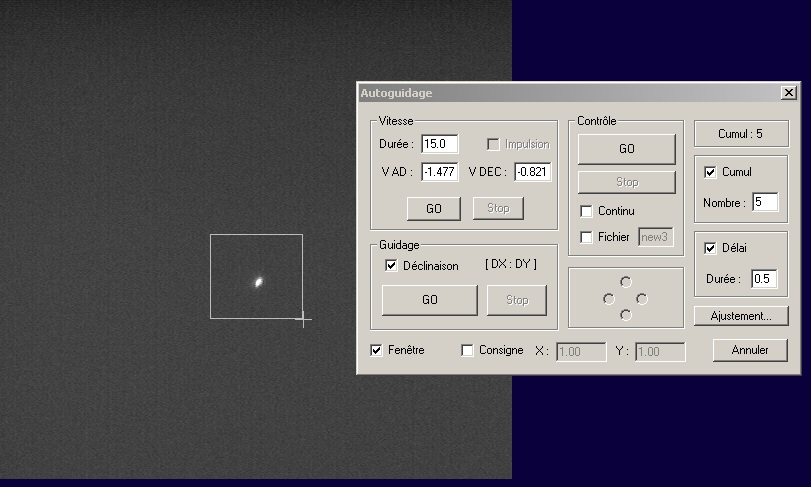
Improved autoguiding functions (click
here for a general description):
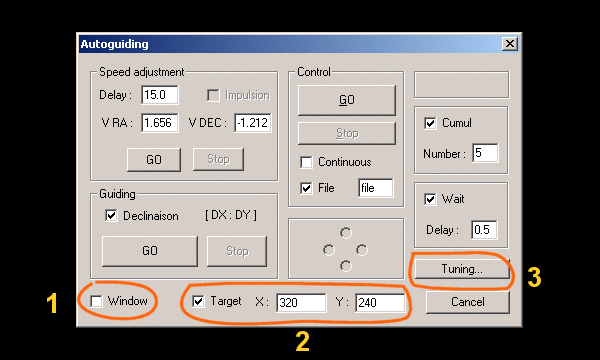
1. Possibility to select the guide star in the field:
2. Possibility to define the lock position of the star during autoguiding (useful for example for spectroscopic work). The target coordinates (X,Y) of the star are given in pixel unit:

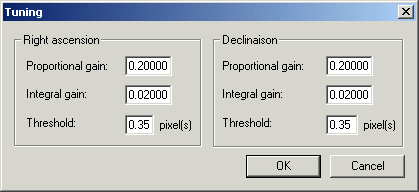
3. Control parameters of autoguiding loop can be modified. The proportional gain reduce the rise time (typical value: 0.2), the integral gain eliminate the steady-state-error (typical value: 0.02) and the threshold of the variation in pixel compared to the starting position beyond a correction is carried out (this parameter prevent guiding for small errors and reduces the adverse effects of turbulence - it's typically value in pixel is equal to 2 to 3s of the star agitation):
|
|
