New features of version 5.41
Version 5.41 - March 19, 2007
The version fixes a problem during the loading of some FITS images (for example from Meade DSI cameras). It should be remembered in addition that command SET_FITS makes it possible to adjust the dynamics of the loaded image. For example before loading
> SET_FITS 0.5 0
conserve full dynamic of images acquired with a 16 bits camera, but at the price of division by two of the intensity of all the pixels.
New gradient removal method using local estimator
Full moon, light pollution, amplifier glow, vignetting in the optical system, ... can cause a large variation in the background across the image. Iris can use a classical polynomial fit of the gradient (up to 5th order). An intelligent search of background areas is implemented, and also the possibility to use a selection mask for identify only pertinent parts of the image (outside stars, nebulae, galaxies, etc). The created artificial image contain only the smooth background. This artificial image is subtracted from your image and the gradient is eliminated. See a complete description here.
The polynomial fit is very efficient but in some situation the method fail. It is the case when the variations of the sky are brutal and of great amplitude. For these situations Iris v5.41 introduces a new method using a local estimator of the sky background. A mask is necessary for identify bright objects and large nebulae because it is not easy for the software to determine areas containing only background.
The new flatten background command name is SUBSKY3 :
SUBSKY3 [SIZE] [MASK NAME]
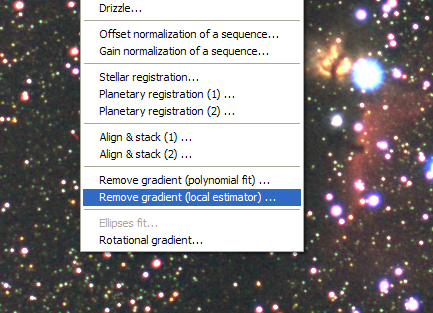
The function is also accessible from Processing menu and command Remove gradient (local estimator)...
The syntax is simple. Two parameters should be provided. The first is the size of the local zone for the calculation of background. It is necessary to choose a dimension larger than the size of the objects present in the image. For example, if the typical dimension of a galaxy is of 60 pixels, you will choose a zone of nearly 100 pixels. The second parameter is the name of the mask for the selection of the background areas.
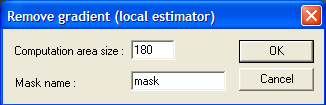
For example, the image below is the sum of 7 exposures exposed each one 2 minutes with a Canon EOS 350D camera (Baader filter) and equipped with a Canon lens 50 mm f/1.2 stopped to f/1.8. The lights of Toulouse town illuminates the horizon and affect the image severely. The constellation of Orion was not very high in the sky at the time of the observation, which does not arrange anything.
The state of art of preprocessing of RAW Images is applied (offset dark, flat-field) but the gradient is always severe.
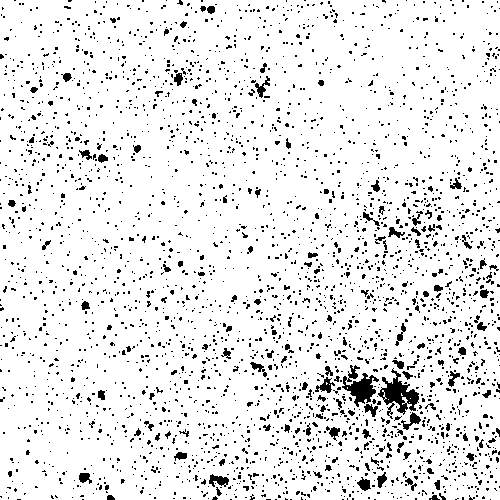
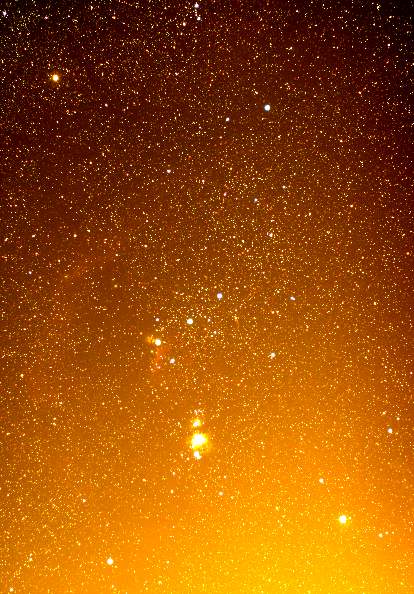
First, create the mask for isolate bright objects. Use the command BIN_DOWN. Starting with the image to process in memory
> BIN_DOWN 3800
The result is a binarized image in which all the initial intensities lower than 3800 are put at zero, and other values take the level 256.
Here a satisfactory mask, in which the real objects are correctly insulated:
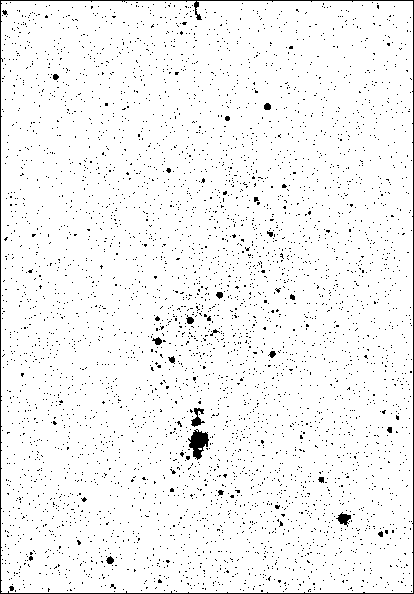
Now try
> BIN_DOWN 3500
The masked zones (in black) take a too large importance. In particular, the sky background is not defined in the lower part of the image. This mask is not valid.
Save a good mask in the working directory
> SAVE MASK
Note: to obtain a mask which selects all the pixels of image run the command > FILL 256.
Reload in memory the image to be process, then:
> SUBSKY3 180 MASK
or from the dialog window
Remember, the first parameter is the characteristic size of the largest objects of the image. Successive tests are necessary to select the value which does not create a artifacts around the bright and large objects. If a problem appears, increase the calculation zone size.
|
|
|
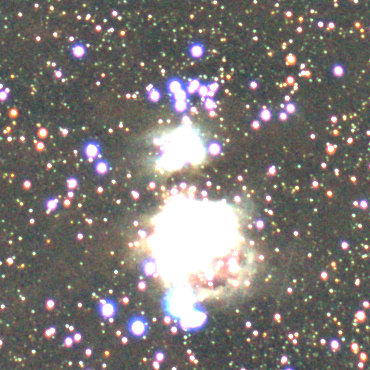
Next image, the result of the processing. The gradient removal success reveals weak objects of the image. Moreover, the white balance of the background is obtained simultaneously. The only other processing carried out here is a slight gamma stretching (see Gamma adjustment... command of View menu). Improvement compared to the starting document is considerable.
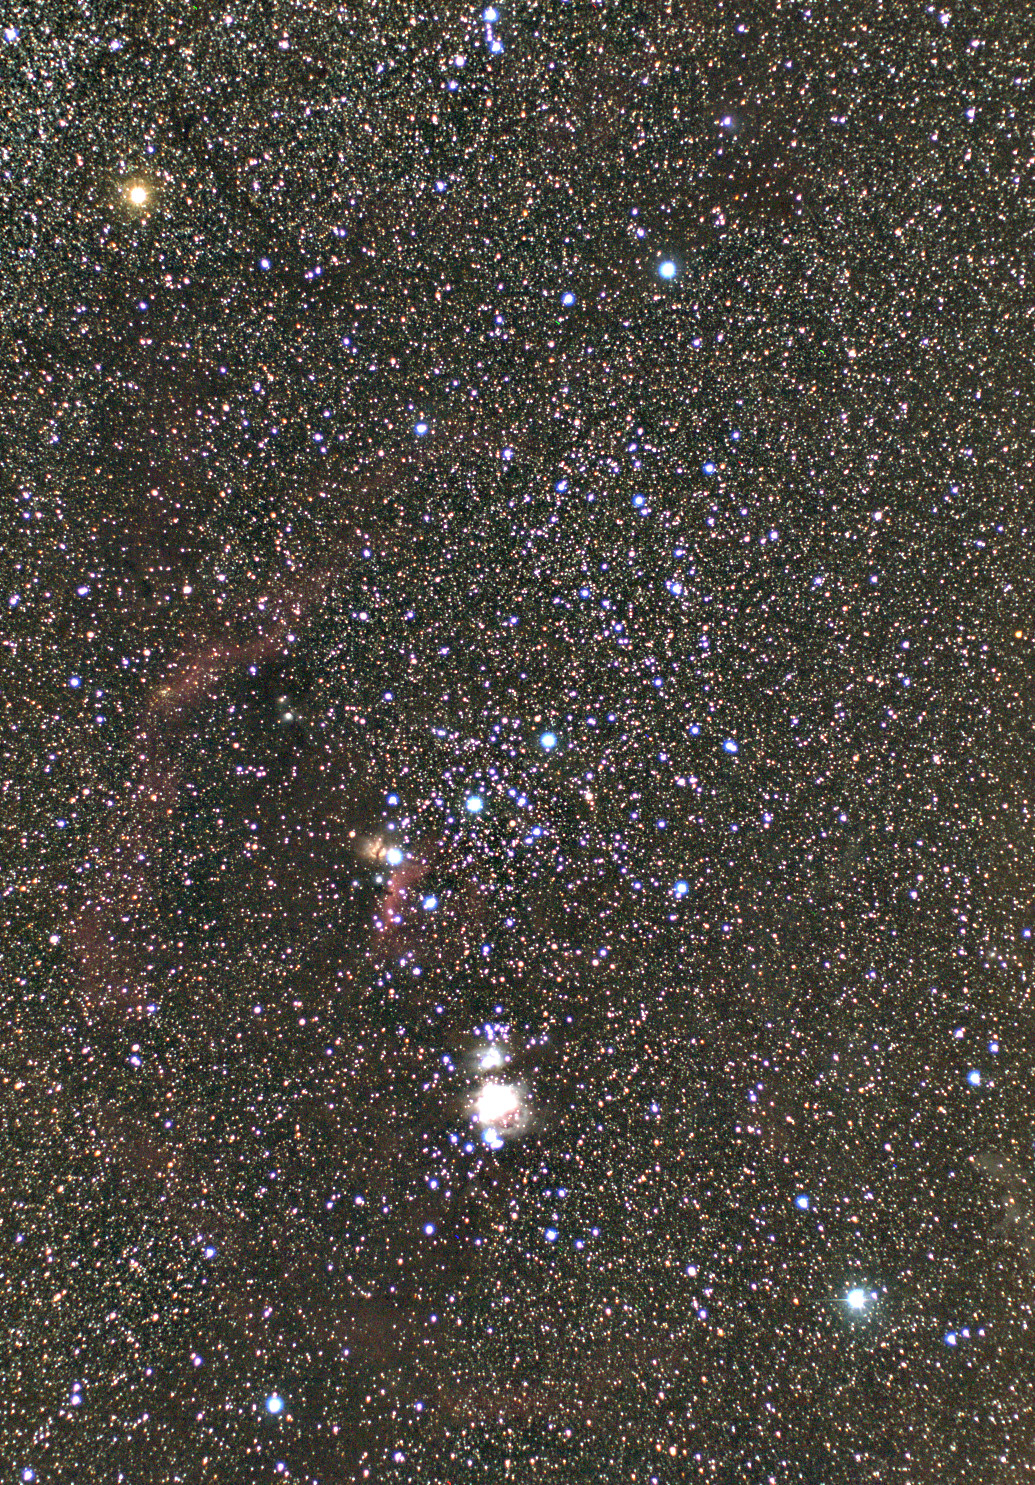
Click
on the image or here for download the large version.
For
more details about the photographic lens Canon 50 m f/1.2, click
here.
A side effect of the algorithm used is a black border around the processed image (the wide of the border is nearly equal to the size of the calculation zone divided by two). Use commands like WINDOW, WIN, ... for crop the image.
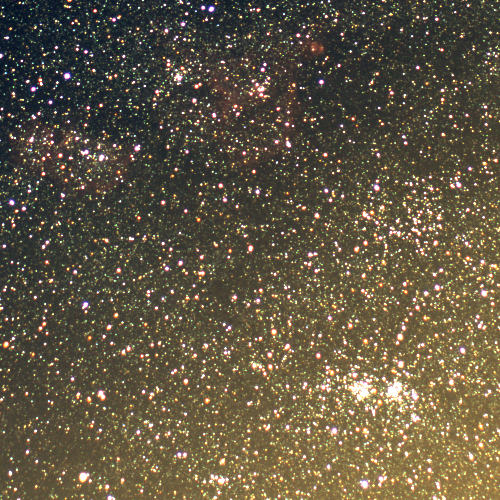
Another example, also starting from images taken with a 50 mm lens (Perseus double cluster region) :
|
|
|
Left, the starting image, right, the adopted mask.
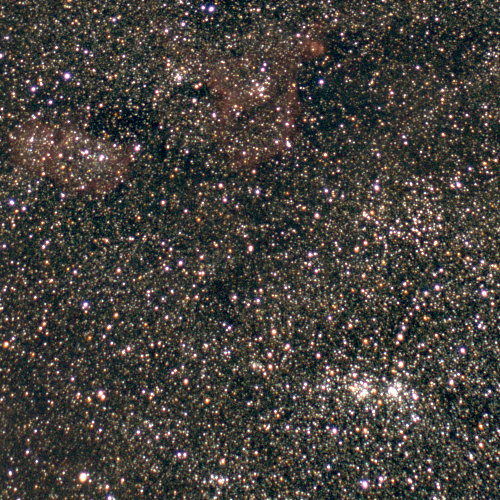
The image after gradient removal procedure (local estimator
method).
The polynomial fit method (nearly a global method) is not very efficient here because the density of stars is too significant for find the correct sky background level.
Version 5.40 - March 3, 2007
Iris can now read RAW files from Sony Alpha 100 and Kodak P712 digital cameras:
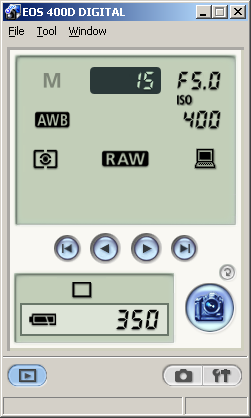
Iris can now remotely control the Canon EOS 400D, and more generally nearly all the digital EOS cameras.
Several bugs are corrected (for example saturation problems for commands RGB2HSI and HSI2RGB). Some ergonomics aspects were improved. For example, Iris does not generate any error, but simply a warning message, if an image cannot be registered in a sequence (see the commands COREGISTER2, COREGISTER4 or function Stellar registration... menu Processing).
Improvement and extension for remote control Canon EOS
1. Device control
Iris can now use three methods for operate the shutter. For select the method click the button Options... of Acquisition dialog box (Digital photo menu) :
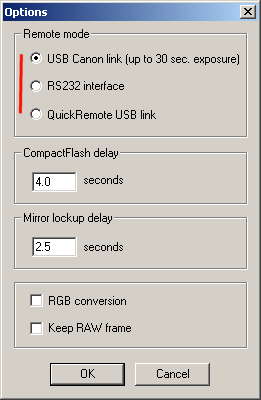
1 - By using the standard USB connecting cable to the Digital camera. The maximum exposure time is then 30 seconds, but you can on the other hand program very short exposures.
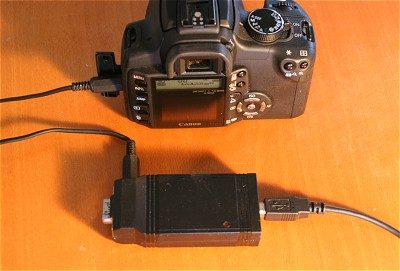
2 - By manufacturing a small interface to be connected on the serial port (COM port) of your PC (Iris support USB to COM port interfaces). The electronic (see below) use very current components. Toward the PC, the connector is of standard type DB9 (9-pins). Toward the Digital DSRL, the connector is a 2.5 mm stereo jack.

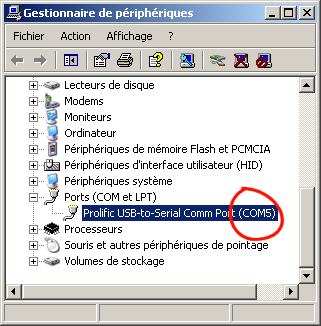
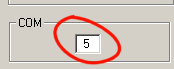
You must also indicate to Iris the COM port number used. To know the COM number, refer to Windows manager, and indicate the result in the Settings... dialog box (File menu):
3 - By using the QuickRemote interface. This interface establishes a direct link between an USB port of your PC and the shutter interface of Canon digital camera:
Note that standard USB connection with your camera is necessary if you wish to transfer the image acquired after exposure.
In all the situations described hereafter, the presence of a memory CompactFlash (CF) car is mandatory in the DSRL.
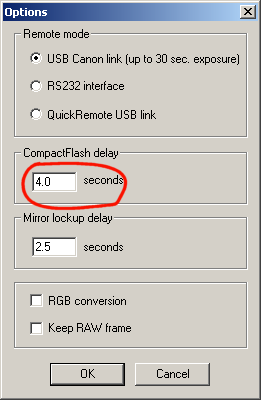
Another adjustment is necessary to determine the minimal time for save an image in the CF card just after the exposition (time during the camera write operation LED is lightning). According to the speed of your CF card and DSRL model, this time can be 1 to 2 seconds up to 8 or 9 seconds. If you take RAW (recommended for serious job), measure the writing time for RAW files, not for JPEG images! Enter the delay value in the Options dialog:
Close this windows if it is present on the desktop:
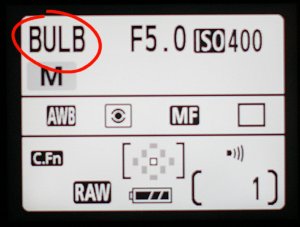
If the camera is equipped with a photographic lens, disable autofocus function (MF position):

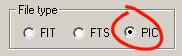
Lastly, remember that the 48-bits colors images are supported only by the PIC format images under Iris. Select the PIC format before acquiring images with a Digital SLR camera (command Settings... dialog box, File menu):
See complementary info about DSRL control here.
2. Some examples
2.1. Single shot
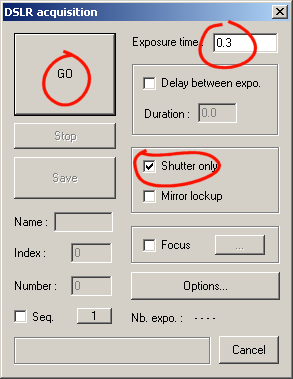
Choose one of the three shutter commands (dialog box Options...). Select the Canon USB link, then:
- Shutter only option,
- enter exposure time in seconds,
- and finally, click GO to take the image:
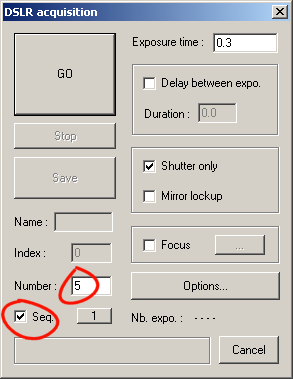
2.2. Acquisition of a sequence of images on the CF card
Select the Seq. option, enter the Number of images to acquire, then GO:
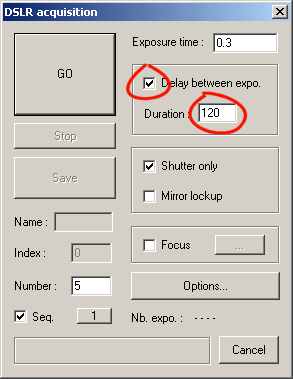
2.3. Acquisition of a sequence with delay between shots
For example, for wait a 120 seconds between each acquisitions:
2.4. Lock the mirror before exposure
The camera mirror can be raised a few moment before exposure in order to reduce microvibrations. The times (in seconds) between the lock and the effective acquisition is adjustable from the Options dialog box. Here the delay is 2.5 seconds:
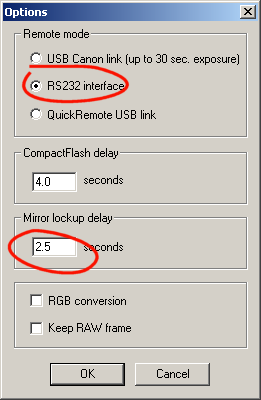
Warning, only the Serial and QuickRemote remote mode are compatible with the mirror lockup possibility.
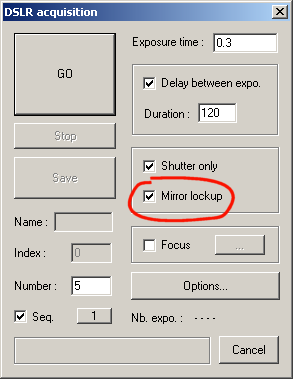
Finaly, select the Mirror lockup option of the DSRL acquisition dialog box:
From the camera Custom Functions enable the Mirror lockup option:
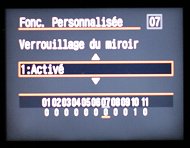
Think to disable the function when you do not need more this possibility.
2.5. Take and download a single shot
The standard USB is mandatory. For exposure longer then 30 seconds, use also the Serial link or QuickRemote USB link for shutter command.
Uncheck the Shutter only option, then click GO:
![]()
After the exposure time and the download toward the computer; the image is displayed. The image can be saved on your hard disk in a usual way.
If the camera image quality is JPEG, the transferred and displayed image is a color 48 bits image. If the camera image quality is RAW (not use the option RAW+JPEG), the image displayed is a 16 bits version (Bayer image)..
A RAW image can be directly converted into 48 bits color by choosing the option RGB Conversion of Options... dialog box:
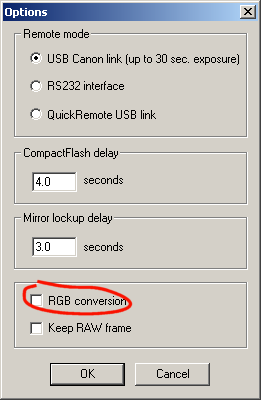
Note: for future processing it is always recommended to differ the RAW conversion (after pre-processing).
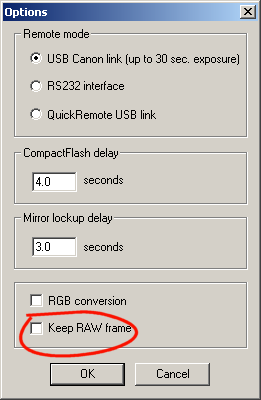
If you choose the option Keep RAW frame, Iris copy into the working directory the JPEG or RAW acquired image (the name of the image is exactly the same one as that given in the CF card). The image is not displayed:
IMPORTANT: If the image not downloaded, erase entirely the CF card (or better, format the CompactFlash) et re-run the test.
2.6. Shot and download a sequence of images
Choose the generic name of the sequence, then index of the first image (it is automatically incremented by one unit with each image taken) and numbers of images to be shot. Then, click GO:
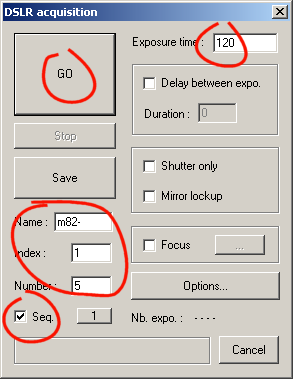
The sequence saved in the working directory is here M82-1.PIC, ... M82-5.PIC (note the use of PIC format).
New command
FILE_AFFINE [ IN ] [ OUT ] [ NUMBER ]
Iris can register wide-field stellar images. For that, it is recommended to use the powerfull Three matching zones function of Stellar registration dialog box (Processing menu) - (see details here), or run command COREGISTER4 from the console.
After the execution of the function, Iris created automatically in the working directory the file affine.lst. This text file contains the parameters of the transformation applied to each image of the sequence (a line by image). Each line contains the 6 values:
A B C D E
such as
x' = A X + B y + C
y' = D X + E y + F
with (x, y) the coordinates in the transformed image and (x', y') the coordinates in the starting image.
The interest of this file is the possibility to apply in a second time the same transformations to a sequence of images without having to remake the complete calculation of registration (see also command FILE_TRANS function, the partnership of TRANS command).
For example
> COREGISTER A B 20
> FILE_AFFINE A
C
20
The produced sequences B1, B2,... B20 and C1, C2..., C20 are strictly identical.
You are free also to define yourself the affine.lst file (text editor, external software, ...) before run command FILE_AFFINE.
SET_FITS [ BSCALE ] [ BZERO ]
The operation of command SET_FITS was extended to make adjustment of the dynamic during conversion of 32-bits real FITS files. Remember that if x is the value of a pixel in file FITS, the value x' managed by Iris is then:
x' = BSCALE. X + BZERO
For example, before loading images FITS coded with very small real numbers:
> SET_FITS 5000 0
|