IRIS TUTORIAL
Open
an image file
Settings
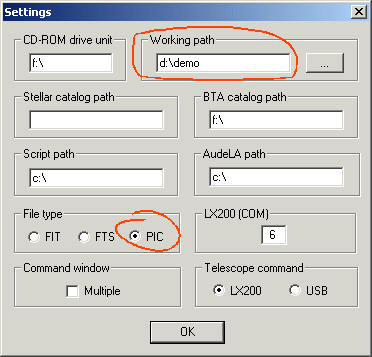
At the first run of Iris you have to adjust some settings. The principal step is to say to the software where you put your images. This is the working directory. So, during a first use you have to make the following operations:
1) open the Settings dialog from the File menu
2) Select a valid path for the working path item. Here d:\demo (it is an example).
3) Select the image default files type. You have choice between FITS and PIC format. FITS is a standard in astronomy (you can select two extensions names for the FITS files, .fit or .fts). PIC is a proprietary format. The true colors function of Iris are only supported by this latter format. Also, for efficiency reasons it is recommanded to select PIC at a first time. Notice that tools exist for convert FITS files to PIC files and also convert PIC files to FITS files. Useful for export your data for example. You can also load and save infographics format (BMP, PNG, JPEG, ...).
Open a file
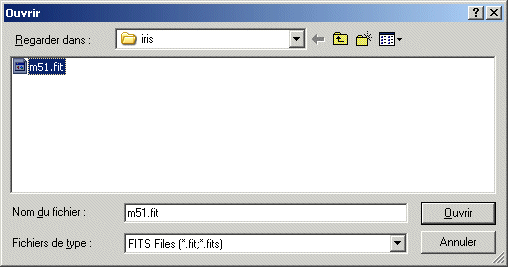
Method 1
Select Open command of File menu (or click the standard Open button on the toolbar). For example, select the file m51.pic located in the c:\iris directory:
Click Open button. The file image is loaded in computer memory and appear on the screen area as follows:
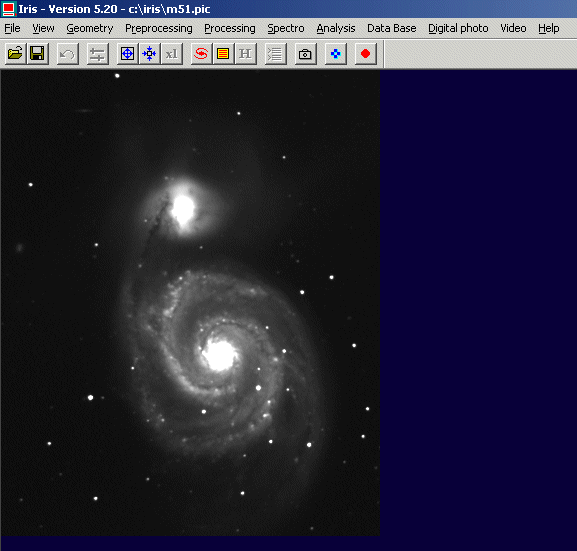
Note, only one image can be displayed at once. It is of course possible to load a PIC file from the Open dialog box.
Click here for download the M51.PIC image.
Method 2
Use the inline console command, a powerful functionnallity
of Iris. For this, click the ![]() on the toolbar. A text editor appear on the screen. It is the console
command.
on the toolbar. A text editor appear on the screen. It is the console
command.
Then type the command:
>LOAD C:\IRIS\M51
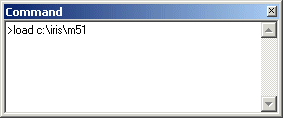
LOAD keyword is a command name. "C:\IRIS\M51" is an argument of the command (here the path and the file name of the image to be loaded and displayed).
The prompt ">" is necessary left of the command name. Case of letters is not significant. The extension of the file is not necessary because LOAD command can open only the default file format (see below).
Press the keyword <Enter> to validate your command.
If the file M51.PIC exist in the directory C:\IRIS, all is right, the image is correctly loaded. If the indicated image do not exist in the directory or if the image is a FITS file (M51.FIT for example) an error is returned. The reason is simple, the default selected format file in the setting dialog is the PIC format and the LOAD command can open only file of the selected default file format.
If the image to open is located on the working directory, a more simplest form of the load command can be used:
>LOAD M51
This command is a compact form of equivalent (remember, the selected default directory is "d:\demo"):
>LOAD D:\DEMO\M51
The possibilty to write compact console command is the principal reason of working path and defaults files concepts.
Method 3
Drag and drop importantion.
From the File menu, click the Select files item:

A selection files dialog box appear on the screen (if necessary close or reduce all the front windows for see this dialog). Select the file type of images to be imported. Drag and drop on the selected files dialog from the file manager the desired files. In the following example, the FITS format is selected for input images, and only one image is imported ("M51.FIT"). Finally, choice a generic name for the output images. Here a very quick name is designed "i":
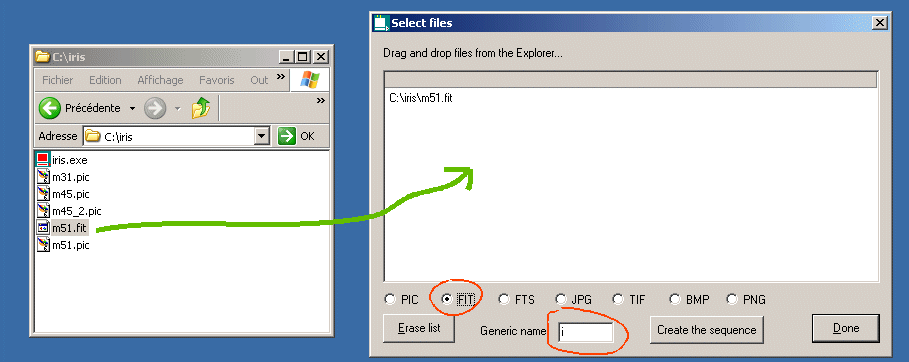
Click Create a sequence for convert the FITS files M51.FIT to a PIC file in the working directory (the default file format and the default directory). The full name of this new image file is I1.PIC. "I" is the generic name and "1" in an index. The proof, from the console, execute the command:
>LOAD I1
Now suppose you have selected more than one file in the Select files dialog, for exemple M51-1.FIT, M51-2.FIT, M31.FIT. If the generic name for the imported images is "RUN", the result is three new images in the working directory. The input images are ordered by alphabetic name and the correspondance between input and output is:
M31.FIT --> RUN1.PIC
M51-1.FIT
--> RUN2.PIC
M51-2.FIT --> RUN3.PIC
Method 4
If you import large sequence of images, a very good idea is to index the file names, like M51-1.FIT, M51-2.FIT, M51-3.FIT, ...
For import this sequence you can use the specific console command FITS2PIC. The command convert a sequence of FITS images to a sequence of PIC images. For example, suppose a sequence of 3 FITS images stored in c:\iris directory. For import these images in the working directory and convert these in PIC you have to type:
>FITS2PIC C:\IRIS\M51- I 3
FITS2PIC accept three parameters: (1) the generic name of input FITS files (here M51-), (2) the generic name of output PIC files (here "i" - for example), (3) the number of images in the sequence (here 3). The syntax is: FITS2PIC [INPUT] [OUTPUT] [NUMBER]
Many thousand commands of this type are available. For a list of the commands click here.
After running the FITS2PIC command, it is easy to see that the c:\demo directory (the working directory) contain the files I1.PIC, I2.PIC, I3.PIC
You can visualize this images successively. For example:
>LOAD I1
>LOAD I2
>LOAD I3
At this stage note that it is possible to import JPG, TIFF, PNG, ... images by a similar way.
About the internal coding of the data
Iris store pixels in the computer memory in the form of signed 16-bits integer data So, the dynamic of a classical image is between the levels 0 and 32767. But negative number are perfectly accepted (useful for some processing). If we consider this aspect, the full dynamic image of Iris is between -32768 and 32767.
Note: The real data type, double precision coding, is used many time, but only for high precision intermediate calculus, not visibles by the user.
The side effect of the signed data type is the impossibility to display directly FITS images coding the pixels between 0 and 65535 (unsigned 16 bits format). The only solutions under Iris in this situation are (1) divide all the pixels of the imported image by 2, (2) clip values between 32768 and 65535 to the unique value 32767,
For applied the first method run the in-line command LOADSX. The level of the pixels is multiplied by 0.5 to bring final dynamics between 0 and 32767.
For example suppose an unsigned 16-bits M51 image (dynamic range between 0 and 65535). For correctly load into memory and display this you can run:
>LOADSX M51 (or LOADSX C:\IRIS\M51 for example if the imported image is not stored in the working directory).
For applied the second method, run the in-line command LOADSX2. The level of the pixels is not modified, but the image is truncated for intensities higher than 32767. For example:
>LOADSX2 M51
You can also import directly sequences of unsigned FITS files:
CONVERTSX [IN] [OUT] [NUMBER]: The level of the pixels is multiplied by 0.5 to respect dynamics 0...32767. For example
>CONVERTSX M51- I 37
The sequence M51-1, ..., M51-37 is converted to the sequence I1, ..., I37.
CONVERTSX2 [IN] [OUT] [NUMBER]: The level of the pixels is not modified, but the images are truncated for intensities higher than 32767. The final level lies between 0 and 32767.
CONVERTSX3 [IN] [OUT] [NUMBER]: Value 32767 is subtracted from all the pixels of the imported images. The final level lies between -32768 and 32767.If an unsigned 16-bits image is in memory (open by the classical LOAD command or by the menu) it is possible to convert this into a signed image by using the SIGNED command (no parameter - the dynamic is divided by 2) or the SIGNED2 command (values upper to 32767 are clipped to 32767).
Can I open true colors images?
Yes, you can open 3x8 bits BMP, JPEG, PNG, TIFF, and also 3x16 bits (48 bits colors) PNG and TIFF files. For all these situation, the image is stored in memory in the form of a 3x16 signed bits document. How to proceed ?
From the File menu, click Load option and select infographics file types in the dialog box:
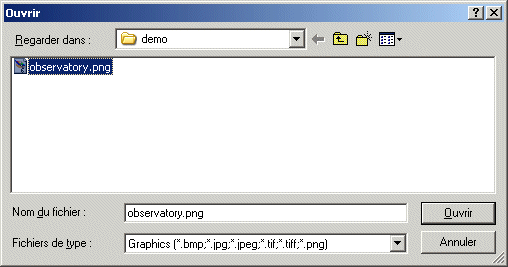
Click Open, and the image is displayed:

You can also open the color image from the console command:
>LOADPNG OBSERVATORY
Equivalent commands for TIFF files is LOADTIFF, for BMP files is LOADBMP, ...
For identify the numbers of colors in the current image, look the info in the lower right corner of Iris window:
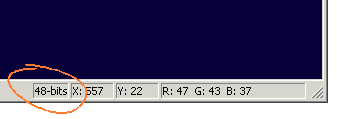
This area give also data about the position of mouse pointer and the pixel intensity under the pointer (here R, G and B pixels because the actual images is a 48 bits document).
Click here for
download the OBSERVATORY.PIC image