IRIS TUTORIAL
Blinking and animation
The BLINK command can be used for compares two images by displaying them successively and cyclically on the
screen. The syntax is
BLINK [NAME1] [NAME2] [DELAY]
The names of the two images are in the parameters [name1] and [name2].
The images may have different sizes. It is recommended to adjust the dynamic and
offset of images to minimize flickering effects between the images. The blinking time may be adjusted with the [delay] parameter that contains
the visualization time of an image in milliseconds.
During blinking it is possible to adjust visualisation threshold, color
palette, use some processing command like TRANS
for register dynamicaly the two images... Processing concern the image [name1].
Example
>BLINK M51_1 M51_2 200
To stopping the blink enter the command:
>BLINKOFF
The BLINK command is a powerful tool
to bring out any difference between two images. It can be used for many kinds of
investigations: detection of supernovae, novae, variable stars, comets,
asteroids, etc.
The BLINK2 command
is similar to BLINK command
but for 3 images instead 2 (that allows sometimes better identification of
moving objects). The syntax is
BLINK2 [NAME1] [NAME2] [NAME3] [DELAY]
For example:
>BLINK2 ASTER1 ASTER2 ASTER3 200
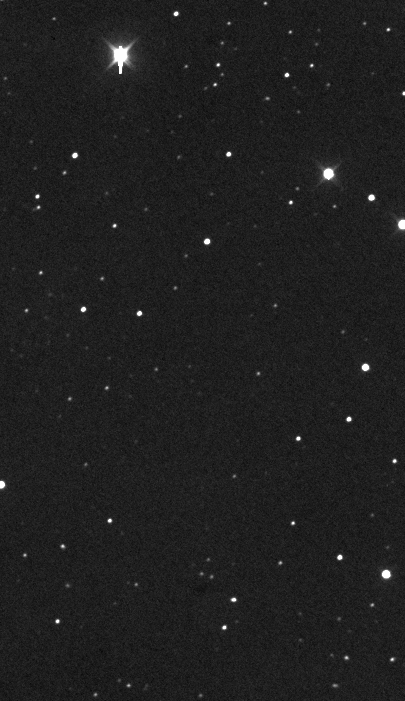
Blinking example. The
supernova SN 2000B in NGC 2320, discovered
by the French amateur Pierre Antonini. The reference image is from a CN-212
Takahashi telescope. The SN image is from a FSQ-106 Takahashi refractor. Before
blink, the images are co-registered with the aim of the COREGISTER command.
|
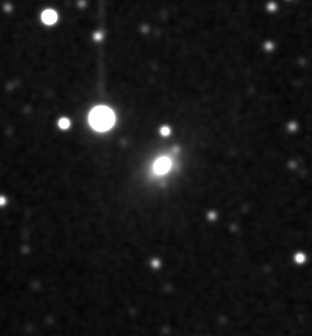
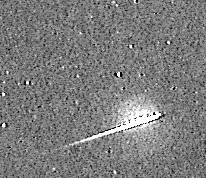
BLINK2 example. The command is very usefull for asteroids detection. It is possible to count up
to 6 asteroids in this frame and a possible new rapid variable star
in the upper-right corner! (CN-212 telescope + KAF-1600).
|
For animate a large number of image, invoque
the Animate
dialog box (View menu):
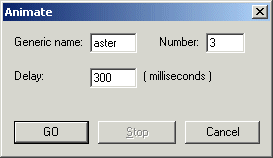
Push the Stop buttom for stopping the animation.
Animation d'une séquence avec
interpollation
PIC_ANIM
is a powewful command for improve fluidity of the animation of a sequence. For
that of the intermediate images are calculated by linear interpolation
starting from the acquired images.
The syntax is: PIC_ANIM [INPUT] [OUTPUT]
The parameter [INPUT] indicate the name of a text file which respectively contains on two columns, the name of the acquired
images, and date of acquisition of these images (or all other identifying
function of time, for example an index value which goes
increasing).
The parameter [OUTPUT] indicate the name of a text which respectively contains on two columns, the name of the
interpolated images, and dates for which the interpolation is calculated (or
an identifier function of time, in conformity with that used in the input file).
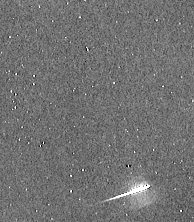
Here an application example application on the trace of a bright
Leonid meteor. The observation was carried out by Franck Vaissière by using a modified webcam
Vesta Pro on November 19 2002. The lens is the origin objective of the webcam. Here
3 images extracted from a sequence of the event:
Suppose 5 images to be interpolated with the names MET1, MET2,
MET3, MET4 and MET5. We create in the working directory a text file of name
IN.LST containing:
met1 1
met2 2
met3 3
met4 4
met5
5
We create the output file OUT.LST:
r1 1.00
r2 1.25
r3 1.50
r4
1.75
r5 2.00
r6 2.25
r7 2.5
r8 2.75
r9 3.00
r10 3.25
r11
3.50
r12 3.75
r13 4.00
r14 4.25
r15 4.50
r16 4.75
r17
5.00
r18 4.50
r19 4.75
r20 5.00
r21 4.50
r16 4.75
r17
5.00
The images R1 and R5 for example will be identical to images
MET1 and MET2 (correspondence of the dates). But moreover, between the two
images observed, command PIC_ANIM will generate the intermediate images R2, R3 and R4, and so on for
the whole of the sequence.
Note: file OUT.LST can be creates automatically with the
assistance of command GEN_OUT, which is quite practical for long sequences. In the example one
will make:
>GEN_OUT OUT R 1 5 0.25
After having saved the file IN.LST and OUT.LST, we produce the interpolated sequence:
>PIC_ANIM IN OUT
The sequence R1... R17 synthesized can be visualized with
the Animation command from View menu. You can also
save the sequence in the form of BMP images for produce an animated GIF or a AVI film
for
example with the assistance of an adequate software:
>PIC2BMP R RR 17
You have now on the disc a sequence RR1.BMP...,
RR17.BMP.
Here the animated sequence of 27 images of the object which
shows the trail well distorted by high altitude differential winds velocity:

Click
on the image for display an enlarged version (750 Kb)
INDEX