Settings and running
To install Iris decompress ZIP file IRIS.ZIP in the directory of your choice in your hard disk. This procedure installs also the demonstration image M51.FIT in the hard disk.
From the first run you can use Iris without difficulties. For example, activate the File menu and load the image M51.FIT in the installation directory of Iris. Then adjust the visualization thresholds.
However, for some applications he will be can be necessary to act on the parameters of the program. One can for example:
1) Consult data bases on CD-ROM.
2) Work from the Iris command window.
3) Driving the Audine camera.
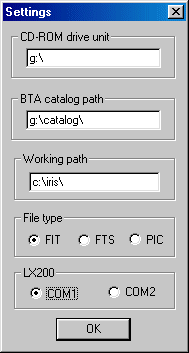
It is very important to say to Iris where you put your images. This is your working directory. So, during a first use of Iris you have to make the following operations (Settings command from the File menu):
1) In the text edit zone Working path enter the complete path of the directory containing your data. For example: d:\astro (your images are in the directory astro of the disc D:). For the present demonstration, enter the installation directory of Iris (c:\iris for example).
2) Select the image files type. You have choice between PIC and FITS format. In this last case a fine distinction is made between the names of files images ending by the extension FIT or FTS.
3) If the CD-ROM unit chosen by Iris does not agree for you, enter in text edit zone CD-ROM drive unit the letter of your CD-ROM unity. In the zone BTA catalog path, enter the path of the directory containing the indispensable catalogs during an exploitation of the BT-Atlas. In the BT-Atlas CD-ROM, these catalogs are in the CATALOG directory. You can perfectly copy the completeness of this repertoire in a directory of your hard disk (it is a procedure recommended to read more quickly the data). In that case you naturally have to change the path the catalogs (for example: c:\catalog\).
4) Click OK.
Execute the Load... command from the File menu and select the M51 file in the Iris directory. The command we have used had two effects:
(i) transferring the image
from the hard drive to the memory,
(ii) displaying the image in memory.
There is a second way to load an image. Click
on the Command icon![]() in the tools bar, then type the command:
in the tools bar, then type the command:
>LOAD M51
Note that the prompt ">" is indispensable left to the key word. Case of letters is not significant.
Press <Enter> to validate your command.
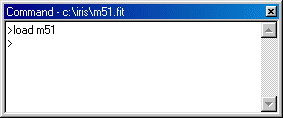
The first word is the command name, and the other one(s) is (are) the command argument(s). Here, the LOAD command will transfer the chosen image from the drive to the memory. The syntax of this command is:
LOAD [IMAGE FILE NAME]
IMPORTANT: The default path used by LOAD (and every other command using files) is the Working path. You may change this path in the Settings window. For example, if you write C:\ASTRO\MYIMAGES, the images will be automatically loaded from this directory, and saved to it. Of course, you can also write a complete path when refering to an image (for example LOAD C:\ASTRO\MYIMAGES\M51). Note that it is not necessary to enter the file extension (.FIT, .FTS, .PIC...). Also note that the prompt symbol ">" is essential before the command name.
A command is launched when you type the <Enter> key. It is possible to go back to a previous command by using the direction key (the cursor position within the line does not matter) and to run it again simply by pressing the <Enter> key. You can take the opportunity to modify the command parameters. This is very convenient for operations you want to repeat many times. All the usual edition modes are available (insert, suppress, copy and paste, ...). Commands are not case sensitive.
Try another command in the command area:
VISU 800 0
VISU is the key command in Iris. It allows you to examine images before and after processing. Mastering the use of this command is thus essential.
We will simply remind you that visualization consists of displaying each pixel of the image on the screen with points of varying brightness. In general, the intensity of the point is proportional to the level of the corresponding pixel in the image.
The levels in the image are constrained by two bounds: the upper threshold that limits the strongest intensities in the image, and the lower threshold, which limits the weakest intensities. The syntax of the VISU command is:
VISU [UPPER THRESHOLD] [LOWER THRESHOLD]
The major problem in visualization is that the number of gray levels that can be displayed on the screen is usually much lower than the number of levels in a digital image. Without preprocessing, it is difficult to examine all the dynamics of an image with just one visualization. The classical solution is thus to carry out several visualizations while judiciously choosing the thresholds each time. Type for example:
VISU 6000 0
VISU 12000 0
The galaxy nucleus is now visible. The core itself is saturated in the image and thus cannot be seen no matter which upper threshold is chosen. Now let's explore the faint regions of the image:
VISU 500 0
VISU 250 50
VISU 50 600
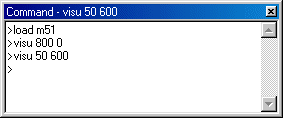
You can now see small, faint galaxies (note the inversion of the thresholds for a negative view).
There is no attempt to distinguish details within the disk in this last visualization. The aesthetic aspect is also ignored (the image noise is clearly visible now). The emphasis here is on detectability.
You can easily learn about thresholds by using the two cursors of the Threshold window:
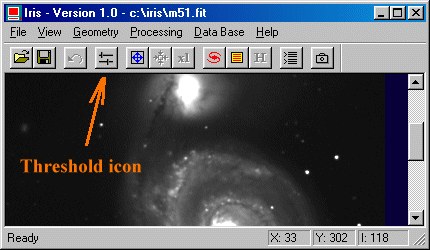
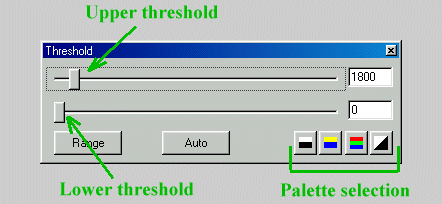
It is easy to modify color palette with the palette selection buttons.
|
|
|


