For each image of the sequence ARP97_1 to ARP97_5, we have to perform the following preprocessing work:
LOAD ARP97_1
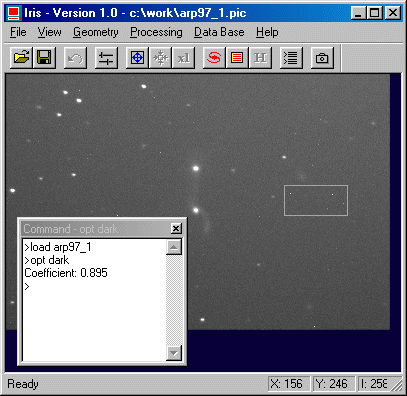
Visualize the image, choose a rectangle around hot pixels with the mouse (important: exclude stars in the selection rectangle), then type:
OPT DARK
Note the found coefficient. It should be close to 0.90.

Note: A coefficient greather than 1 will not be optimal, because we would have to multiply the dark map by a factor greater than 1, then yielding to an increase of the noise in the resulting dark map.
Note: If possible, the area selected with the mouse should not contain very bright objects or stars.
LOAD DARK
MULT 0.895
ADD OFFSET
SAVE N
LOAD ARP97_1
SUB N 0
DIV FLAT 9700
SAVE I1
Note that the N file contains both dark current and offset maps, that permits both effects to be subtracted in a single operation.
Note also that the DIV command has got two parameters. Of course, the first one is the name of the image to be divided by (here, the flat-field image). The second parameter is a normalization factor that allows the mean level of the input image to be kept constant. Here, it must be equal to the median value of the flat-field.
Proceed with the same method for ARP97_2.PIC, etc...
In fact, we may note that the integration time is the same for all the images, and that these images were done about at the same time during the night. So, the dark map will probably be the same for any of the images. The optimization of the dark current may be performed for the first image only. So, for the second image of the sequence, we will only do:
LOAD ARP97_2
SUB N 0
DIV FLAT 9700
SAVE I2
and
LOAD ARP97_3
SUB N 0
DIV FLAT 9700
SAVE I3
etc...
In fact, the PR (PReprocessing) command allows you to perform all these operations with just one line of instruction. The syntax is:
PR [IN] [DARK + OFFSET] [FLAT] [NUMBER]
The first parameter is the generic name of the input image. The second parameter is the name of (optimized) dark current map added to the offset map. The third parameter is the name of the flat-field. The fourth one is the generic name of the output images. And, as usual, the last parameter is the number of images to process.
Try:
PR ARP97_ N FLAT I 5
This produce quickly the I1 to I5 preprocessed
sequence frame. This is the good method !
Between each exposure of the sequence ARP97_1 to APR97_2, we have deliberatively moved the telescope very slightly, in order that any residual effect will be averaged when combining the images. So, we have to register the images before adding them.
Iris offers several possibilities to do so, but the basic principle remains the same: choose one or several common stars among the images, measure their shifts in X,Y with respect to e.g. the first image, and then precisely translate the images with the TRANS command so that the images may be perfectly superimposed.
Choosing a common star is not so simple as it may seem: it has to be bright enough so that its signal/noise ratio is very good, but not too bright so that the CCD is saturated. Of course, it also must be present in any of the images to register.
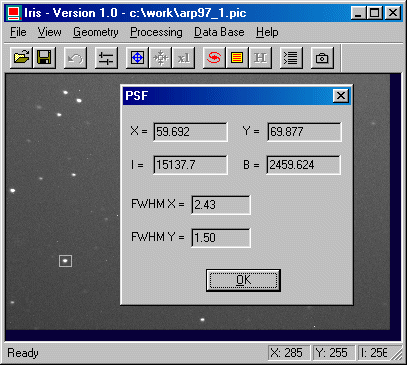
The main tool used to know the position of the star is the PSF command. Define a small rectangle around the star. The rectangle should be just large enough to contain the star (the whole star, including its base), typically 10 to 15 pixels in width. Then execute PSF from the contextual menu. Iris will return information on the chosen star:

* the position of its centroid, valid down to
ta hundredth of a pixel
* the peak intensity
* the local background level
* the Full-Width Half-Maximum (FWHM) of the star along the X & Y axes.
Iris uses a sophisticated mathematical method to estimate these parameters (gaussian-fitting).
Suppose that the coordinates of the star in the first image are (463.53, 166.05), and that the coordinates of this star in the second image are (472.47, 165.46). We have to perform the following subtractions:
DX = 464.53 - 472.47 = -7.94
DY = 166.05 - 165.46 = 0.59
To register image 2 with respect to image 1, just type:
LOAD I2
TRANS -7.94 0.59
SAVE J2
One can do the same operations for the other 3 images and create 6 new images J1.PIC to J5.PIC. Of course, as far as J1 is concerned, just do:
LOAD I1
SAVE J1
Note: To verify that the registration is close to perfection, try to subtract an image from another one. Most stars should have disappeared, without any gradient effect. For example, type:
LOAD J1
SUB J2 5000
VISU 6000 4000
The command DTRANS allows you to combine position measurement and translation. For example, load the 2nd image, select the reference star with a small rectangle, and then type (464.53, 166.05 is the coordinates in the first frame of the reference star):
DTRANS 464.53 166.05
SAVE J2
The parameters of the DTRANS command are the coordinates of the star in the first image. The other functions will be automatically done by DTRANS. Of course, you have to select the right star in each image!
The REGISTER command allows you to perform all these operations with a single command. It is necessary to select a relatively isolated star in the first image with the aid of the mouse, by drawing a rectangle around the star. The star should be approximately in the middle of the rectangle. The width of the rectangle should be larger than the greatest estimated distance between the star's position on two successive images in the series (in our example, the rectangle will be about 40 pixels wide, and a good star, despite a slight saturation, is at coordinates (60,69)) in the first image. Then type:
REGISTER I J 5
The sequence J1 to J5 is automatically created.
Note: The command will work properly only if Iris is able to recognize without ambiguity the star in each image.
Control (subtract first and last image):
LOAD J1
SUB J5 500