Exploitation of AVI files and automatic images selection
The availability of webcams offers some interesting
prospects in the field for the astronomical observation. The performances of
these cameras are certainly limited
(impossibility to make long integration time, detector of small size, relatively
high readout noise, spectral response not well defined...) but the facility
of use and the low cost are sufficiently justifying to lead considerable observers
to take their first steps in numerical imagery of the sky in their company.
The possibility of acquiring many images a second even makes it possible to undertake certain work with at least as much effectiveness than an astronomical costly camera. It is the case in planetary observation where the strong reactivity of these cameras, coupled with the possibility of massively realize the selection of the best images, can make wonder. The strategy of observation consists here to acquire sequences of several hundreds of images, then to retain only those which are not disturbed by atmospheric turbulence. These last are then added to constitute the final document. The gains is double: (1) the selection of images is an excellent method to partly reduce the harmful effects of turbulence, (2) the composite of a great number of images makes it possible to compensate for the weak dynamics of Webcams . Moreover, from the images colors are directly obtained, which give one made photovisuel pleasant to the planetary disc (but unfortunately not always ready to be used for a scientific exploitation if we take into account the bad definition of the spectral bands).
It is not possible with the present version of Iris to control Webcam directly. On the other hand, it is possible to recover the images coming from the driving software provided with Webcam. The files images are then generally available in two forms: BMP images format and AVI films format.
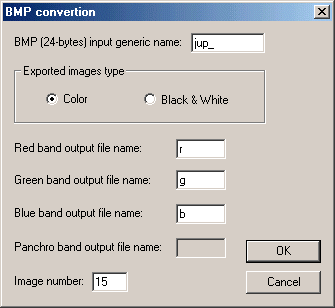
The command BMP conversion... of File menu convert sequences of files BMP 24 bits to transform them into exploitable images with the software of astronomical processing:
In this example one converted a sequence of 15 BMP images having for generic name JUP_ (images JUP_1, JUP_2, JUP_3... JUP_15). IRIS produce three series of images at output having for generic name R, V and B.
The equivalent command since the console is:
CONVERTBMP24 JUP _ R V B 15
But let us return to files AVI.
While launching the command AVI conversion... from the File menu you open a dialog box which convert the images contained in AVI film into individual images which are backed up automatically on the disc under an astronomical format (FITS or the proprietary format PIC). This command convert a video flow in its entirety and it is not possible to select images before conversion (see Select image... command from the View menu for this).
Select AVI file to be converted. Then, decide if you wish to make the separation of the trichromatic images of AVI file. In this situation, Iris will produce 3 series of images corresponding to the channels red, green and blue (you must provide the generic name of these images). By selecting the option Black & White Iris produces a single sequence of images in which the intensity of the pixels is the sum of red, green and blue channels.
You can define the delay period between display two successive frame (in seconds). Avoid spending one excessive duration here because the execution of film AVI can last for ever. A zero value corresponds at the maximum speed of display (note: you can enter of the real numbers, for example 0.3).
The Remove duplicated images option is significant with films AVI. Those indeed have the annoying tendency to duplicate the images in order to give the feeling of a fluid film, while at the same time acquisition was jerked. These redundancies must be generally removed to carry out a correct image processing thereafter.
While click on the Display button you play AVI film with the screen. While click on Convert button, the film is still displayed, but in more the converted images are recorded in your working directory.
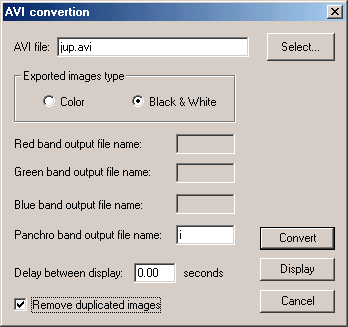
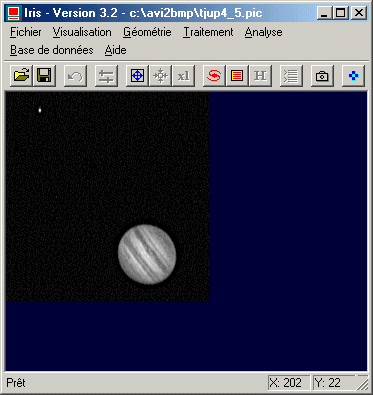
In the example, one works on a film AVI having for name JUP.AVI. The produced monochromic sequence has as a generic name I (images I1, I2, I3, ...).
Before IRIS launches the conversion itself, which can take time and especially occupied a substantial disk space, a confirmation of your options is required.
Once conversion carried out, the following operation generally consists in sorting the best images of the sequence (the variations of quality are essentially caused by atmospheric turbulence). Often the selection is more effective on a sequence of images than one treated in order to increase contrasts. A good solution consists in applying the unsharp masking technique to all the sequence (Unsharp masking of a sequence... from the Processing menu):
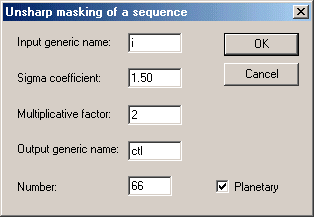
In the example, one produces a new sequence of 66 images having for generic name CTL with a raised contrast.
This stage there are two schools:
Tests being better than a long speech, it is necessary indeed to test to select the good school for a particular situation. In a general way the second procedure is preferable.
Activate the Select images... command from the View menu:
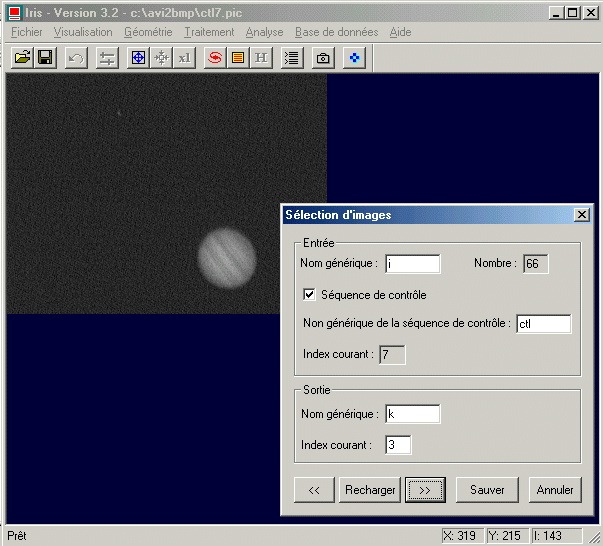
Enter the generic name of the images to which the selection will relate (sequence I). We use here a sequence of control which will make it possible to facilitate the selection (sequence CTL). Enter then the name of the sequence of the images selected (sequence K). The current index of output sequence is the index added to the generic name of the next backed up image.
You sweep the sequence of input while click on
the arrow keys right or left. When you wish to store an image in the sequence
of output, click on Save button. In the example of the figure above the visualized
image is CTL7. If one clic on Save the image I7 is copied in an
image having for name K3. The indices then are automatically incremented
(note: the value of the index of output can be modified manually).
It is possible to treat the current image which appears on the screen, by applying a high-pass filter or by modifying the thresholds of visualization for example. To restore the initial state, click on Reload.
In the final analysis, about thirty images of the original sequence were selected. It remains has present to centre them compared to the first image of the sequence, for example by using Planetary registration (2)... command (Processing menu), which is very suitable here. Lastly, the 30 images are added and a high-pass filter type is applied (unsharp masking, wavelet processing...) with the sum of these 30 images.
Some comment about Planetary registration (2)... In this method IRIS fit the best circle around the contour of the object. It is necessary for that to give to the program a value intensity in the image which corresponds to the level of contour. This level must be selected carefully: it must be sufficiently low so that the essence of the disc of planet is included inside contour, but at the same time it should not be so low that contour is traced on artifact close to the sky backgroung level (under these conditions IRIS returns the error message "Window too small"). The in line command CIRCLE can help you to define the level of contour. Load the first image of the sequence (for example), then define a rectangular zone around the disc of planet (use the mouse) and finally launch CIRCLE command since the console with a parameter which is the level of contour tested:
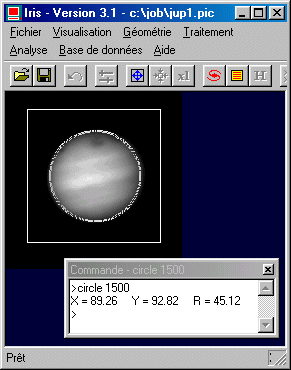
IRIS traces contour automatically (this one is calculated by using only the pixels located in the zone of selection). In the example one chose the intensity 1500, which is a good choice here (not hesitated to modify the value of the parameter to measure its impact). IRIS turns over the position of the center of the disc (X and Y coordinate) and the radius for a contour of intensity 1500. The method functions well on objects presenting a disc of revolution: Jupiter, Mars with the opposition. On the other hand for Saturn there remains preferable to use the method of intercorrelation method (Planetary registration (1)... or PREGISTER commands).
The Planetary registration (2)... command exploits the fit contour algorithm. For example (note that IRIS does not ask for the definition of a zone of calculation, it is all the image which is used for that):
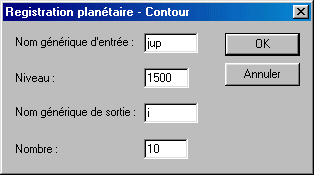
This same command since the console is written:
CREGISTER JUP I 1500 10
Below we can see the result from images acquired under very poor conditions of turbulence (27/11/2000 with 22H50 YOU, with Takahashi FSQ-106 refractor and a camera Philips ToUcam Pro).
It is possible to extraction of images of a film AVI the separate the tricolor images. The three sequences of images must be treated with the identical one. A difficulty little of appearing at the time of the selection of images: this one acts only on one channel at the same time. If one makes the selection on the green channel, the indices of the images are to be preserved to be able to isolate the corresponding images in the channels red and blue. This information exists in the shape of a file having for name SELECT.LST and which is updated each time you click on Save in the Select image dialog box (the use of file SELECT.LST is described below)
To display the result use TRICHRO command from the console console and save the result by using command SAVEBMP. For example:
TRICHRO R V B
SAVEBMP RESULT
The automatic selection of best images (related to atmospheric turbulence) if possible and require the in line commands BESTOF and SELECT. First of all let us analyze BESTOF, of which here syntax:
BESTOF [NAME] [NUMBER]
The parameter NAME is the generic name of the sequence on which will carry the search of the best images. The parameter NUMBER is the number of images of the sequence.
It is significant to note that the selection must be carried out on a sequence BEFORE registration (the images can thus be shifted the ones compared to the others). If it is possible, it is better also to have carried out the complete preprocessing (subtraction of the offset, of the dark signal and division by the flat-field).
The result of command BESTOF is a text file which is created in the working directory. This file has as a name SELECT.LST. Here an example of such file:
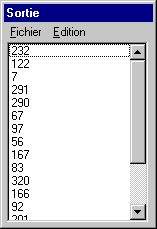
Iris sorted the indices of the images of best quality to worse quality. In the example the image of better quality has index 232. The second best image has index 122 and so on. The criterion of sorts on the analysis is the contrast and the entropy of the images. It is adapted to the study of the planetary images only.
Once that the best images of the starting sequence are identified it is necessary to create from them a new sequence in which the images are ordered by order descending of quality. It is what the command SELECT does of which here syntax:
SELECT [IN] [OUT]
IN is the generic name of the starting sequence to which the selection related. OUT is a sequence in which the images are sorted by order descending of smoothness. To do that command SELECT exploits the contents of file SELECT.LST.
Well on before using command SELECT it is necessary
as a preliminary to have to launch command BESTOF. Remember that command Select images..
from View menu produce also file SELECT.LST (writing of a line in this file
each time you click on the
Save button).
Once the sequence sorted by quality you have freedom to add only N first images which you judge to have best sufficient quality. For example if you estimate that 10% only images have a correct smoothness in a sequence of 500 images you will make (after registration!)
ADD2 J 50
the sequence J being the sorted sequence by SELECT command.
For more examples, click here.
|
|
|


