|
|
View menu
Compute the logarithm of the image in memory.
It is a basic command to visualize both high and low levels of the image.
EQUALIZATION
Compute an histogram equalization, that will
generally result in enhancing the lowest levels in the image.
MODIFIED EQUALIZATION
This method is dedicated to deep-sky objects and allows their optimal visualization (Gaussian histogram, see An Optimized Stretch for Deep-Sky Images in CCD Astronomy, Winter 1997, pp. 16-18).
|
|
Left, standard image. Right, after Modified Equalization.
Applies a simple method which modifies the pixel intensity distribution (DDP = Digital Development Process). This distribution is linear (not modified) below a level and non-linear upper this level. A coefficient parameters adjust the dynamic scale. DDP improves the quality of visualization (give a photographic aspect).
If I(x,y) is the input image, than the output image is:
I'(x,y) = coefficient * level * {I(x,y)/([I(x,y)] + level)}
The operator [] is the low pass filtering. Iris use for it a gaussian filter of width sigma. If sigma has a non-zero value, the fine details of the image are increased. The typical values for sigma are included between 0.7 and 2.
For more details, see: http://www.asahi-net.or.jp/~rt6k-okn/its98/ddp1.htm
Example(M51.FIT image):


Same result is possible from the in-line commands:

RAMP
This method may be used with images having a large dynamic range. The algorithm computes the image modulo (modulo value is given in a dialog box). This creates ramp effects in the image, which is very efficient with a 'false-colors' palette. Modulo value ranges typically between 256 and 2048.

ISOPHOTES
Displays an image in the form of isophote curves. The parameters are:
X.Dim & Y.Dim: the width and height of the display in screen pixels. The final dimension is adjusted to obtain square pixel images.
High & Low: the high and low levels between which the isophote curves will be drawn.
Step: the step size between two isophotes.
There are three choices for the type of graph:
- Normal: the isophotes are drawn in white
- False-colors: the isophotes are drawn with the current color palette
- Reinforced: the isophotes are drawn with the current color palette and every Step isophotes is a reinforced white line.

NOTE: in astronomical imagery, it is often advantageous
to work with an image in a logarithmic scale when drawing isophote curves (see
Logarithm command). This avoids having isophotes too close to each other
in the bright parts of the image.
Displays an image in the form of tridimensional plots, with the surface of the image represented in the X-Y plane, and the intensities of the image plotted along the Z axis. It is possible to examine the image from different points of view.
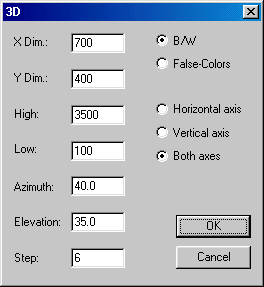
The parameters are:
- X Dim, YDim: The width and height of the output image.
- High, Low: The maximum and minimum intensity thresholds between which the tridimensional plot will be drawn.
- Azimut: The azimuth angle in degrees (for example, if Azimut=0, the image is viewed face on , if Azimut=90, the image is viewed from the side.
-Elevation: The elevation angle in degrees (for example, if Elevation=0, the image is viewed in profile, if Elevation=90, the image is viewed from above.
- Step: the step of the mesh along the X and Y axes, in pixels.
- Color option: determines the use of the color palette:
- B/W: plot in monochrome
- False-Colors: plot with the current palette.- Plotting types:
- Horizontal axis: plot of the tridimensional profiles along the X axis of the image
- Vertical axis: plot of the tridimensional profiles along the Y axis of the image
- Both axes: plot of the tridimensional profiles along the X and Y axes of the image.Examples:


3D display of a logarithmic
image of M51.

Zoom on a star.
FRAME
draws a frame of intensity Level around the current image with small marks every Step pixels. Tick length is Length pixels. If you choose Length=0, a simple frame will be drawn around the image.

Remark: you may cancel any processing you have just done by clicking on the undo button in the toolbar.
|
|
|


