The display area of the field is part of the main window, which displays the field as defined by the user. This area contains all objects belonging to the selected databases. These objects can be identified with a "double click" with the left mouse button. At the top left of this zone, a symbol is displayed which allows you to to see at a glance the type of map currently displayed. There are two possible symbols:
![]() When
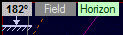
this symbol is displayed, the current view has the type "Horizon".
In this view, the field is oriented in such a way that the nearest horizon is
horizontal on the screen. The number shown in the symbol gives the current
azimuth (for example 180 ° for the South). A "double-click" on this
symbol opens a dialog box in which you can specify the azimuth to be used for
the direction of the view.
When
this symbol is displayed, the current view has the type "Horizon".
In this view, the field is oriented in such a way that the nearest horizon is
horizontal on the screen. The number shown in the symbol gives the current
azimuth (for example 180 ° for the South). A "double-click" on this
symbol opens a dialog box in which you can specify the azimuth to be used for
the direction of the view.
![]() When this symbol is
displayed, the current view has a "Field" type. In this view
North is at the top of the screen by default, unless a symmetry or rotation
is applied to the field. The small yellow bar indicates the direction of North
(from the centre of the screen). A "double-click" on this symbol
opens a dialog box in which you can specify the rotation to be applied to
the field.
When this symbol is
displayed, the current view has a "Field" type. In this view
North is at the top of the screen by default, unless a symmetry or rotation
is applied to the field. The small yellow bar indicates the direction of North
(from the centre of the screen). A "double-click" on this symbol
opens a dialog box in which you can specify the rotation to be applied to
the field.
It is possible to toggle the display of the two types of view in several different ways:
(1) You can use the keyboard shortcuts H (for Horizon) and F (for Field);
(2) You can use the commands Display Horizon View and Display Field View available in the menu Display;
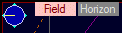
(3) You can use the two small buttons Horizon and Field
available to the top-left of the map. They allow you to quickly switch between
the two different types of view. The current view type is easily spotted through
the background color of the active button: red for the Field type
and green for the Horizon type:
It must be noted that the display of the buttons can be turned on and off
using a specific option in the Maps tab of the Option
dialog box.
In the top right hand corner there is a reminder of the databases currently being displayed in the map. The first symbol refers to the database for the stars, and the second to the database for deep sky objects. In the following example, the star database is the SAO catalogue and the database of deep sky objects is the Revised New General Catalogue and Index Catalogue.
![]()
If the SAO catalog name appears on a red background (see below), this means that another catalogue of stars has been requested for display, but the zoom level is too high to display this catalogue and C2A displays the SAO catalogue instead. To display the requested catalog and not the SAO catalogue, choose a sufficient zoom level to get a reasonable number of displayed objects. C2A will then switch automatically to the requested catalogue.
![]()
If the name of the catalog of deep sky objects appears on a purple background (see below), this means that the PGC catalogue was requested but the zoom level is too high to display it. Instead C2A displays the Revised New General Catalogue and Index Catalogue (RNGCIC) instead. To display the PGC catalog and not the RNGCIC, choose a sufficient zoom level to get a reasonable number of displayed objects.
![]()
Pressing Ctrl+B displays in the top left corner of the map a text buffer which is useful for memorizing and copying information about objects on the map.
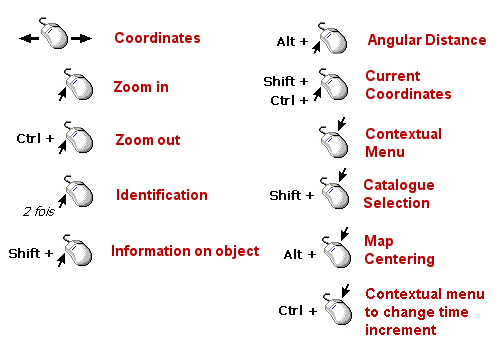
All actions in the field display area are performed with the mouse and keyboard.
By default, the actions you can take with the mouse are described in the illustration below. To get more precise information one of these actions, select it with the left mouse button.
It is possible to change the behavior of the mouse from the tab Misc in the Options dialog box using the button Mouse Management... The following dialog box is then displayed:
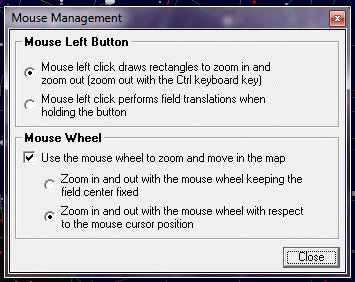
In the zone Mouse Left Button, the first option define the default mouse behavior: the mouse left click draws zoom rectangles (zoom in if no keyboard key is pressed while drawing the mouse rectangle and zoom out if the key Ctrl is pressed). The alternative option is to use the mouse left click to translate the current view from one point to an other. Take care however: for the views with the Field type, the translation is stopped when one of the two celestial poles is reached and is at the center of the view. For the views with the Horizon type, the translation is stopped when the zenith or nadir are reached.
The second option in this dialog box allows you to use the mouse wheel to zoom and to move in the current map. The mouse wheel is enabled by default. Enabling and disabling the mouse wheel is done by checking the option "Use the mouse wheel to zoom and move". By combining the usage of the mouse wheel and the CTRL and SHIFT keys on the keyboard, on gets the following behaviors:
|
Key Press |
Mouse wheel |
Action |
|
None |
|
Zoom in |
|
None |
|
Zoom out |
|
SHIFT |
|
The map slides towards the right |
|
SHIFT |
|
The map slides towards the left |
|
CTRL |
|
The map slides towards the bottom |
|
CTRL |
|
The map slides towards the top |
|
CTRL+SHIFT |
|
Increments the time by one unit in calculating the view |
|
CTRL+SHIFT |
|
Decrements the time by one unit in calculating the view |
A second option in this zone allows you to specify if the zoom with the mouse wheel should be done considering or not the position of the mouse cursor in the map. In the first case, the mouse cursor position is not taken into account and the center of the field stays the same during teh zoom process. In the second case, the field center is adjusted taking into account the mouse position in the map, i.e. the center of the field "shifts" towards the current position of the mouse.
· The “G” key allows you to go (or to stay) in a Field view (with North at the top by default) and bring the zoom level to a preset value (the value “Global Field Value” in the Field tab of the Options dialogue box).

