by António J. Cidadăo
As described in the "Super-Resolution" and "Red-Blue tri-colour imaging" sections of this web page, a simple way of producing "true-colour" RGB images with astronomical CCD cameras is to sequentially grab two grayscale components obtained with Red and Blue filters. If the procedures described in the above sections are followed, these two filtered images will be perfectly registered, and thus, ready to be averaged to synthesize the third component (a "Green" image) necessary to produce the "true-colour" effect. The synthesis of the "Green" component, as well as the R(G)B merging, are readily performed with software like Adobe PhotoShop or the Win95 version of SBIG's CCDOPS.
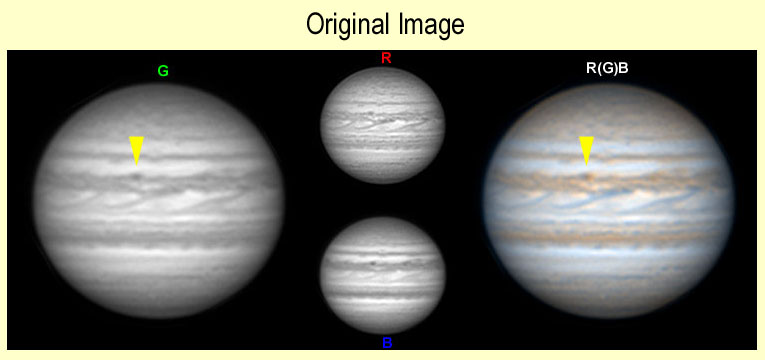
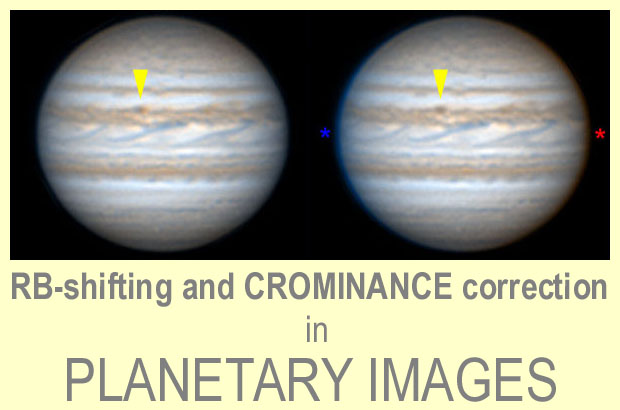
Although these Red- and Blue- filtered images of planet Jupiter (R and B in the middle, respectively) were obtained only a few minutes apart, the fast planet rotation determined a visible motion effect on cloud features, more evident near the central meridian and the equator (e.g. arrowhead pointing to a NEBn barge in the left and right 2x enlarged images). When the R and B filtered images are averaged/merged maintaining the alignment on the limb, planet rotation determines that a blurred "Green" component is synthesized (left), and that R(G)B images present features with coloured boundaries (right). In this example, since the B filtered image was obtained after the R image and the planet rotated from left to right, the NEBn barge presents a reddish boundary at the right, and a blue one at the left. An opposite effect would have occurred if the B image had been obtained before the R image. This type of colour channel alignment (limb alignment) produces the so called "original" or "old" R(G)B images referred in the text below.
Even with such a straightforward approach where only two filtered images are necessary, some artifacts may still arise because planets do rotate, sometimes quite rapidly. If the time-lapse between moments where R- and B-images are obtained exceeds a few minutes (the actual figure depends upon the planet's rotational speed and the image resolution) a blurring effect and coloured-boundary artifacts are produced in the resulting R(G)B image. This section specifically reviews some of these artifacts (see figure legends) and describes a procedure that dramatically reduces them, allowing the production of pictorial images that are pleasant to observe and useful to analyze (see "actual procedure" below). I want to stress that one of the steps of the procedure (RB-shifting) is already routinely used by planetary imagers to partially correct their images. The more personal contribution is the "Crominance Correction" procedure that is applied in the final stage of the image-processing protocol.
While corrected R(G)B pictorial images are produced with the routine that is described, every planetary imager must keep in mind that the most relevant data for survey programs arises from the analysis of properly time-calibrated filtered components. Therefore, even when adequate "true-colour" images are produced, it is both necessary and advantageous to keep and provide the various filtered images.
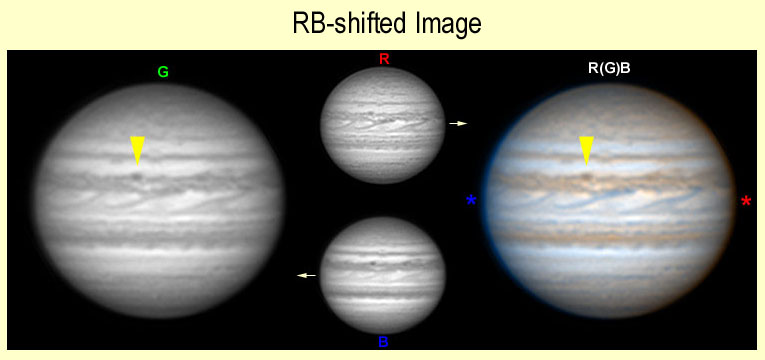
It is possible to shift Red- and/or Blue- filtered images with respect to each other so that it is not the planet's limb but instead the surface/cloud features that become perfectly registered. As a consequence, a sharper "Green" component can be synthesized (2x enlarged image at the left; compare with the "Green" component of the previous image), and there are no "coloured" boundaries in planetary features (arrowhead in 2x enlarged image at the right). A major drawback of this procedure is that coloured fringes appear at the planetary limb (red and blue asterisks in the right image). This type of colour channel alignment (planetary surface/cloud features alignment) produces the so called "RB-shifted" or "new" R(G)B images referred in the text below.
Actual procedure:
1) In Adobe PhotoShop (the protocol below refers to Ver 5.0), open the planetary R(G)B 24-bit TIFF image prepared in CCDOPS for Win95 using the methodology described in "Red-Blue Tri-colour Imaging". This will be designated "old" R(G)B image.
2) Check if the planet's equatorial plane is horizontal. If it isn't it is advisable to rotate the "old" R(G)B image ("Image" menu, then "Rotate Canvas", then "Arbitrary") until a proper positioning is achieved. If the sky value of the image (use "Eyedropper Tool" in combination with the "Alt" key) has been ascribed to the "Background Colour", the enlarged canvas determined by the rotation process will have the correct values and will be indistinguishable from the original sky area. This step of canvas rotation is not mandatory, but it will facilitate considerably the subsequent RB-shifting needed to correct for planetary motion.
3) Activate the "Channels" window ("Window" menu, then "Show Channels"), select the "old" R(G)B image ("Select" menu, then "All") and activate the "Move Tool". Almost all steps below are performed with this configuration.
4) With the mouse, alternatively select the Red- and Blue-channels from the "old" R(G)B image (in the "Channels" window, the selected channel will become highlighted) in order to identify planetary motion between the two filtered images. The limb will surely be accurately aligned, but planetary features may show some shift due to planetary rotational movement. The "Green"-channel can be skipped for now, since it will be synthesized again from Red- and Blue-channel images.
5) To correct the planetary rotational movement that occurred between Red- and Blue-images, select one of these channels from the "old" R(G)B image and use the cursor keys (the "Move Tool" should still be activated) to shift the channel a small number of pixels in the adequate direction. If the optional step 2) was performed, only horizontal corrections are needed and the sky will maintain its proper color after images are shifted. To check if the correction was adequate repeat step 4), and if it wasn't alternatively repeat steps 5) and 4) until a satisfactory result is reached. There is great freedom in choosing the channel(s) to be shifted. A complete correction can be made using only one of the channels (e.g. only the Red-channel is shifted), but partial corrections can be also made in both channels (e.g. the Red-channel is slightly shifted in one direction, and the Blue-channel is shifted a little bit in the opposite direction). When the RB-shifting corrections are successfully made, the planet's limb will not be registered between channels (this will originate red-blue fringes at the limb), but the planetary features will be aligned (and thus will look sharper).
6) Now that a more correct alignment between Red- and Blue-channels of the "old" R(G)B image was achieved in step 5), it is necessary to synthesize a new "Green"-channel. To do that, first select the Red-channel, copy it, and then paste it to a new grayscale "temporary" image. "Flatten" this new image ("Layer" menu, then "Flatten Image"). Now select the Blue-channel from the "old" R(G)B image, also copy it, and then paste it on the "temporary" image. Ascribe this newly formed layer the opacity of 50% ("Window" menu, then "Show Layers"), so that the Red- and Blue-channels will have the same weight, and then flatten the "temporary" image. This will be the new "Green"-channel image.
7) Copy the "temporary" image and paste it onto the Green-channel of the "old" R(G)B image. Save this "new" R(G)B image with a different name, since both the "old" R(G)B, that is before RB-shifting, and the "new" R(G)B image will be needed for the subsequent crominance correction described in the next step.
8) Open the "old" and the "new" R(G)B planetary images in Adobe PhotoShop, and switch them into Lab-color mode ("Image" menu, then "Mode", then "Lab Color"). In the "Channels Window", select and copy the "b" channel of the "old" RGB image and paste it onto the "b" channel of the "new" R(G)B image.
9) Switch back the "new" R(G)B planetary image into RGB color mode ("Image" menu, then "Mode", then "RGB Color") and save it. This "final" R(G)B image will be simultaneously corrected for RB-shift and Crominance, and thus will present the sharpest disk features and will show no red-blue fringes at the limb.
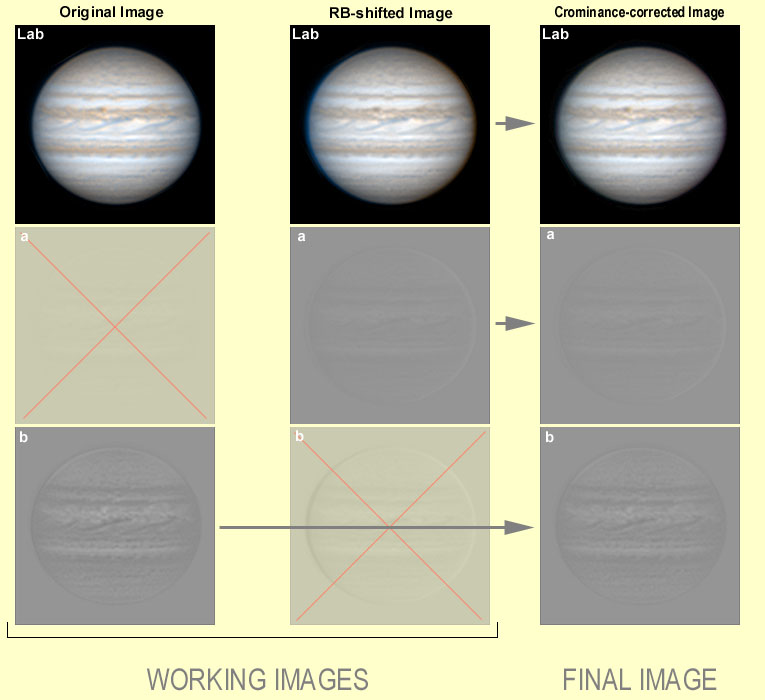
The two "working" images that are necessary to correct Crominance artifacts are shown at the left, already in Lab-mode as described in "Actual procedure" (only the "Lab" image and the "a" and "b" crominance channels are shown; for simplicity, the luminance channel - "L" - is not depicted) . The "original" image is also referred in the text above as the "old" R(G)B image, and the "RB-shifted image" corresponds to the "new" R(G)B image also mentioned in the text. The "final" or "crominance-corrected" image at the right is produced by replacing the "b"-channel of the "new" R(G)B image with the "b"-channel from the "old" R(G)B image.
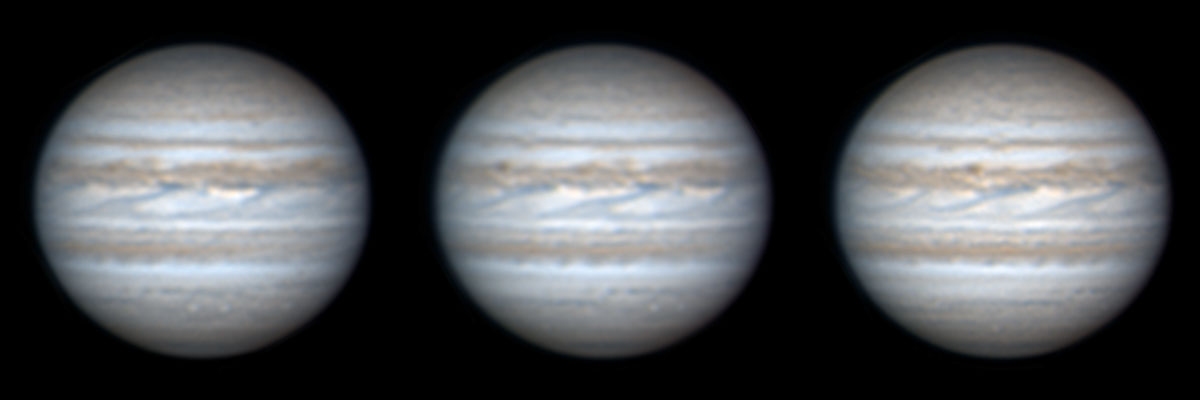
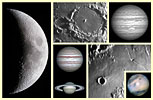
These three Jupiter images originally exhibited some evident shift between their Red and Blue components, a problem that was totally corrected using the procedure described in this section. Click on the image to assess a higher magnification.
All Images and Texts on these pages are Copyrighted.
It is strictly forbidden to use them (namely for inclusion in other web pages) without the written authorization of the author
© A.Cidadăo (1999)