

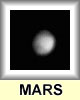
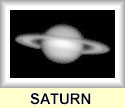
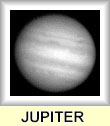
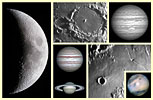
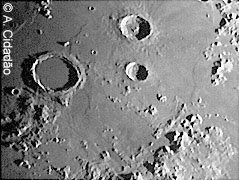
All the above images were obtained with a Meade 10" LX200 SCT and a modified grayscale (Connectix)/ Logitech QuickCam

HOW TO ADAPT A GRAYSCALE QUICKCAM FOR ASTROPHOTOGRAPHY ?
In order to adapt a (Connectix)/ Logitech
grayscale QuickCam for astrophotography it is adviseable to disassemble the camera-head,
carefully removing the objective lens and the IR-blocking filter. Then, just mount the
remaining components (basically a printed circuit that contains the CCD chip) so
that the modified camera can be easily adapted to the prime focus of a given telescope (for
instance, through a 1-1/4" eyepiece adaptor). An excellent page with detailed
instructions for disassembling a grayscale QuickCam was found here, but apparently
it is no longer available. One of the best places to get all the information needed is now
perhaps the Astrocam web-page (in
French). Also take a look at this link for a list of sites
describing QuickCams adapted for astronomy. See also Pedro Ré's web page,
another Portuguese amateur that uses QuickCams.
Please bear in mind that some of the camera's electronic components are not within the camera-head but inside the 25-pin plug located at the extremity of the 1.5m cable that allows the camera to be connected to a computer. This plug should thus be considered part of the camera and be protected from damage.
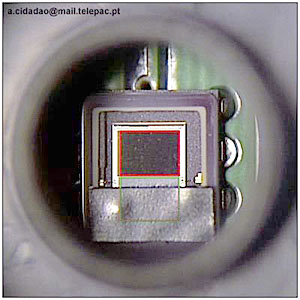
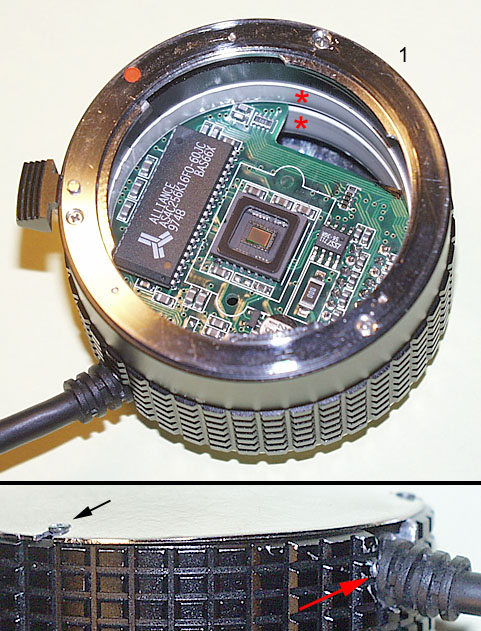
The grayscale QuickCam is equipped with a Texas Instruments 255 CCD, a frame-transfer chip with an array of 320x240 10micron-square pixels. This image shows a blow-up of the QuickCam's CCD, with the imaging-area framed in red and the transfer-area surrounded by a green line. Unfortunately, this camera is not refrigerated and only produces 6-bit digitized images (64 gray-levels). But, fortunately, Connectix did produce it at such a low price. The bad news is that it is no longer produced. Here in Portugal it can still be found occasionally...
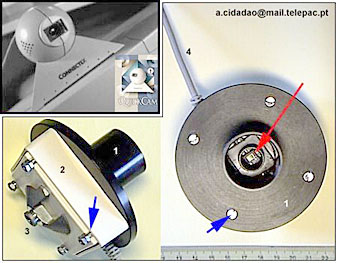
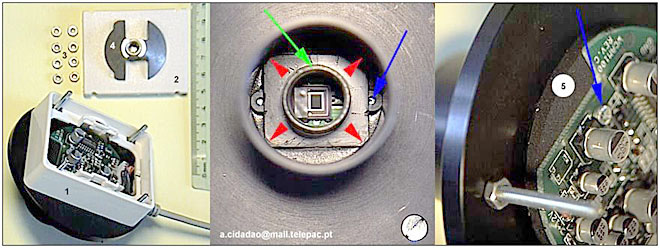
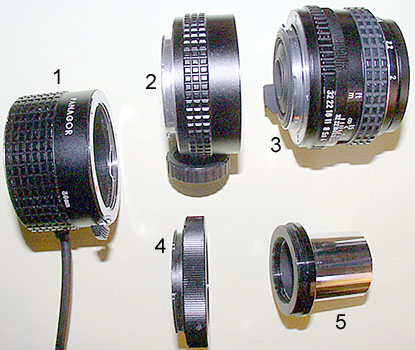
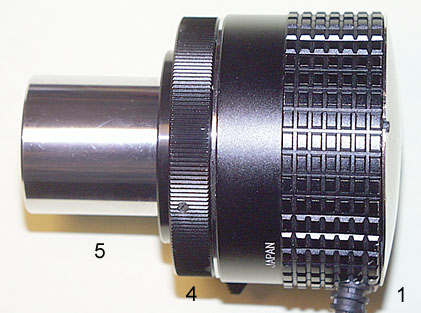
Figures 1 and 3 show the modifications I made to my camera. In short, I remounted the camera electronics onto an extra ST6 1-1/4" eyepiece adaptor (1 in fig1; as you surely know, the ST6 is an excellent cooled-CCD camera made by SBIG; I got an extra nosepiece for the ST6 when I bought a motorized filter-wheel from SBIG). A rubber adhesive plate (5 in fig3) was used to mount the electronics onto the nosepiece. A standard wall electric switch plastic box (2 in fig1) was then used to cover the electronics, with the help of four screws (blue arrows in fig1). Finally, I glued the tripod adaptor that was present within the original QuickCam sphere to the switch box (3 in fig1).
CONNECTING THE QUICKCAM TO A COMPUTER
The Windows version of the grayscale QuickCam interfaces with a PC-compatible computer
through the parallel/printer port, and receives a 5V DC power suply from the keyboard port
(most laptop computers also have an external keybord port). I routinely connect
the QuickCam to a 486DX2 66MHz desktop computer with 32MB RAM, but I have already used it
with an old 386SX 16MHz desktop and a 486DX 40MHz laptop, both with 8MB RAM, without any
problems (the camera's user guide refers that 4MB are enough for obtaining images,
though not for animations).
If we choose to use only the original cables that are supplied with the camera, the maximum distance to the computer will be about 1.5m, which is quite insufficient for most permanent telescope setups as well as for desktop computers. However, it is possible to increase the camera-computer distance using standard computer cables. In my case, I routinely use an extra 15m parallel cable (YES!..., a standard 15 meter 25 wires cable, with 25-pin plugs at both extremities; 3 in fig4) that is connected to the extremity of the original QuickCam cable (1 in fig4). The connection between original and extra cables is made through a 25-pin male-female adaptor (2 in fig4). The camera-computer connection can even be further complicated without problems. In my case, the extra 15m cable is connected to a Zip-drive, which in turn interfaces with the parallel port of the computer.
ATTENTION: as mentioned earlier, it should never be attemped to replace the original camera cable or the original 25-pin plug. In fact, the original cable also provides the power supply to the camera, and the 25-pin plug contains major electronic components, namely the camera's analog-digital converter.
And what about the camera's power suply if we choose to use extra cables? Well, we have at least two solutions: 1) to use an additional power cable with a length that is equivalent to that of the extra parallel cable, which in my case was rather unpractical; or 2) to make an extra power suply that will remain close to the camera. I decided in favour of this second possibility.
I just bought a plastic adaptor for AA-sized batteries (it allows to put 4 AA sized batteries in series) onto which I mounted (i.e. electrically connected and glued) a standard large-sized female keyboard plug (4 in fig4). This female plug of the battery power-pack will interface with the large-size male keyboard plug that is suplied with the QuickCam (5 in fig4). Figure 4 also shows the correct position of the positive (+) and negative (-) poles, both at the male and female plugs (notice that the position of each pole will coincide when the plugs are connected). The remaining 3 pins in each plug are not used.
I decided to choose nickel-cadmium rechargeable batteries (4x1.2V=4.8V) so that the output voltage would be similar to the 5V the camera normally uses, and also to be able to reuse the batteries. Since the QuickCam uses so little power, each charge will produce various hours-long imaging sessions except if, as I have alredy done by accident, one forgets to disconnect the battery pack at the end of the imaging session. Keeping a second set of fully charged batteries at hand will prevent such incidents.
I also tried a set of four alacaline batteries in series (4x1.5V=6V) and the camera worked OK. All I had to do was to recalibrate the camera settings, namely White Balance. But I think is best to work with the NiCads.
I also tried to power the camera through standard wall AC/DC transformers (I tried output voltages of 4.5 and 6V) but the resulting images were useless due to the high amounts of noise/interference they contained.
SOFTWARE
The software that controls the grayscale QuickCam is in my opinion quite user-friendly,
very efficient as well as versatile. To be more rigorous, two distinct software control
the camera. Both are supplied with the QuickCam.
One of them (QuickPICT) is used to grab and save still images, though it also offers the possibility of real-time previewing the object to be photographed, and the other (QuickMOVIE) allows the production of real-time and time-lapse AVI animations. A patch to upgrade to the latest version of these programs (Ver 2.1 at the time this text was written), is available free at both the Connectix and Logitech web pages. I strongly recommend a visit to the Drivers section of the Astrocam web-page. The following comments refer to Version 2.1 for Windows .
The range of parameters that can be modified from the computer is impressive: dimension and zooming of the image; integration time (Brightness command); contrast and offset (Contrast and White Balance commands, respectively); number and interval between images to be automatically obtained; real-time and variable time-lapse animations.
If I had to choose the feature I mostly like in the software, from its practical importance for the production of astronomical images, I would have to choose two: 1) the possibility to monitor atmospheric turbulence through real-time images that are shown at the computer screen; and 2) the possibility of, at the most adequate moment, rapidly obtaining a series of images (as if we were using a motorized photographic camera).
The image series thus obtained is temporarily placed in a "ciber" Film Roll that can store up to 36 exposures. I usualy produce short series of 6 to 8 images, obtained at the moments where seeing is best. We can immediately visualize such images stored in the Film Roll using the quickPICT software in order to choose and save the best ones. The Film Roll is then emptied and new series of images can be obtained. The advantage of this procedure is obvious, a much higher probability of obtaining decent images, even for beginners, and in less than perfect nights.
The ease how AVI movies are obtained is also impressive, and the diversity is in practice related with our imagination (please see the animations section of this page).
A final advise: save your images and animations as BMP, TIFF or non-compressed AVI files. In fact, JPEG compression determines irreversible loss of information in the images, an effect that is readily evident when such images need to be further processed.
IN PRACTICE, HOW TO OBTAIN ASTRONOMICAL IMAGES WITH THE
GRAYSCALE QUICKCAM ?
In my experience, the grayscale QuickCam will allow you to obtain astronomical images of
quite good quality providing thet the object to be imaged is bright enough (and seeing
conditions are not terrible). Such objects include the Sun (ATTENTION!! always
use good quality solar filters; I use a type 2 plus Thousand Oaks Optical, properly placed
in front of the correcting plate of my 4" SCT and kept in place with adhesive tape),
the Moon, bright planets such as Mercury, Venus, Mars, Jupiter and Saturn, as well as
bright stars.
In my opinion, it is better to deactivate the Brightness Auto mode that allows the software to choose the integration time. This option is very usefull for ordinary daylight conditions where the camera's objective is maintained, but not for astronomy. For the moon and planets, the best results are obtained when the Contrast setting is put to zero, the White Balance is then resetted, and finally the proper integration time is adjusted manually (Brightness command). For the Sun, or to enphasise faint planetary details, the Contrast can be manually increased to the desired setting position.
The grayscale QuickCam produces 6-bits digitized images, that is with 64 gray-levels (please check the Image Size and Quality menu since the software also allows for 16 gray-level images that are not adequate for astronomy). This means that we are working well below the desirable 256 gray-levels, that is 8-bits images, that our visual system is able to discriminate in grayscale images. In consequence, to obtain the best quality images a proper Contrast and White Balance adjustment has to be made for each different subject or camera/telescope setup BEFORE images are obtained.
For instance, if we choose a too fast integration time the brightest areas of our object will appear grayish and not white, and the number of gray-levels available to intermediate shadings will be well bellow the optimal 64 this camera allows. This will give images a non-photographic appearance, without smooth gradients. The best we can do to improve the quality of such images is to "expand" by image processing, the brightest gray level of our image up to white. Unfortunately, this will not increase the number of intermediate gray-levels. You can easily guess what will happen if an excessive integration time or an inadequate contrast setting are used. In short, it is better to spend a little extra time fine-tunning the various camera setting parameters BEFORE images are obtained if we want to get the best possible results.
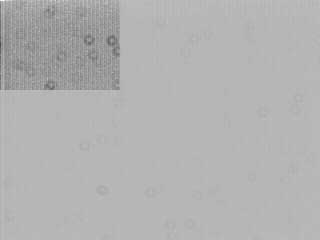
All original images I obtain are first processed with a master flat-field frame (obtained averaging various images of a white target). An example of a typical flat-field image is shown here. The contrast of the upper-left corner of the image was exagerated in order to better show the douhgnut-shaped dust marks and the vertical-line bias pattern. This bias pattern is exagerated by the extra 15m cable I have to use.
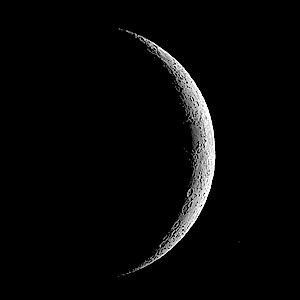
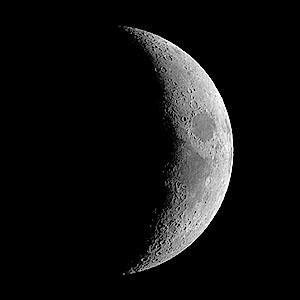
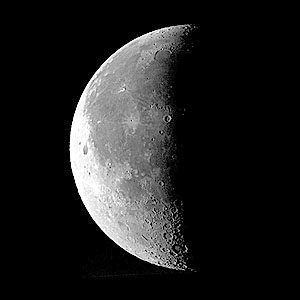
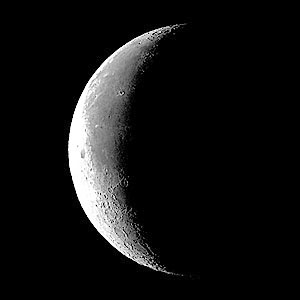
You don't have to own a large telescope to obtain good astrophotos with the grayscale QuickCam. For instance, a 4" SCT working at f/6.3 will give you a partial vue of the moon like this (a 500mm telephoto lens will also do the job, and a 200mm will allow you to photograph the whole moon disk).
If you obtain a series of partially overlapping frames that completely cover the moon disk, and providing that camera settings are unchanged, you can produce nice mosaic images like those shown below (here in reduced format).
And what about a portfolio of an entire lunation? As you will see in part VI of this page, such images will allow you extra fun...
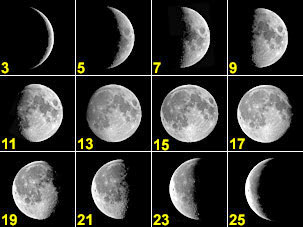
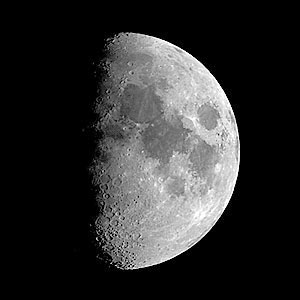
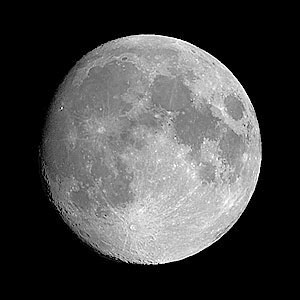
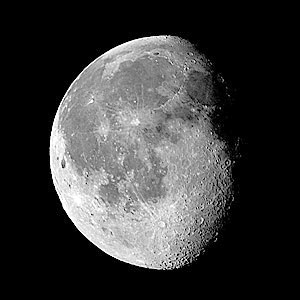
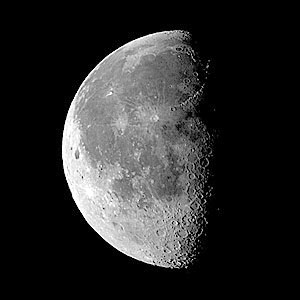
Click to get a larger image of lunation days 3 - 5 - 7 - 9 - 11 - 13 - 15 - 17 - 19 - 21 - 23 - 25
The next two pictures illustrate other interesting observation projects that are suitable for small scopes and the grayscale QuickCam.
The two full-moon mosaics shown on the left image were obtained 6-months apart, first when the moon was near perigee and then when it was near apogee. The difference in the moon's apparent diameter is evident but there is an extra bonus, namely a marked latitude libration effect (for instance, the crater Tycho in much far away from the southern lunar limb in the apogee image).
After proper alignment and resizing of the images, and due to the libration efect I mentioned, it was possible to produce a true 3D image of the full-moon (please use red-blue 3D glasses). Can you visualize the tilting and true shape of Mare Crisium and Grimaldi in the 3D image?
 full-moon at perigee and
apogee
full-moon at perigee and
apogee  3D image of the full-moon
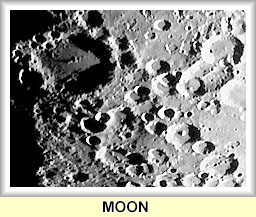
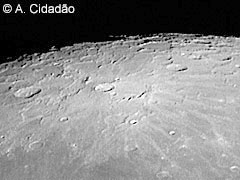
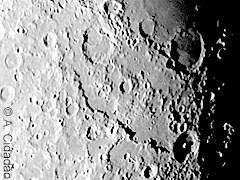
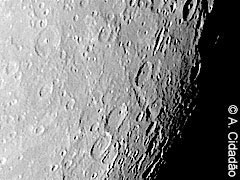
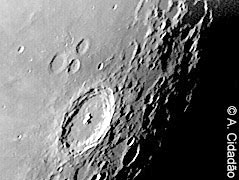
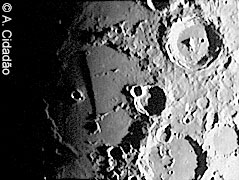
At the prime focus of a 10" SCT (f/6.3 with a focal reducer) the grayscale QuickCam produces quite good images of easily identifiable moonscapes. There is usually sufficient light to use short integration times, and it's an adequate camera-telescope combination to obtain intermediate magnification images or to work with poor seeing conditions. Anyway, don't expect to get the maximum possible resolution with this setup.
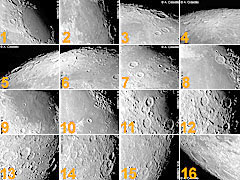
LEGEND: 1-Mare
Crisium; 2-Messier; 3-Hercules
and Atlas; 4-Anaxagoras; 5-Pythagoras;
6-Meton; 7-Aristoteles and
Eudoxus; 8-Posidonius; 9-Mare
Tranquillitatis; 10-Plinius; 11-Theophilus,
Cyrillus and Catharina; 12-Rupes Altai; 13-Maurolycus; 14-Janssen; 15-Vallis Rheita; 16-Schickard and
Wargentin
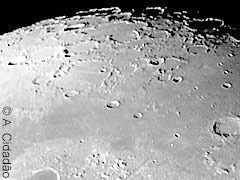
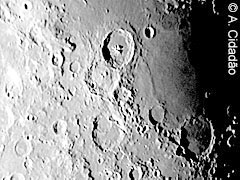
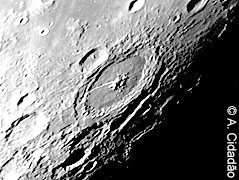
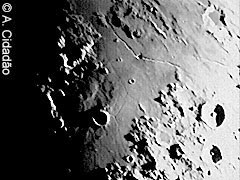
I particularly like to obtain moon images with the grayscale QuickCam and my 10" LX200 opperating at f/10. In fact, it is possible to obtain considerable detail (up to now I have been mostly disturbed by seeing conditions and not by the theoretical limits of the telescope-camera setup I use) and, most importantly, there is usualy not much variation in lunar albedo along the whole area covered by the CCD. This is quite relevant to avoid saturation in a 6-bit camera.
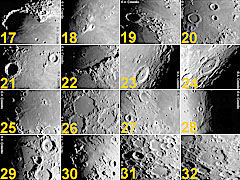
LEGEND: 17-Sinus
Iridum; 18-Aristarchus and Vallis Schroteri; 19-Plato and Vallis Alpes; 20-Archimedes,
Aristillus and Autolycus; 21-Copernicus, Stadius and
Eratosthenes; 22-Montes Apenninus; 23-Langrenus;
24-Petavius; 25-Mare Nubium and
Kies; 26-Ptolemaeus, Alphonsus and Albategnius; 27-Rima Ariadaeus; 28-Lamont and
domes near Arago; 29-Rupes Recta; 30-Rima
Hyginus and Rimae Triesnecker; 31-Tycho; 32-Clavius
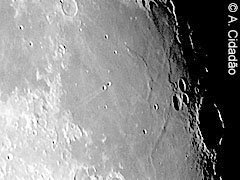
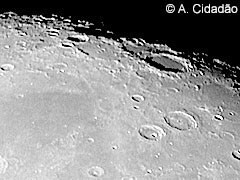
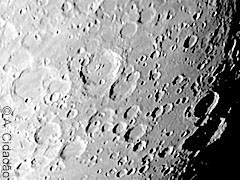
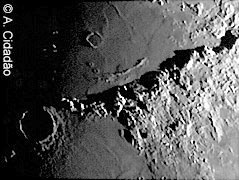
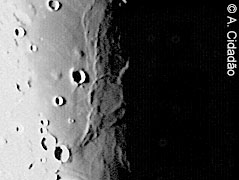
If the camera settings are kept unchanged, mosaics of high magnification moon images such as those of the terminator at days 8 and 9 of the lunation presented below, can be easily assembled. To follow the terminator along the lunation, using such mosaics, is a nice project. In addition, if mosaics of a given day are repeated in different lunations its appearence will surely be distinct, namely due to libration and variation of moon-earth distance.
![]() day 8 of the the
lunation
day 8 of the the
lunation
![]() day 9 of the lunation
day 9 of the lunation
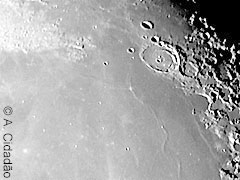
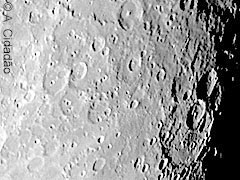
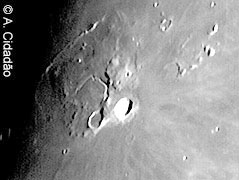
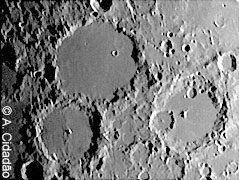
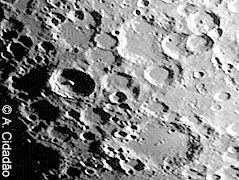
If seeing is above average, it is possible to work with the 10" LX200 at f/20. At such image sampling conditions, be ready to get GREAT detail, as shown in the examples below and in the planetary images presented at the top of this page. Mosaics are particularly rewarding. To get the best signal-to-noise ratio possible it is advantageous to average several original images, e.g. 4 or 8. The Mars, Jupiter, Saturn (see above), and Vallis Alpes images were prepared this way.
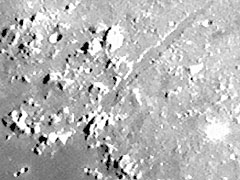
Vallis Alpes with rille (average of 8 images)
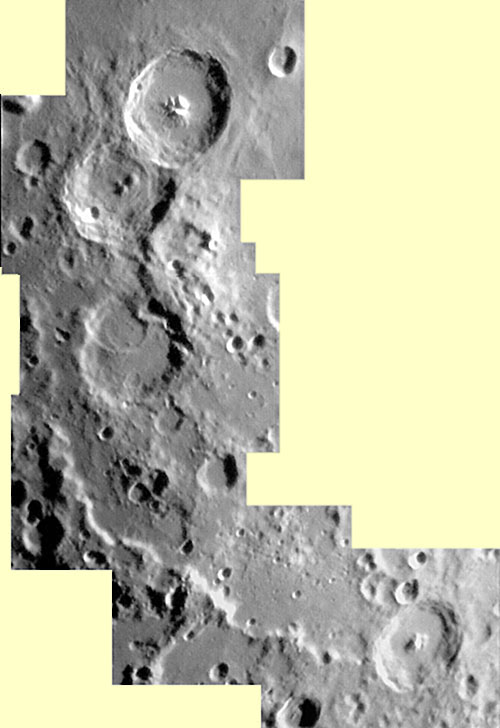
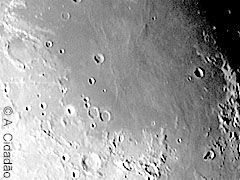
Mosaic of day 7 of the lunation, showing craters Theophilus, Cyrillus, Catharina and Piccolomini, as well as Rupes Altai
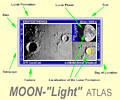
I am currently working in the production of an Atlas of Moon composed of images obtained with the grayscale QuickCam. Since it is being made with a great albeit inexpensive camera, and since obtaining the highest resolution images is not the main objective (anyway, my observing site is not the most adequate for that purpose), I decided to call the project MOON-"Light".
In its simplest form, the MOON-"Light" Atlas is composed of image cardfiles like that shown below. Click here or onto the thumbnail below to activate the Atlas' section of this page. About 650 different craters are ready to be integrated in the Atlas, and I will add them from time to time. Lots of other lunar formations and landing sites of successful moon missions are currently online at this page. A part of this Atlas is also at the Nautilus FTP-site.
The production of real-time or time-lapse animations is an extremely easy task when we use the excellent software that controls the grayscale QuickCam (V2.1). Give it a try..., quite interesting results can be obtained!
For instance, to demonstrate the effect of atmospheric turbulence on telescopic images why not producing a short real-time animation of a bright star in- and out-of-focus? Anyway, the movie can be used to check the scope's colimation. And what about planetary images? Real-time animations readily demonstrate that images are not always sharp in an average night, even with a high quality telescope.
Bright stars: real-time animations of in-focus and out-of-focus stars
Bright planets: real-time animation of Jupiter
I particularly like to produce time-lapse animations (to see more of my work take a look at the time-lapse animations section of this page. In the example below (lunation animation), each frame represents a mosaic of images obtained with a 4"SCT, in consecutive nights of a lunation. Phase and shadow progression, latitude and longitude libration effect as well as variation in the moon's apparent diameter are evident. But there are other simpler projects that can be attempted. Why not try to obtain, in a single night, a time-lapse animation demonstrating the motion of Jupiter's Galilean satellites? The grayscale QuickCam and a small scope will do the job.
Moon: time-lapse animation of the whole lunation
Moon: high-resolution version of the above animation 460K


Venus, imaged under unfavourable seeing conditions with a 10" (f/10) SCT and a QuickCam VC. QCIF (176x144 pixels) low resolution mode. Average of 6 frames.
All Images and Texts on these pages are Copyrighted.
It is strictly forbidden to use them (namely for inclusion in other web pages) without the written authorization of the author
© A.Cidadăo (1999)