|
|
|
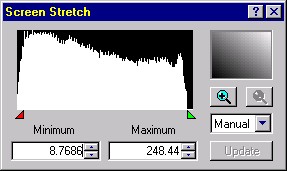
Digital Darkroom Good and bad practices (II) 1st step : normalization We explained in the pages dedicated to CCD how to calibrate raw digital images during the pre-processing step to remove all artifacts like dark frames and other bias generated by the electronic sensor to get frames ready for post-processing. Now, before stacking these images they need to be normalized so that they cover an uniform range of brightness. The tools available for the post-processing are numerous but hopefully using an imaging software we can use predefined algorithms and even automatic procedures. These tools ensure many functions among them : - Display a histogram of the image light curve showing the "brightness" level of each pixel - Stretching the color channels or luminance range in order to extend the histogram over the full range of data - Correct the balance (color, luminosity or contrast). - Special fonctions like duplicating, adding, substracting, differencing, darkening, lightening, etc. By stretching the range of colors or luminance, the dynamic range of the image will be corrected. The darkest level set by default to 0 will be set to the minimum available in the image (e.g. 8.7686 in the below image), and the brightnest level by default set to 255 will be assigned to the maximum available (e.g. 248.44). This process can also be performed by automated procedures like Auto contrast or Auto color in PhotoShop and in adjusting brightness or color curves. To play with : Color, hue and brightness
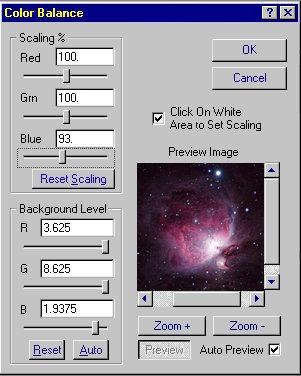
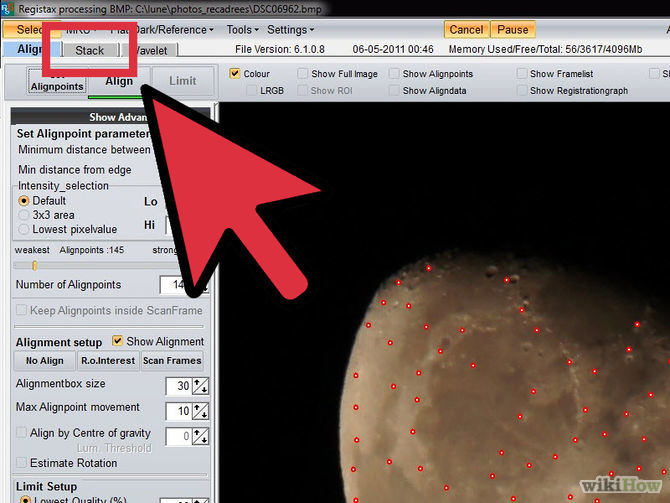
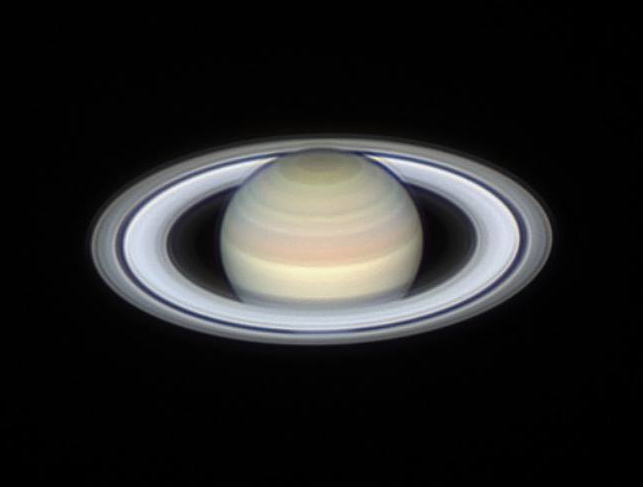
A second issue is the color balance of the image. In theory, the brightest stars must be pure white and the background sky pure black, without red, green or blue dominance. Here also the correction can be set automatically in most imaging programs. In case of algorithm failure, the previous steps must be applied manually, shifting the brightness of each channel. But most of the time the aesthetic effect is improved when the background sky is deep blue or even black. Now our images are prepared and ready for registration and stacking. 2d step : registration The next step is to register all pre-processed images in order to combine their data pixel by pixel without the slightest shift thanks to an alignment tool using two or several points in each image. The pictures alignment is sometimes a hard-to-match task but a mandatory one if you want to get rigorous results. You will agree to recognize that it will be silly to mix two inverted images of Saturn or images of a galaxy where stars are misaligned... The principle consists for each image of removing misalignments such as telescope drift, rotation and higher orders differences (including scanner nonlinearity and film unstability using analog peripherals) by positioning peculiar alignment points, typically stars. This method usually aligns a serie of points in each images with a minimum of 2 points as far apart as possible for a better alignment accuracy. For the ease of the process images are treated two by two and the result image combined together, etc. To
watch : Planetary Imaging & Processing - Process The Moon Registax Photoshop To read: Align and Stack Multiple Moon Pictures with Ninox and Registax, Wikihow MaxIm DL Video Tutorials, Cyanogen Imaging Registax, by Cor Berrevoets
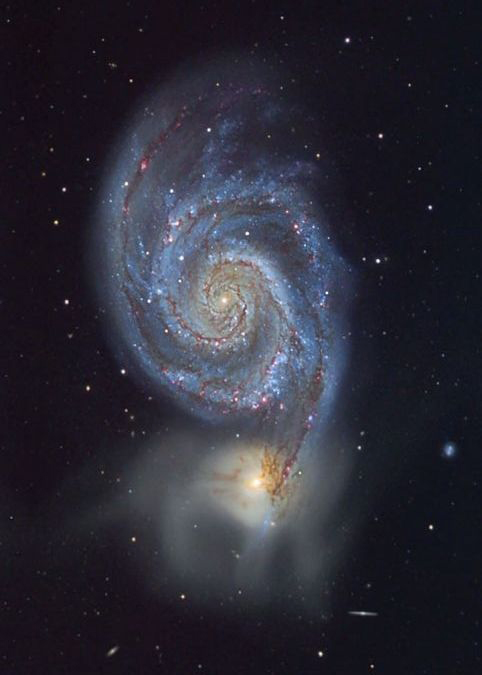
Once the points are in place in each image the program can automatically refine the pixels position. Then using a bilinear interpolation, it creates automatically the composite by shifting the second image on the original. In some cases this alignment algorithm is able to coincide non-square pixels, different camera orientations or different optics with an accuracy down to a fraction of a pixel (the tricks is to zoom the normal view to enlarge the pixel on screen). Like rotating a single image, an inconvenient of this registration is to soften your resulting image. This side effect can be suppressed by applying a sharpen function with a minimum of strength to restore the original resolution. 3d step : stacking The basic concept consists of stacking or combining images together in respect to the exposure time of each image to simulate a longer exposition. So if you add 4 images, each of them will receive 25% of the weight of the total exposure time. This step is simple and only the processing tool depends on the nature of your images, monochrom or RGB. Indeed, this last often uses a specific function to insure the stacking of the three monochrom images taken through red, green and blue filters, knowing the blue one requested the longer exposure. For B/W images the method consists of using a non alignment points and a blending, adding images according to their time exposure. Another way to combine images is to use a short exposure image to restore highlights in long exposures. The principle consists of creating a mask that isolates the highlights of the long exposure. This is the famous unsharp mask technique explained in next page, particularly impressing when picturing bright nebulae or the Sun corona during an total eclipse. If a B/W stacking is quite easy to make in stacking some black-and-white frames, to increase the contrast of a RGB image, we can take profit of a slight different technique, combining a monochrom picture with our RGB's to produce what we call an LRGB image. In short and theoretically, to increase the signal-to-noise ratio, reduce the turbulence and others artifacts, RGB images should be the stacking of several dozen to some thousands monochrom images as well. The number is not very important, and in some cases even 1 R + 1 G + 1 B added to the luminance are enough when seeing is excellent. But usually, as the seeing is far to be exceptional, most amateurs prefer to stack several LRGB to reduce the electronic noise and effects of the turbulence. So it is common to record between a handful up to some thousands of individual L, R, G, B frames (sometimes thanks to video capabilities of the new generation of CCD cameras or DSLRs). Then these R, G and B frames are stacked together with the luminance image. In theory, under clear skies and working conditions particularly fine without turbulence, the Luminance gives the contrast to the RGB picture. Some amateurs do no hesitate to record 10 to 100 times more L frames than R, G and B frames. Without the Luminance, the resulting color image can looks fine of course but it can lack of depth, of contrast, and be fade and not crisp of details. However, as we see below right, when working conditions are as usual and not the best, if by chance you can benefit of a very low turbulence, a "simple" RGB stacking of some thousands of individuals R, G and B frames can also produce excellent results.
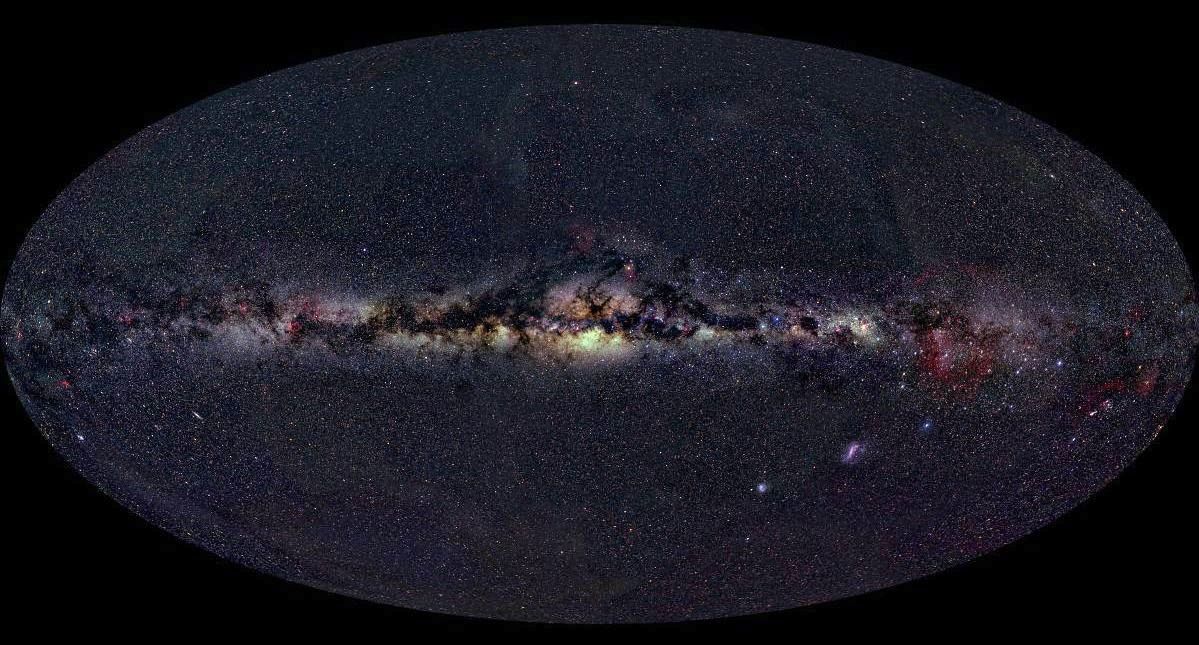
The luminance frame is the combination of one to some dozen to hundreds individual monochrom frames. The luminance frame can be recorded in white light or in selected bands like near UV when picturing Venus or near-IR when picturing Mars for example or even in spectral lines (SII, OIII, H-alpha, etc.) when related to nebulae or galaxies. The luminance frame is particulary important when picturing highly featured surfaces like planets. The final image results then in the combination of all these individual frames. At last, you can compose or merge several images to circle a vast area of the sky, larger that the field of your scope and create a mosaic. This method requests to extend the input image to enlarge its limits and sometimes to create a linear gradient mask that runs from black and white across the overlap between the two images. Then you can create a blending mask for the overlay and composite all together, the extended input image, the overlay and the mask. Note that when you assemble multiples large frames to create a panoramic image of the Milky Way for example, you should take into account additional constraints and issues like the camera distortions that request an astrometry calibration, perform a photometric calibration between all frames, and take into account the right projection. Alex Mellinger who created a huge poster of the Milky Way in high resolution explained his technique in a paper (PDF) published in 2009. The basics being defined, in next pages we will see several techniques to improve the aesthetic of astronomical images and to correct their defaults. Unsharp mask, LRGB or mosaic are all terms that apply to image processing techniques that combine multiples photographs to enhance its features. But to get results as exceptional as the ones displayed above or in the gallery, some strict rules must be applied. To read : Composites by Examples |
|||||||||||||||||||||||||
|
Page 1 - 2 - |
||||||||||||||||||||||||||
|
|
||||||||||||||||||||||||||


