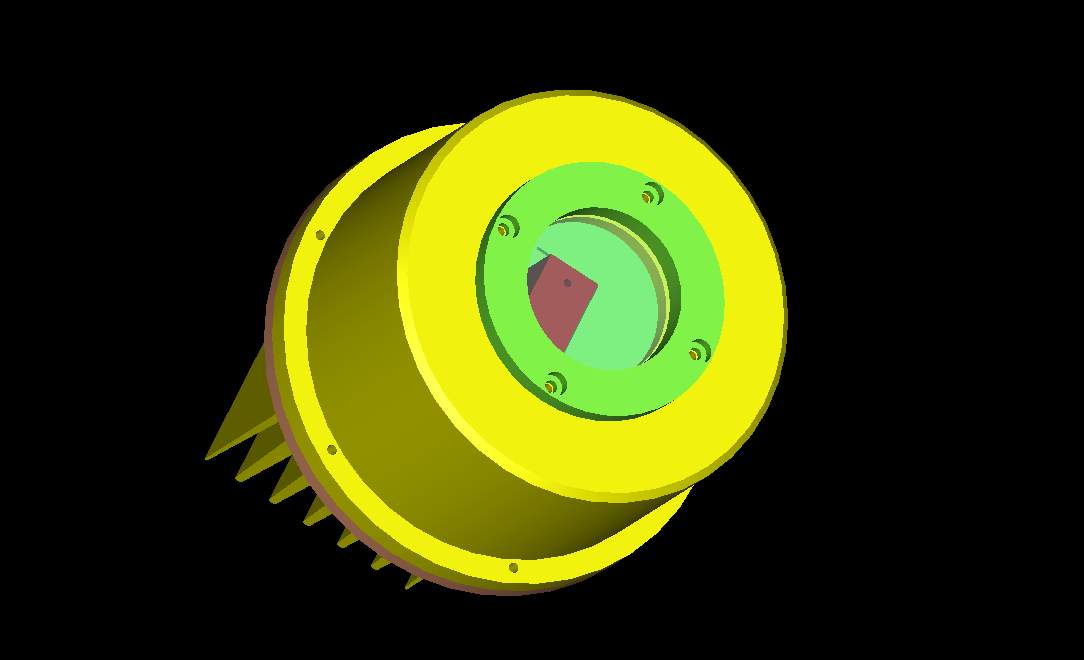
Airtight case with shutter for Audine
Frontface of the case with closed shutter

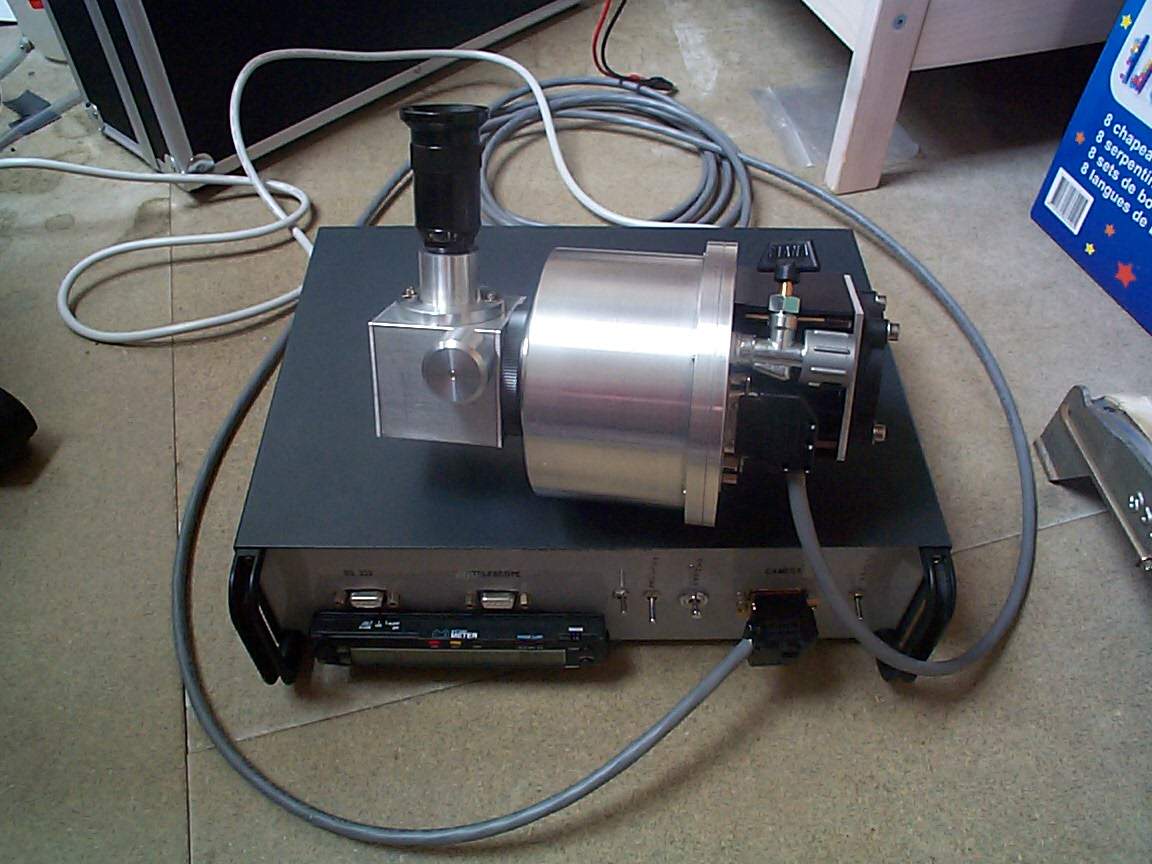
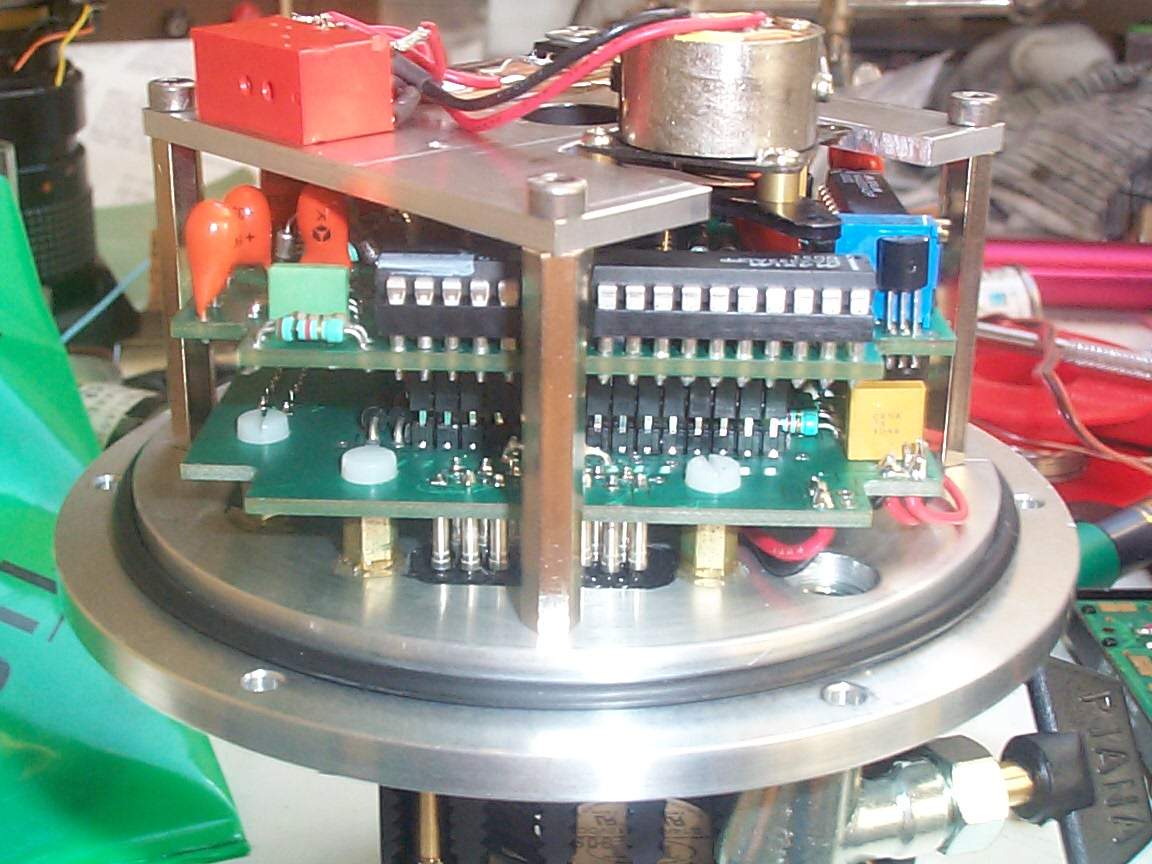
Camera assembled with homemade flip-mirror on power supply
SUMMARY
CCD astronomy began for me with purchasing the set of Audine pcb on Essentiel Electronique.
I'have build my Audine with an KAF401E sensor thanks to the great files for building you can find on the web: www.astrosurf.com/audine
THANK YOU THE AUDINE TEAM !!!
Nevertheless for me and other peoples, two major improvments appears quicky to be necessary for efficient use :
- Audine has not shutter : let's add it.
- Audine is not airtight and is icing : let's solve this problem.
My design specifications for the case were the following :
- Do not modify PCB and hold tight them
- Be really airtight and able to be filled with dry gas (like nitrogen)
- Be able to enclosing a shutter
- Be the more light possible
- Allowing the removing of PCB for fixing
- Not to much increasing the optical path
- Be easy to machine.
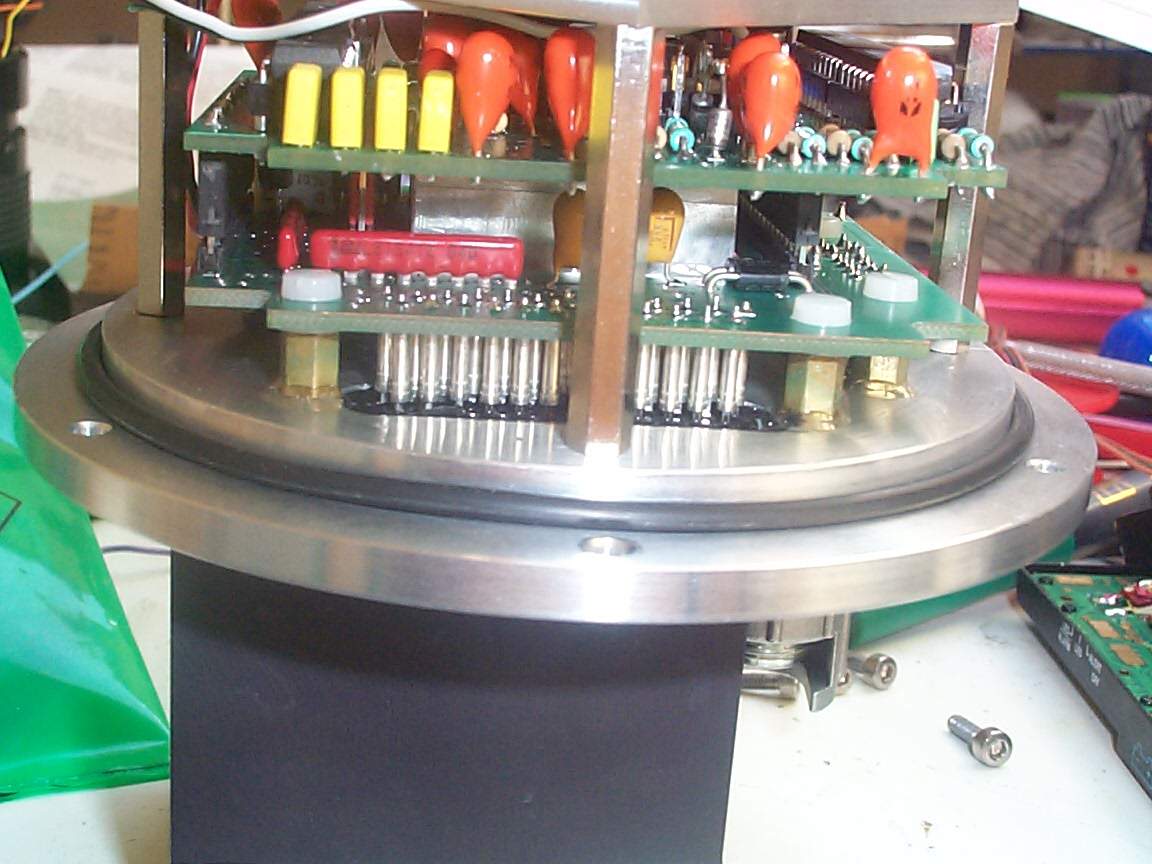
1. Do not modify PCB and hold tight them.
It was for me an evidence : i had already fully wired my camera, and don't have the ability to re-route the PCBs. In my case, the PCBs are tighted in place thanks to the Sub-d's original holes.
2. Be really airtight and able to be filled with dry gas (like nitrogen).
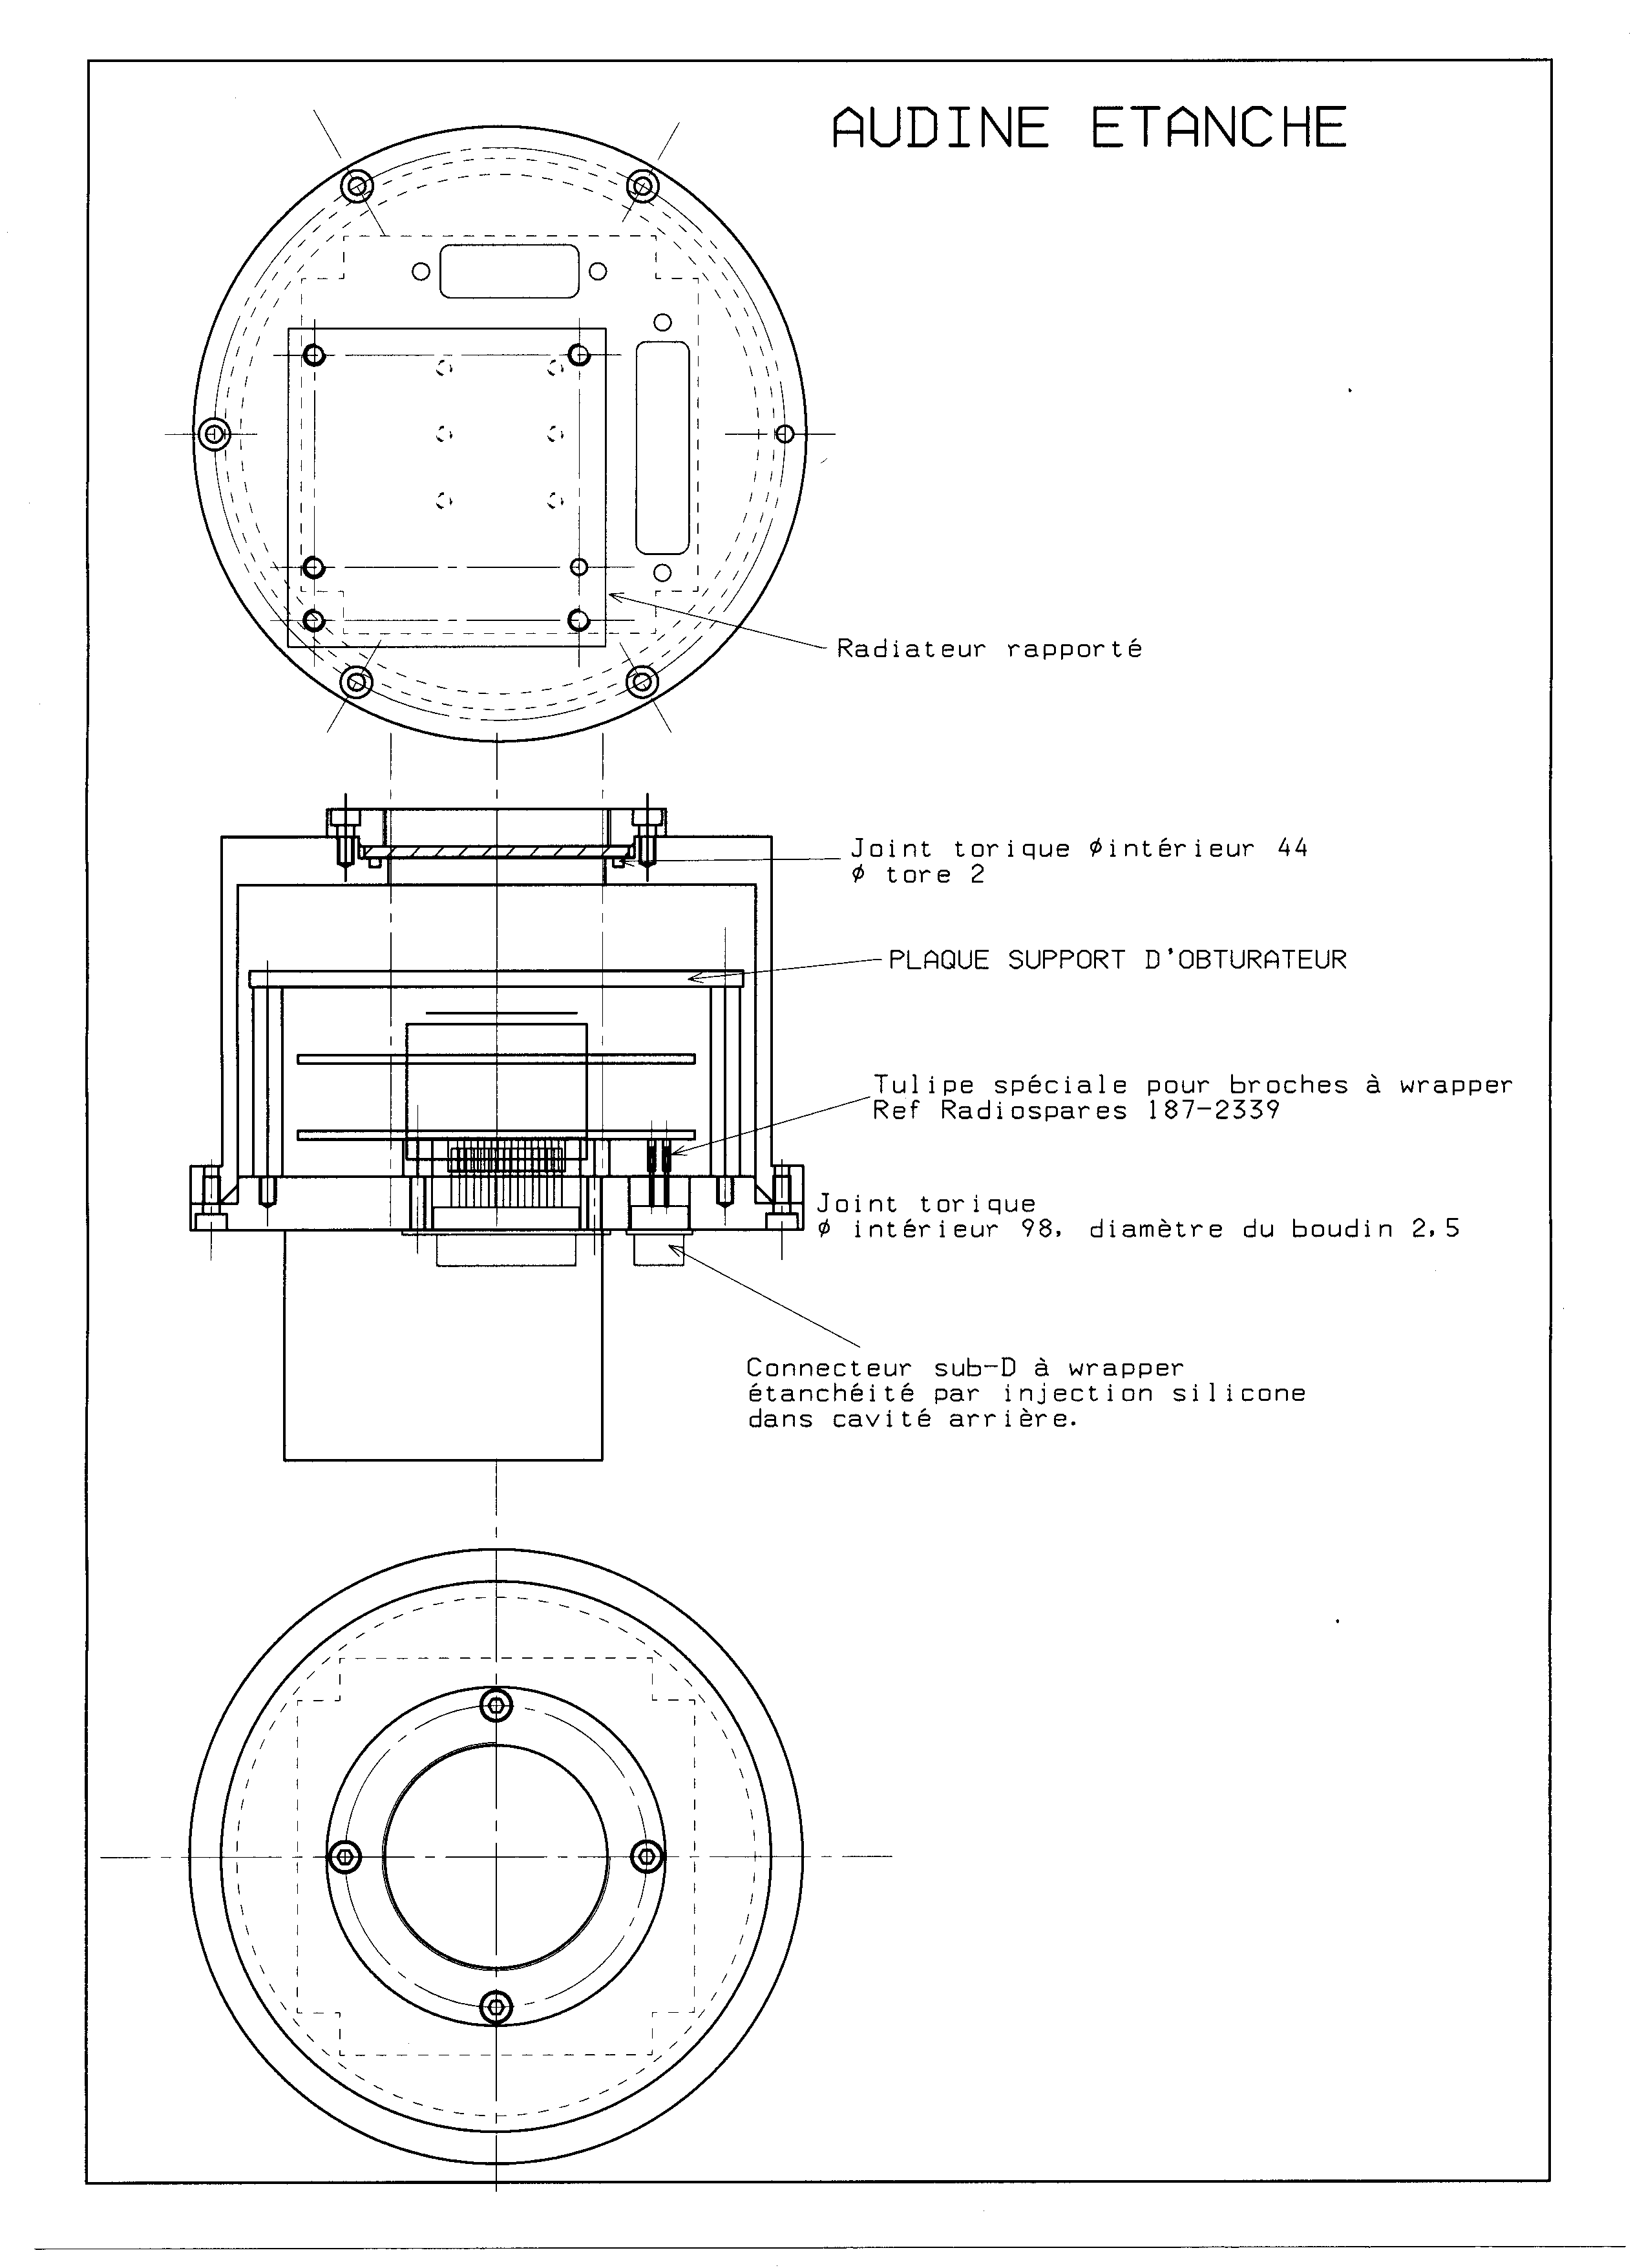
It is not a so simple problem. We have to airtight an opto-mechanical enclosure (simple problem) but with a lot of electrical opening (Sub-ds, not very simple problem).
The opto-mechanical solution is very classical and simple, two o-ring.
We can found an o-ring under optical window and an other at the interface between main tube and bottom.
For electrical airtight, various solutions have been used :
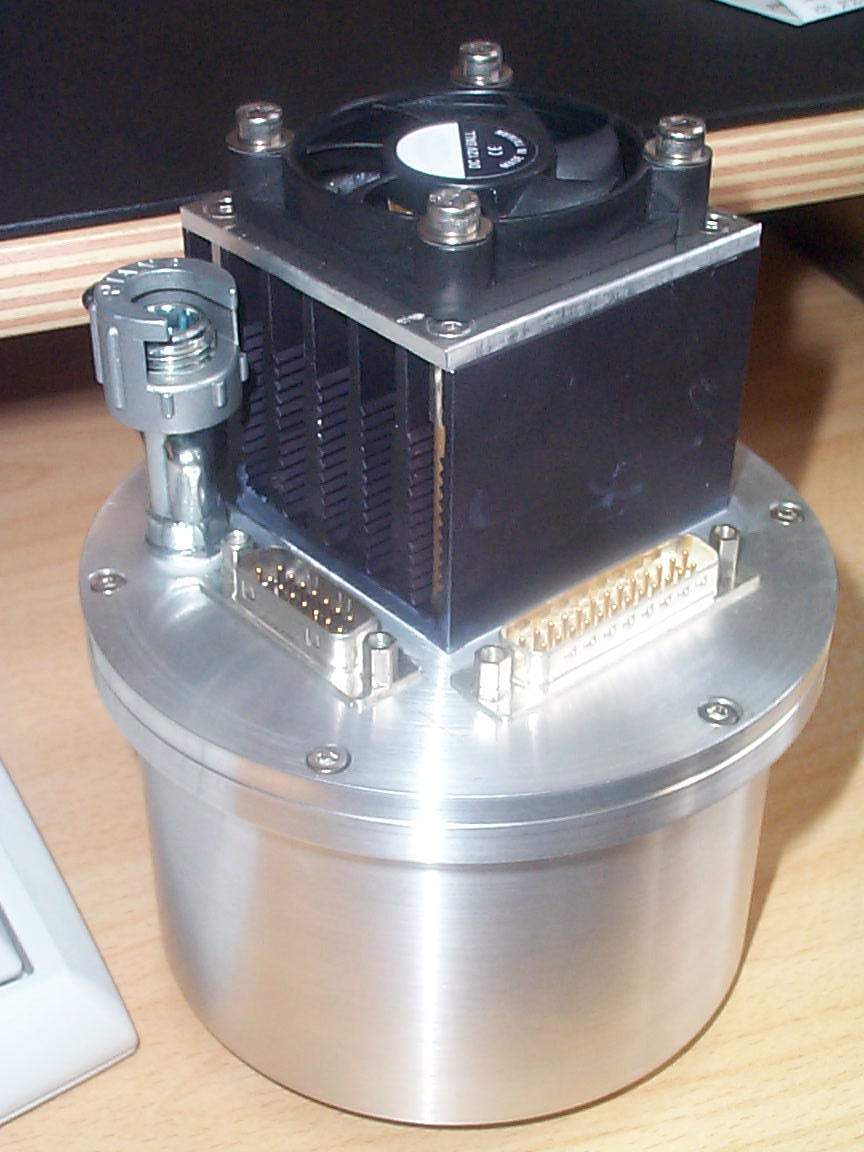
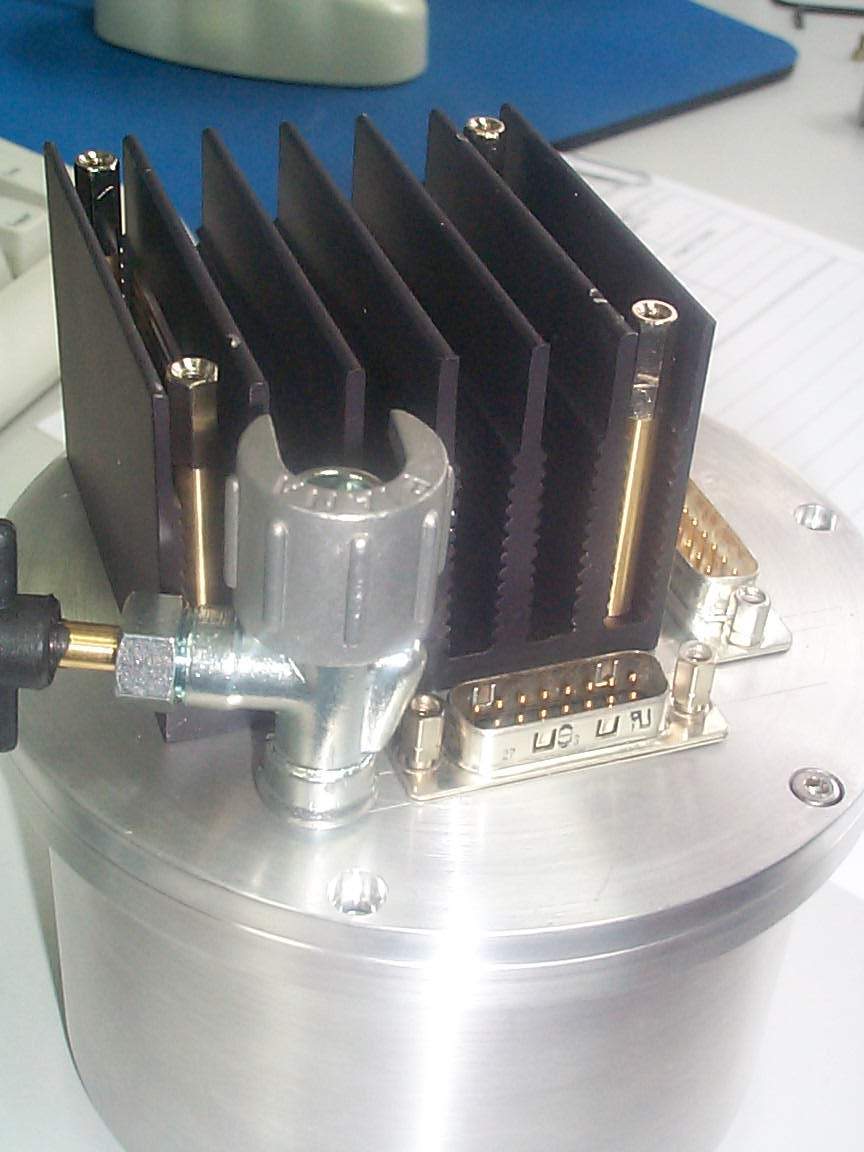
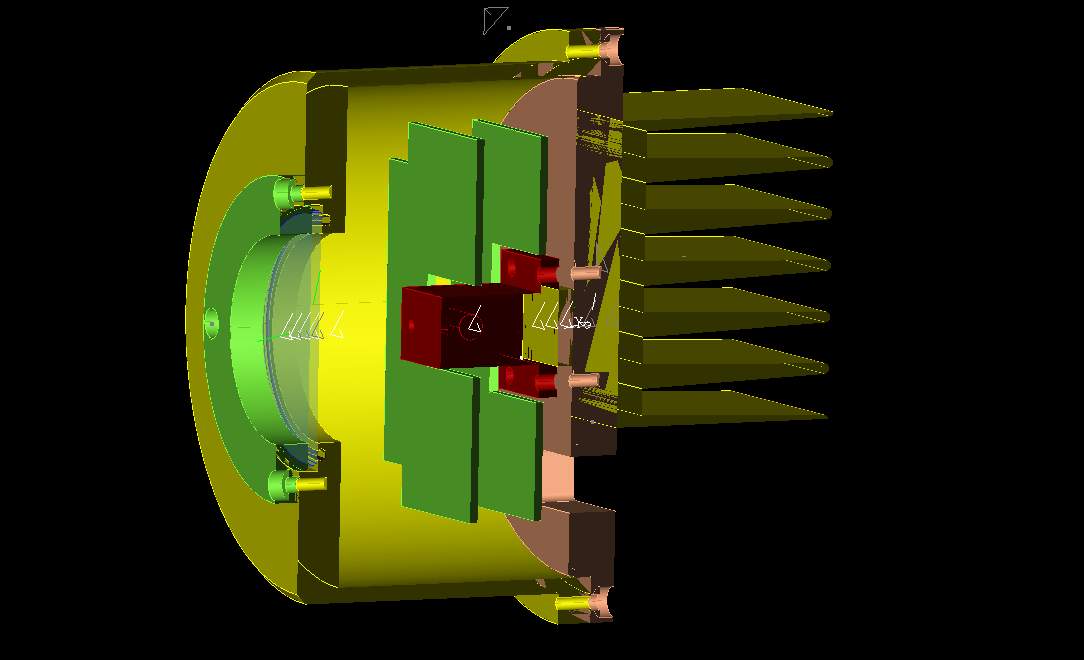
Some Sub-d for wrapping purpose have been used, screwed by external side of the bottom. The pins of wrapping sub-d are very long and allow to pass thru a wall of 10 mm (0,4 inch). A internal cavity around sub-d pins allow filling with silicone material and so, the air tight is perfect (you can see the silicone material in black on picture ). An other small consideration, the wrapping pins must be massive pins, not rolled pins for good air-tight.
The threaded holes allowing mounting spacers on internal side and external side are the same and are coming out. The spacers have been screwed glued with epoxy cement like Araldite to be sure to save airtightness.
At last, an compressed air tap has been added, screwed with teflon strip and allow the filling of camera with dry gas. The bleeding is made by the optical window (you have to unscrew juste a little bit the four screws to allow the air pass.
3. Be able to enclosing a shutter.
It was enough for that to save place on the top of the electronic boards and to envisage a way for fastening this shutter.
The place was reserved for an shutter recovered on a old super8 camera. This shutter is fastened on an 3 mm thickness aluminum plate assembled on the bottom plate of the camera by 4 taped spacers.
4. Be the more light possible.
The problem of the weight always arises since one uses a telescope on a under-dimensioned mount (in my case, C8 on Super Polaris).
There I must say that the increase in weight hardly could be avoided but only minimized by the drawing of the parts. A good metal turner/milling machine operator will be certainly able to optimize this to decrease the thicknesses of the walls and to make pockets of lightening inside the front face.
5. Allowing the removing of PCB for fixing.
It would have been simple to weld directly the AUDINE's boards directly onto the wrapping pins which exceeded bottom of the case. But two problems arose.
1/ The PCB holes of the Audine sub-d are smaller than wrapping pins (it's impossible to enlarge them because we have double side metalized holes PCB).
2/ The disassembling of the lower board would not have been possible whitout unsoldering this one.
This problem was solved while welding onto the Audine boards tulips of a special kind which are especially designed to be connected on male pins for wrapping.
The only small disadvantage of these pins it is that they are sold only in 2.54 mm step bars.As long as the Sub-d connectors have a VARIABLE step it is thus necessary to strip the bars to leave with precautions only the tulips and to weld them instead of Sub-d onto the lower chart of the AUDINE.
6. Not to much increasing the optical path.
There it was necessary to make concessions compared to the point N°3. I preferred to integrate the shutter inside the enclosure and to increase the optical path which is from now on of approximately 40mm. If were to be remade, I would increase it straightforwardly to have the standard optical path of the Pentax M42 screwing i.e. 45 mm.
To obtain a machining easy (and thus economic) the forms selected were simplified to the maximum. One thus obtains at the beginning three parts of lathe (mount, body and bottom face) and one part of milling (the drain). The bottom must then be taken again in milling (openings for the connectors) and in drilling/tapping.
The radiator was obtained starting from a standard section brought back on the bottom by 4 screws and provided with spacers making it possible to hold the fan. The section for the radiator was bought at Selectronic.
A hole in the content and the radiator makes it possible to pass two wire of the ventilator and is sealed off with silicone adhesive before fixing the radiator.
To improve thermal contact between the radiator and the bottom face, silicone grease identical to that used for Peltier was interposed with the assembly.
ASSEMBLY DRAWING
Download camera assembly drawing GIF (78 Ko)
Download assembly drawing DXF (473 Ko)
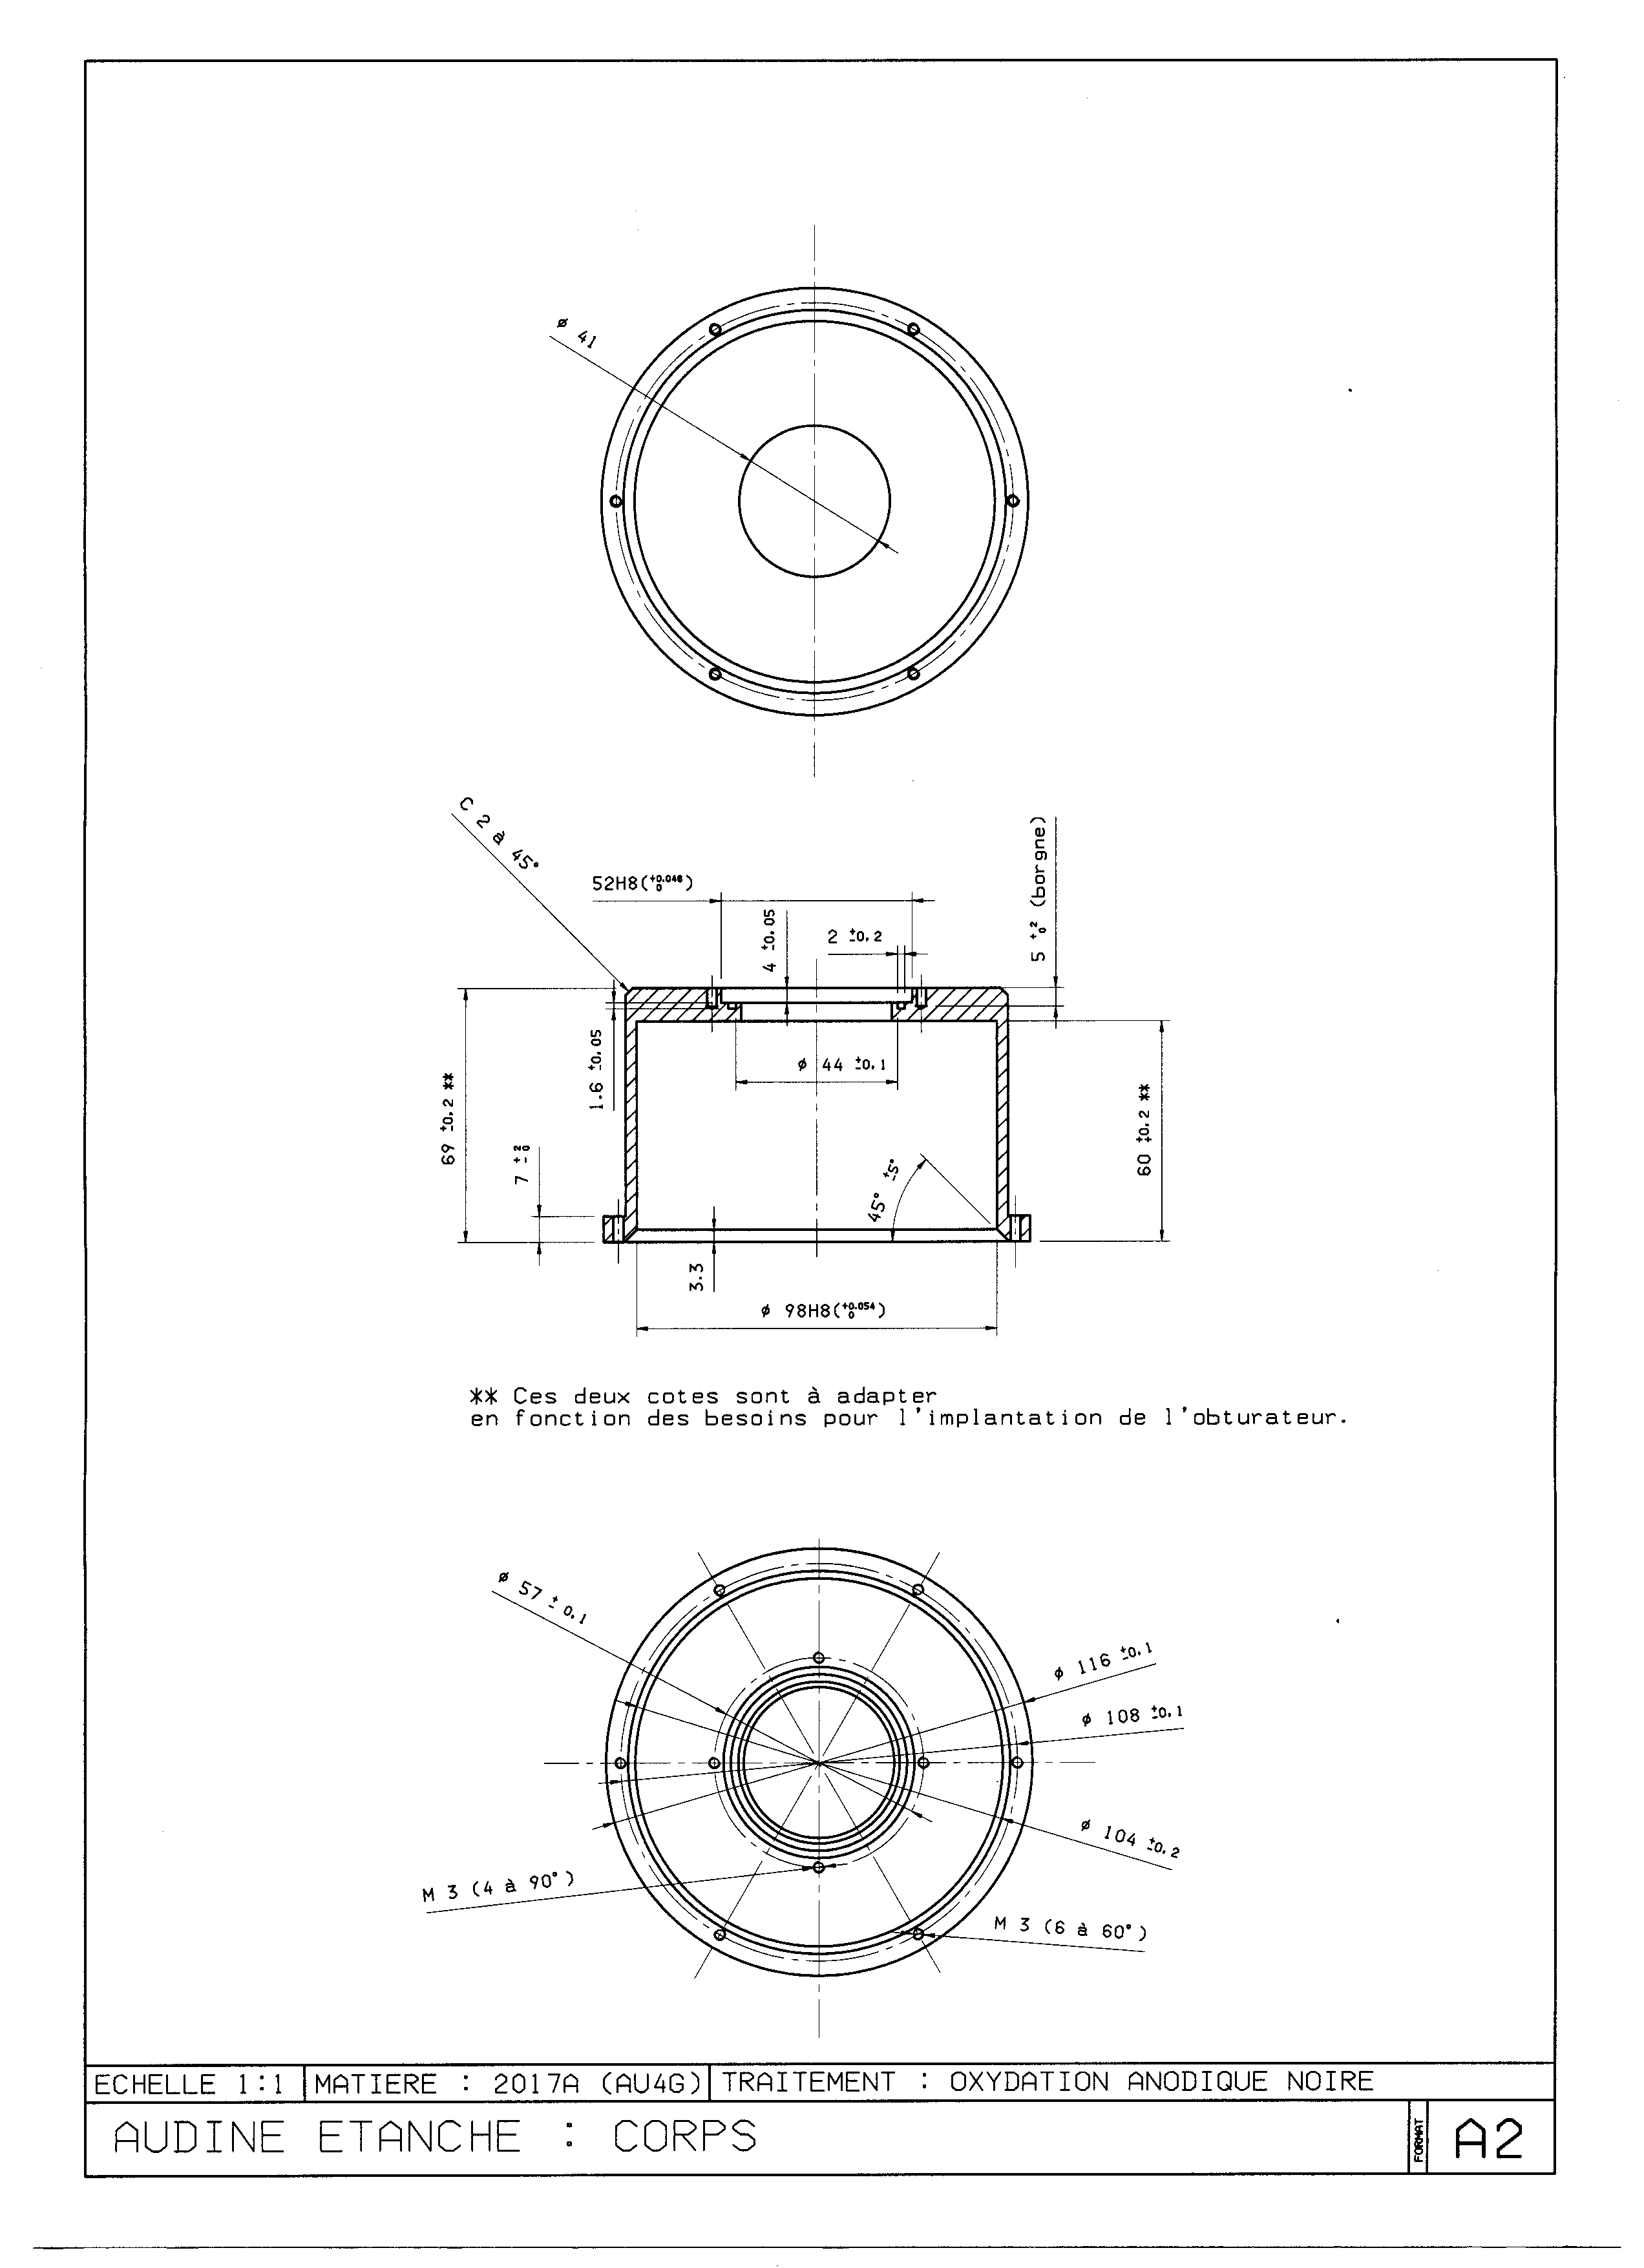
Camera main tube
Download main tube drawing GIF (68 Ko)
Download main tube drawing DXF (469 Ko)
Camera bottom
Download bottom drawing GIF (93 Ko)
Download bottom drawing DXF (550 Ko)
Camera lens mount
Download lens mount drawing GIF (55 Ko)
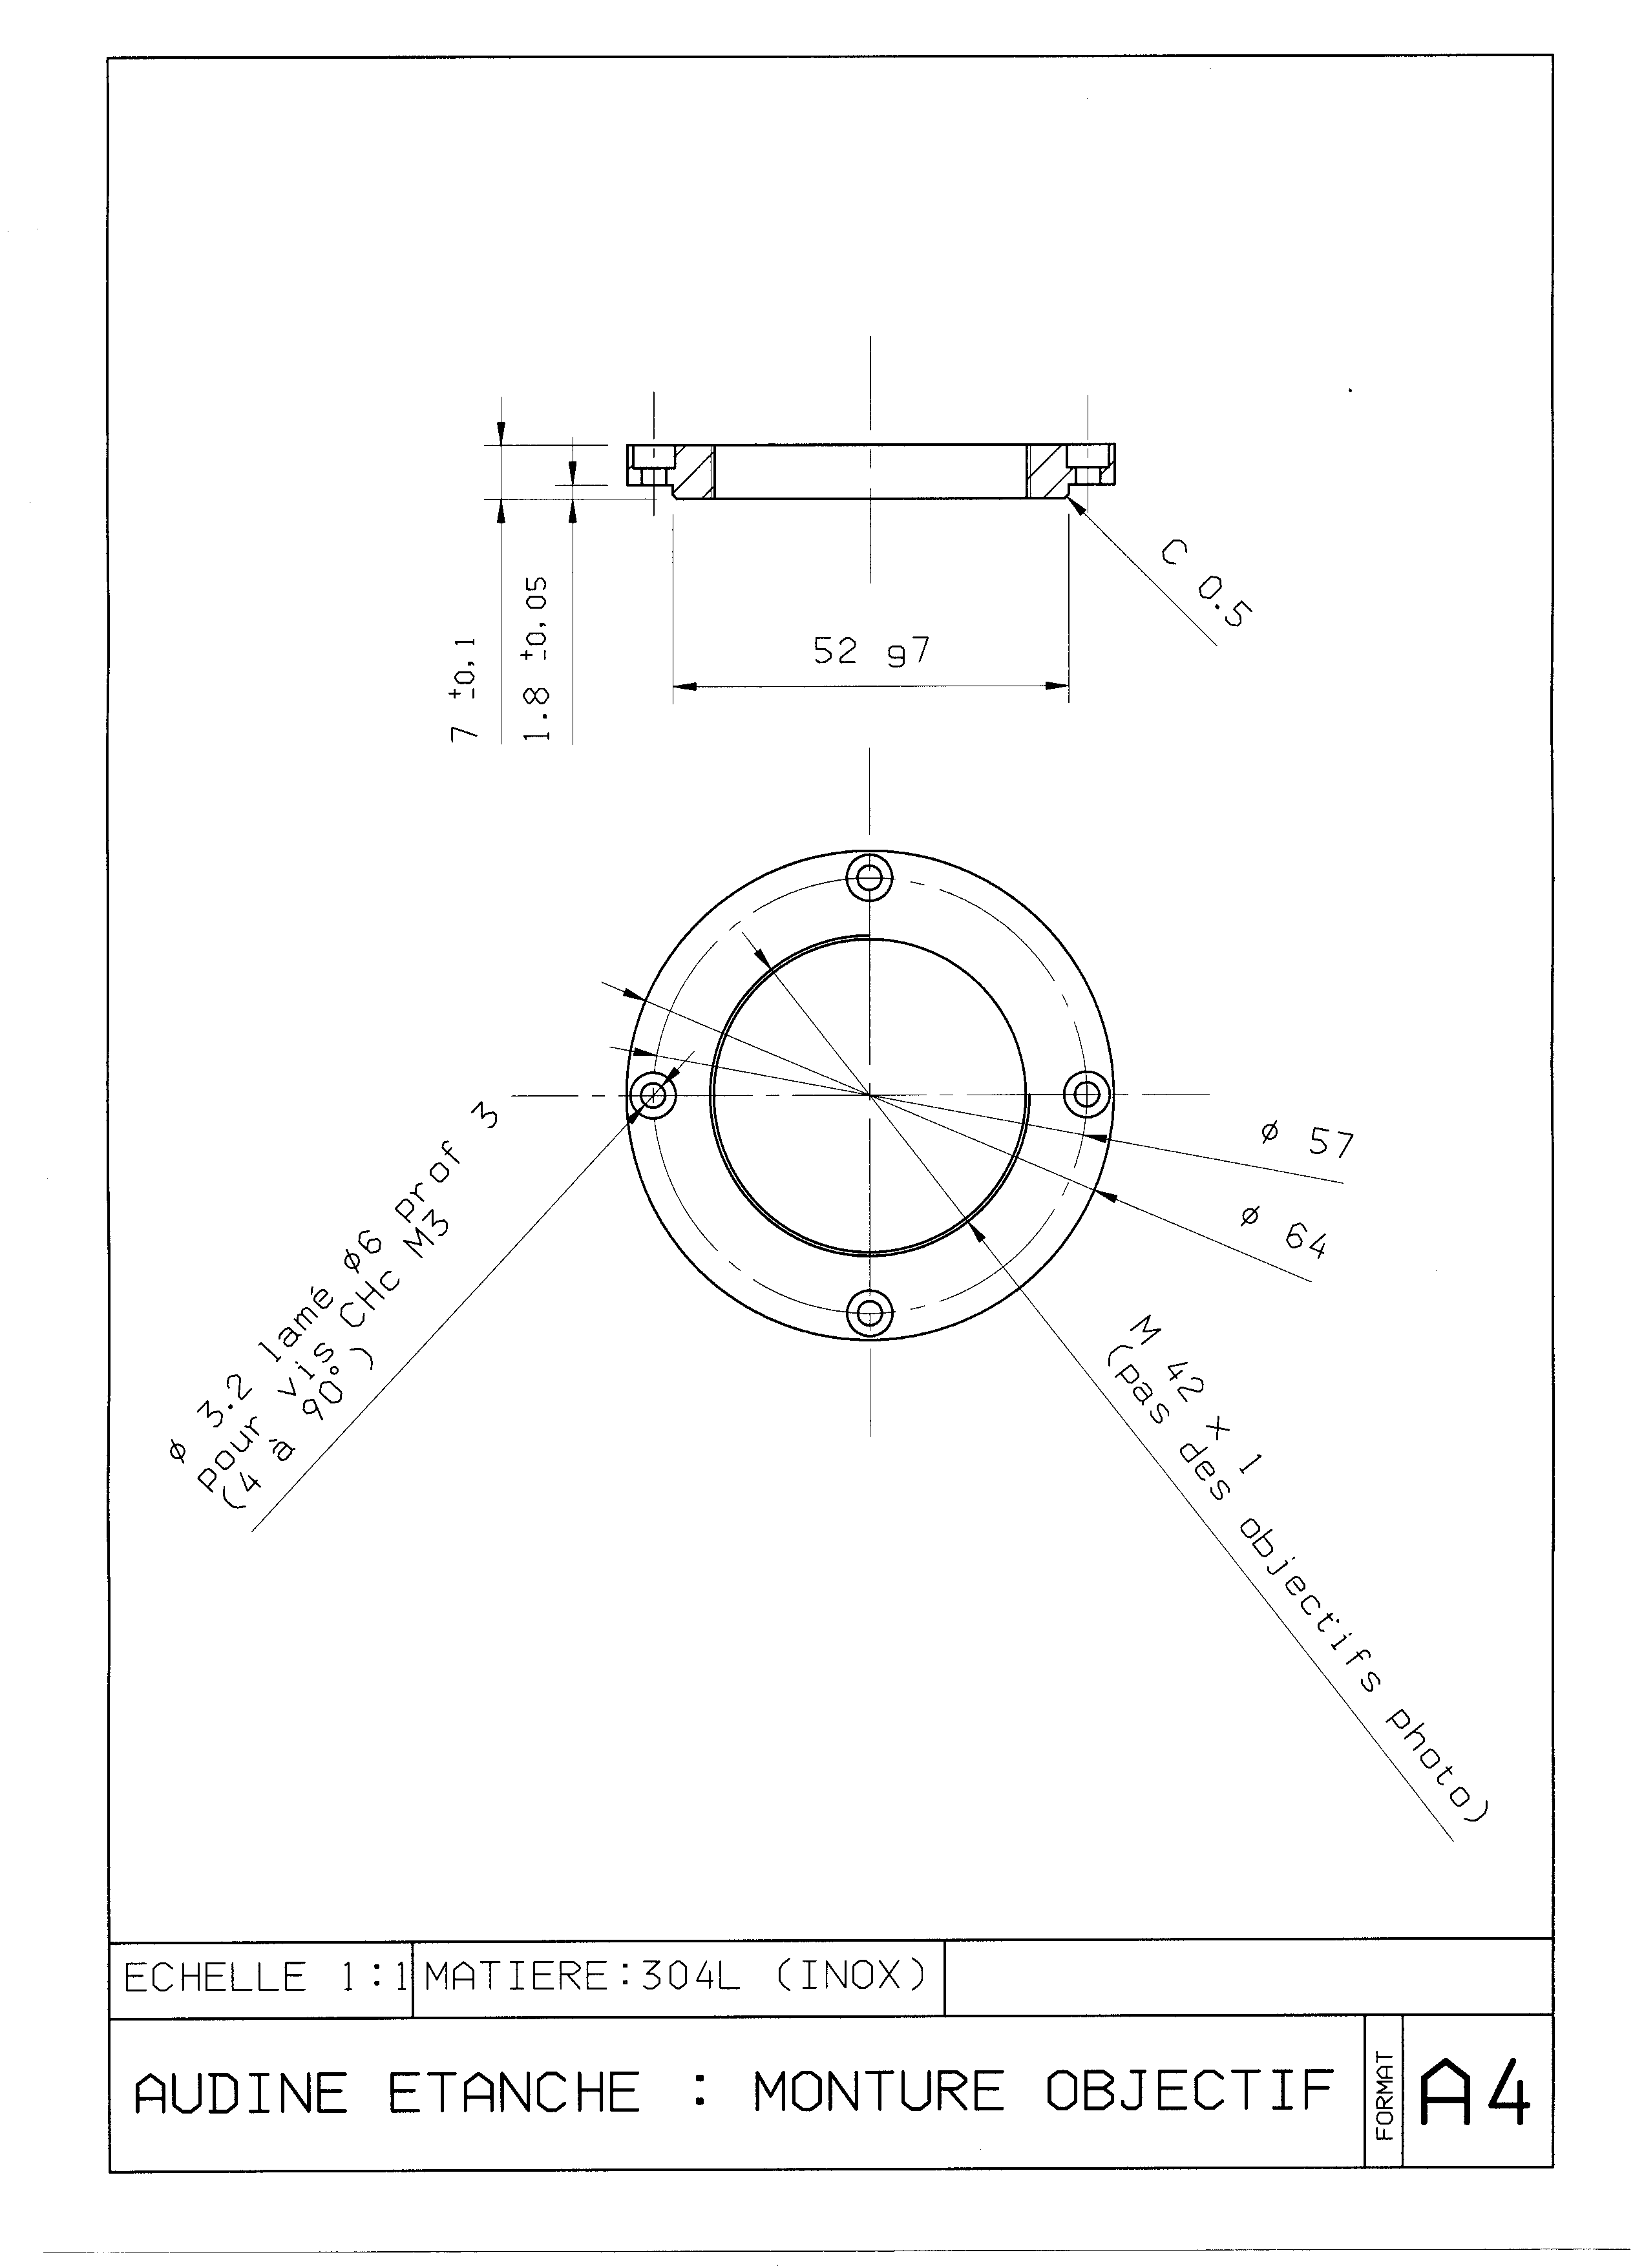
Download lens mount drawing DXF (420 Ko)
Cold drain
Download cold drain drawing GIF (68 Ko)
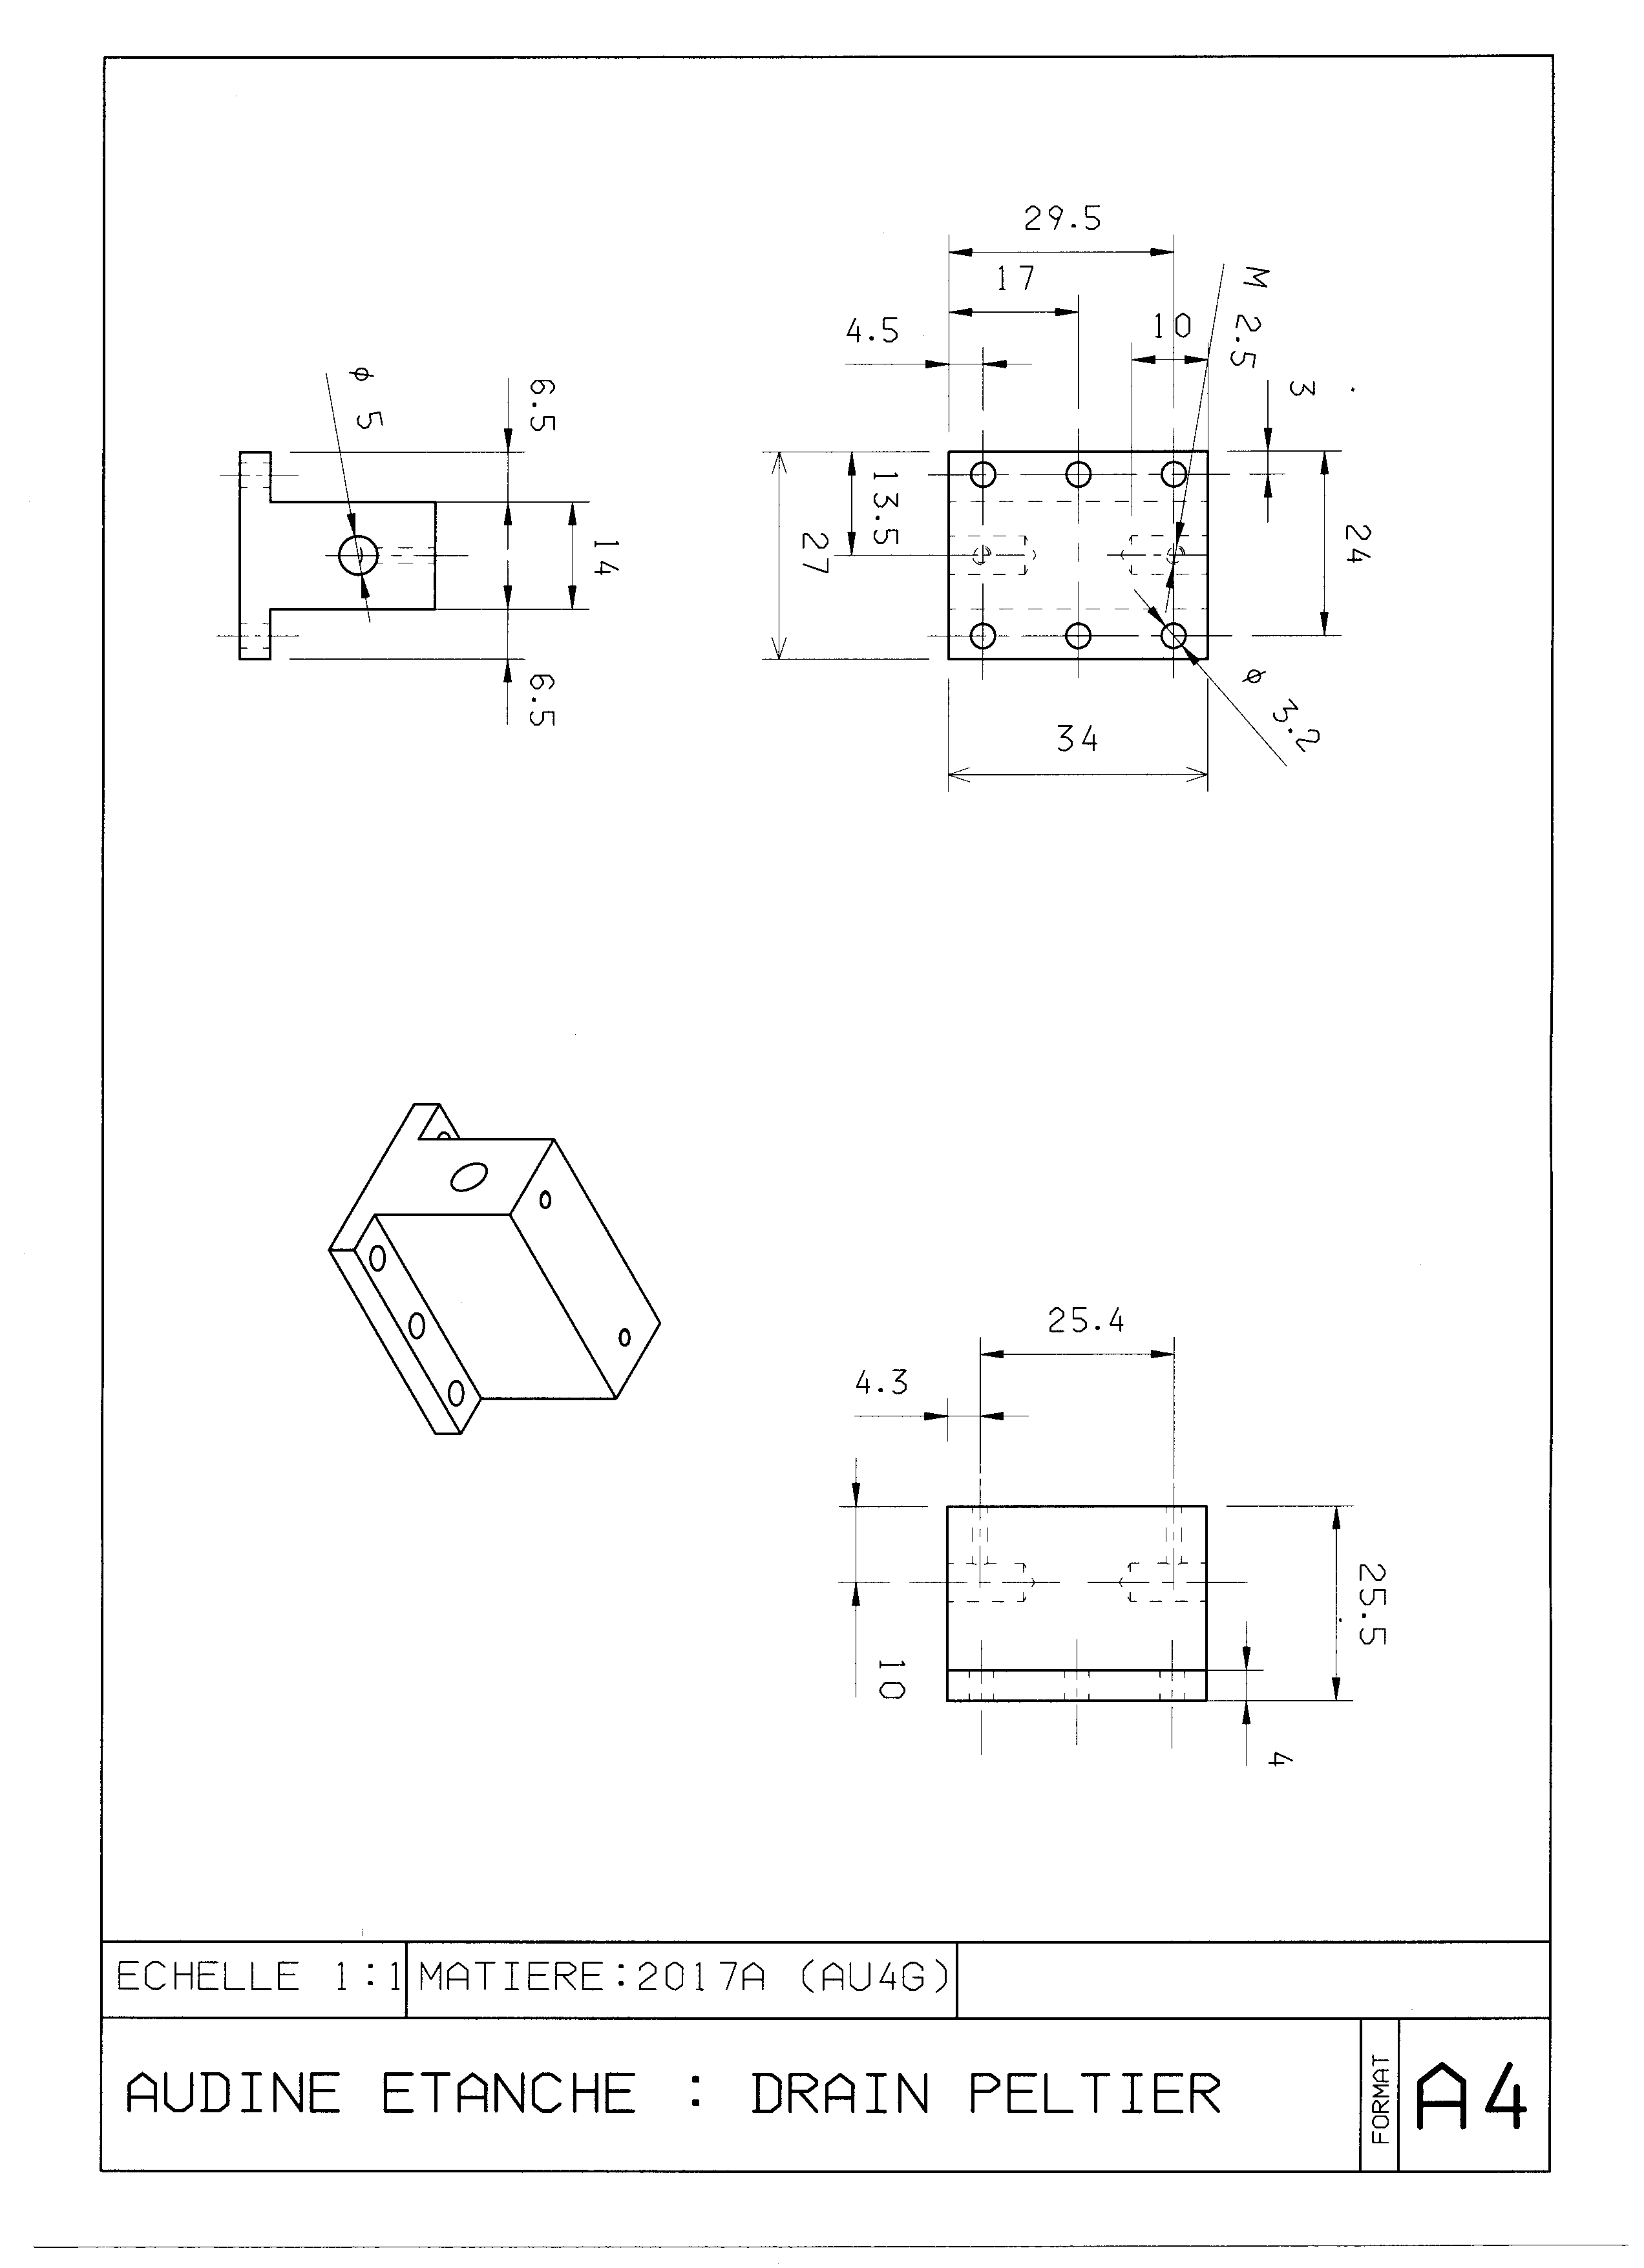
Download cold drain drawing DXF (81 Ko)
Cooler
Download cooler drawing TIFF (96 Ko)
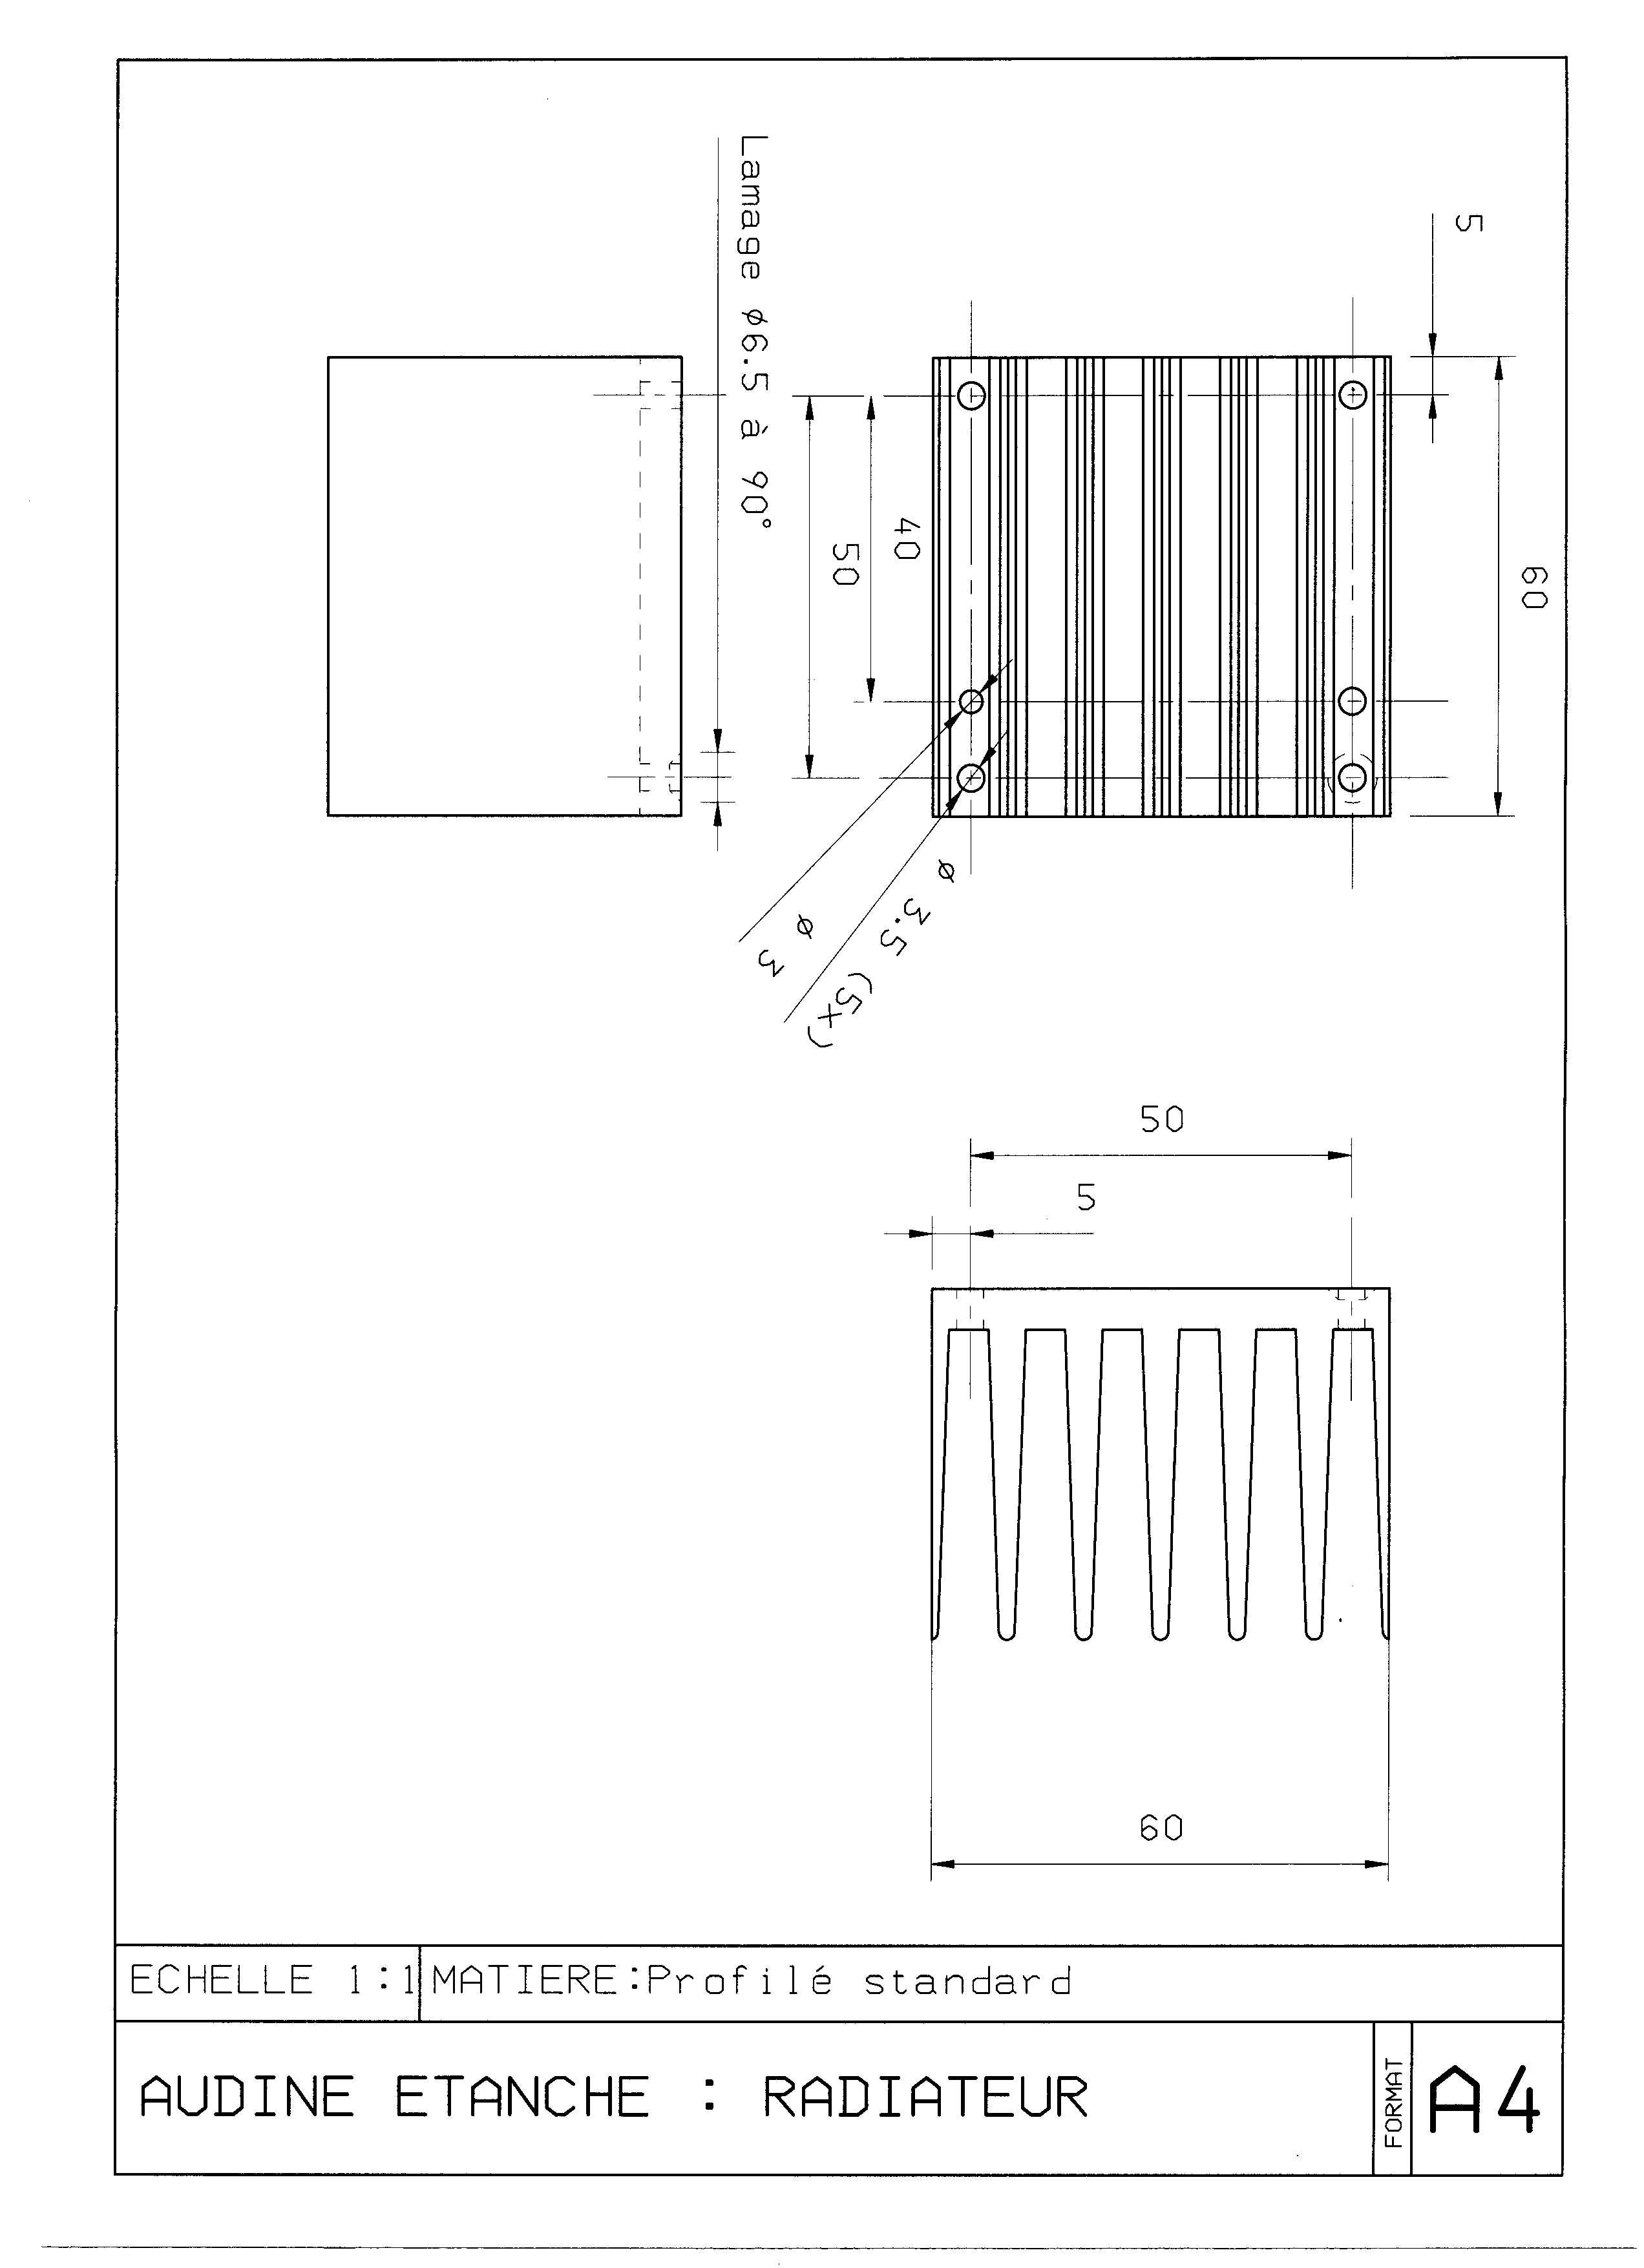
Download cooler drawing DXF (57 Ko)


If you have any remarks or critical looks about this page, please don't hesitate !!