by Christian Buil
The Solar Explorer - October 25, 2023
by Christian Buil
The Solar Explorer - October 25, 2023
Stars

Star'Ex is an extension of the Sol'Ex instrument. It is proposed to realize spectra of stars (other than the Sun), nebulae, comets, galaxies, quasars... Star'Ex, the "Star Explorer", opens wide the doors of astrophysics, but it also reveals a formidable and exciting vector of discoveries for itself. It is a spectrograph that can be used on a small telescope of 60 mm diameter as well as on a much larger telescope. The spirit is the same as for Sol'Ex: you are invited to build the device (as simple as Sol'Ex), to understand how it works (it is not difficult), to master it (it goes fast), to have fun (for a minimal financial cost, which is also part of the fun) and to share your observations (so much there is to do) The performances of the Star'Ex spectrograph and its variations have nothing to envy to more expensive equipment. The difference is yours to make!
For a "Solar Explorer" to become technically a "Stellar Explorer" you just have to make a small 3D printed star pointing module. It will take you one day of your time. For the rest, let yourself be guided by the explanations given in this page and the numerous achievements of amateurs to discover the fascinating world of astronomical spectrography. This is the promise of Star'Ex. You can choose a high spectral version, a kind of magnifying glass to scrutinize the intimacy of the spectrum of stars, a low resolution version to decode the light of stars located at the edge of the universe, or even a version specialized in the study of the infrared spectrum, which will tell you more about the atmospheres of planets and even your green plants! All the optical elements are available as kits - see the Contact page of this site for their composition. En standard, vous avez en particulier la possibilité d’assembler un Star’Ex dit «Haute Résolution» spectrale (Star’Ex HR), ou un Star’Ex «Basse Résolution» spectrale (Star’Ex LR). In particular, you have the possibility to assemble a "High Resolution" spectral Star'Ex (Star'Ex HR), or a "Low Resolution" spectral Star'Ex (Star'Ex LR).
This section of the site describes how to build the pointing module to be added to Sol'Ex, how to adjust it and helps you to take your first steps in using Star'Ex. But the instrument is not enough by itself: your discovery will be extended by the way to process the spectral data and interpret them. Many software have been written for this purpose, powerful and user-friendly, like VisualSpec or ISIS. But this will also be the occasion to discover a brand new one, specially written in the frame of the Sol'Ex/Star'Ex project: specINTI, a bit the equivalent of INTI for solar image processing! If your curiosity leads you to the spectrographic world you will have no regrets during this trip, for sure!
Part 1: Make the pointing cube
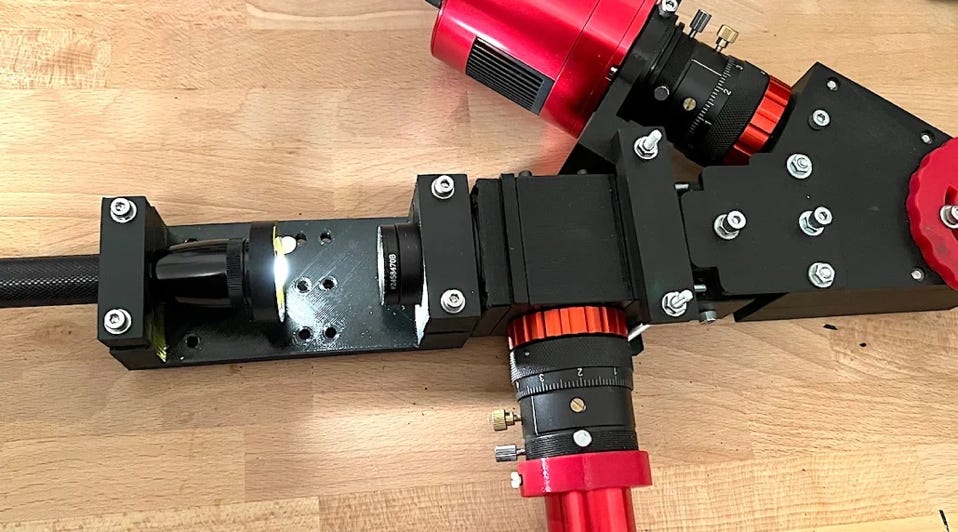
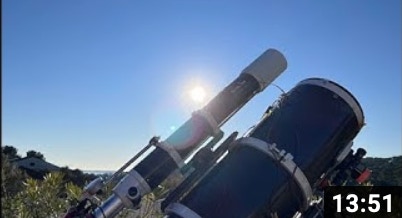
The image below shows the Star'Ex instrument in a situation for observing the stars. We identify the guidance / pointing module right at the entrance, look like a cube, which makes the link to the telescope, Sol'Ex in itself is unchanged, but we notice an acquisition camera whose detector is cooled for a better performance on weak objects (recommended, but not compulsory for the first weapons).
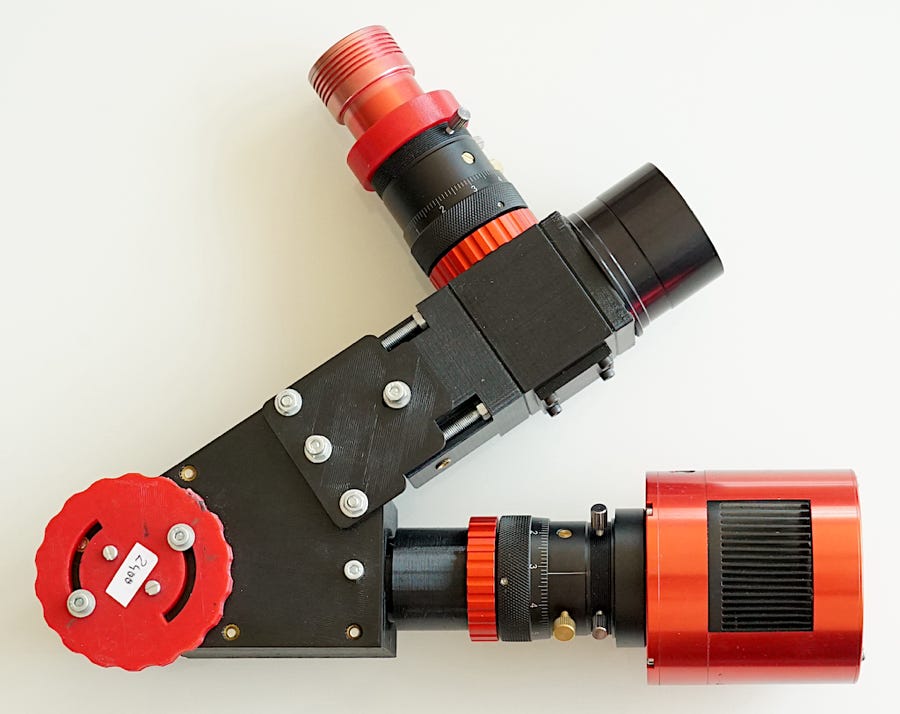
Complete Star’Ex with its guidance camera and a spectra acquisition camera with a sensor cooling system.
The guide cube is important because it will allow you to aim at the star so we are trying to take the spectrum and position it on a slit as narrow as 10 microns at the focus of the telescope. I show how it is done in a video to follow.
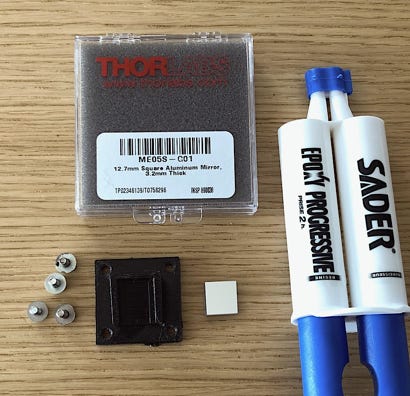
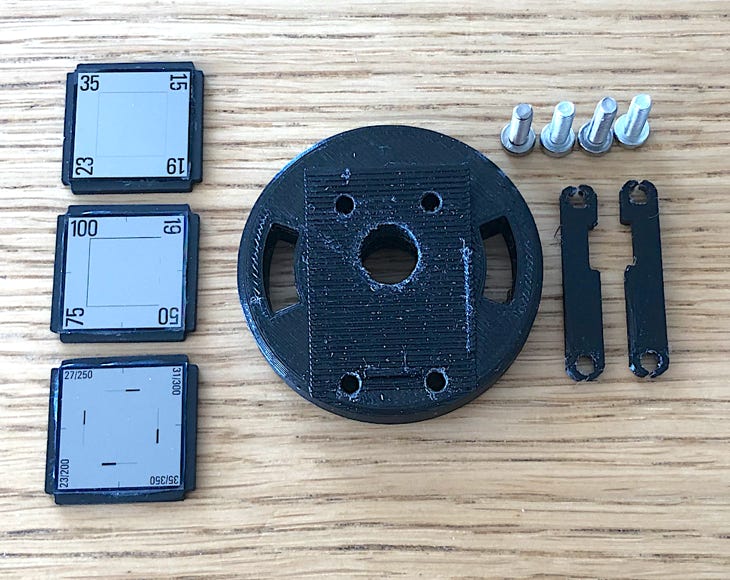
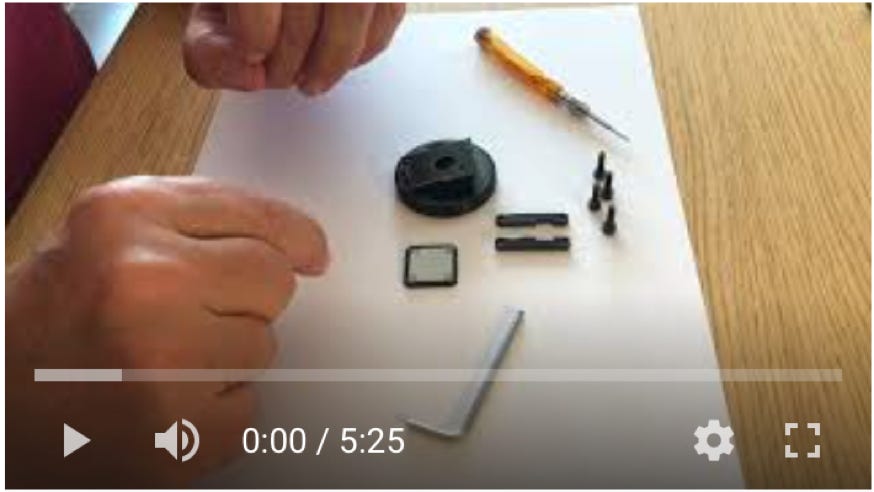
A handful of optical components is required to make the guide cube. They are included in the Sol'Ex basic kit, which you can obtain from Shelyak (see "Contact" section):
- two lenses of 12.7 mm in diameter and 50 mm in focal length, which produce a quality and permanent image of the Sol’Ex slit on the guide camera.
- an aluminized mirror with a side of 15 mm.
The optical diagram of the guidance / pointing system is as follows:
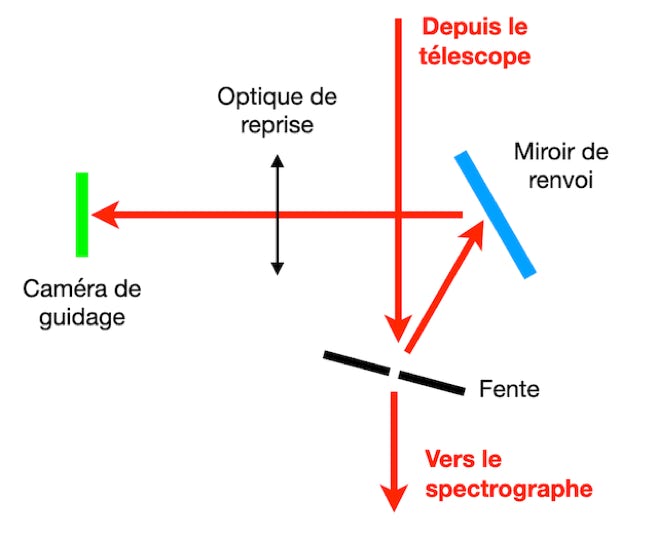
The sharp image of the star field focused on the slit by the telescope is reflected by the slit (except at the location of the slit). This is the reason why the Sol'Ex slit is tilted at 30 ° = after reflection, the light is directed sideways on a small deflector mirror. The latter reflects the light towards the two doublets of 50 mm focal length, positioned head-to-tail, and which form a clear image of the slit on the guide detector. These two lenses form an image carrier, similar to the principle found on periscopes, for example.
The assembly of these optical elements is very simple, it does not require any adjustment.
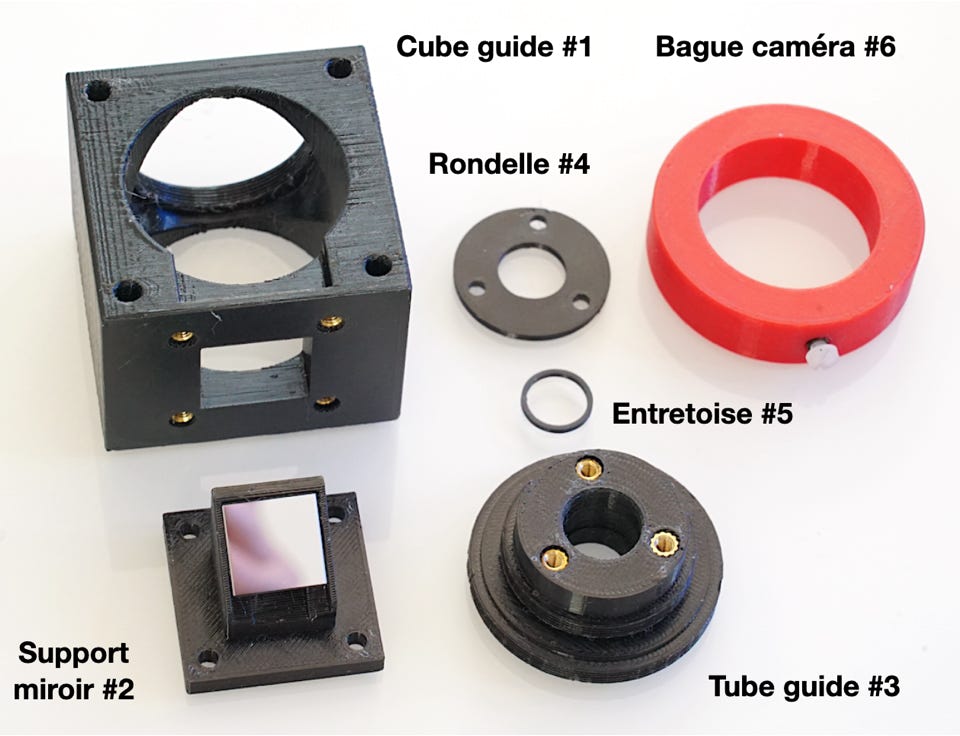
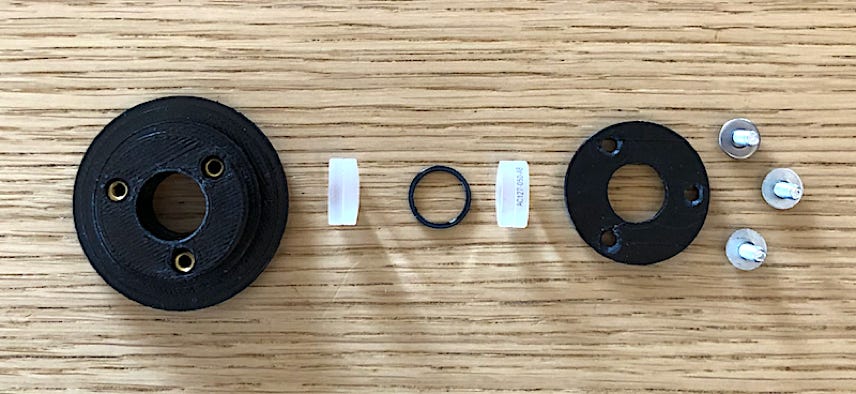
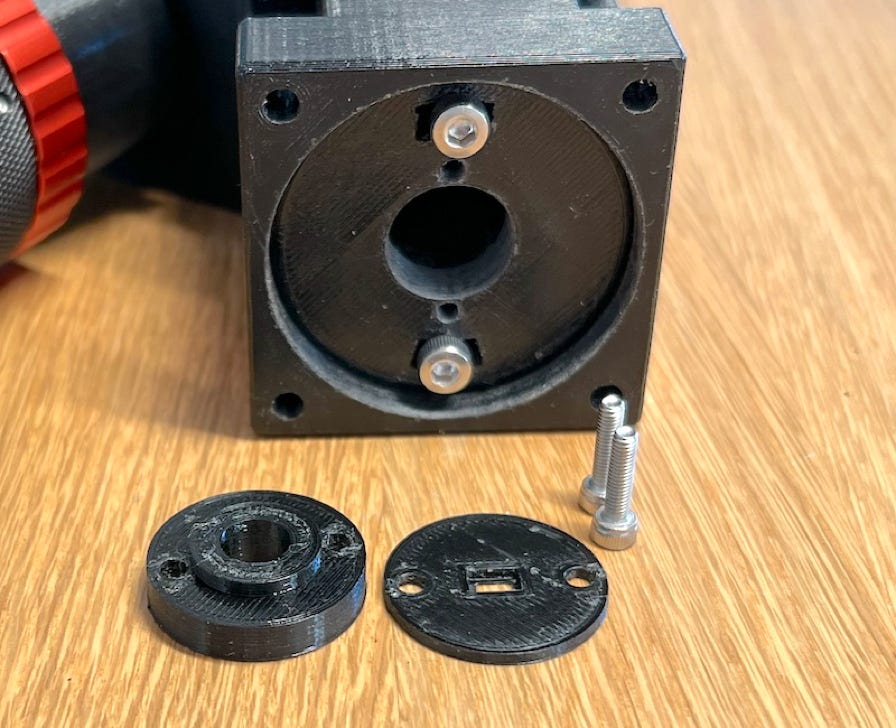
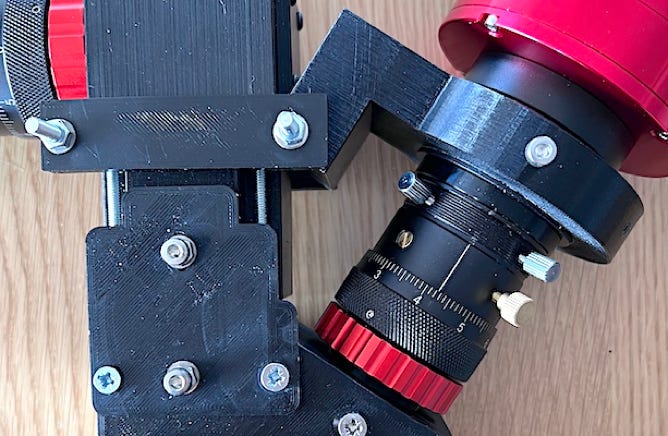
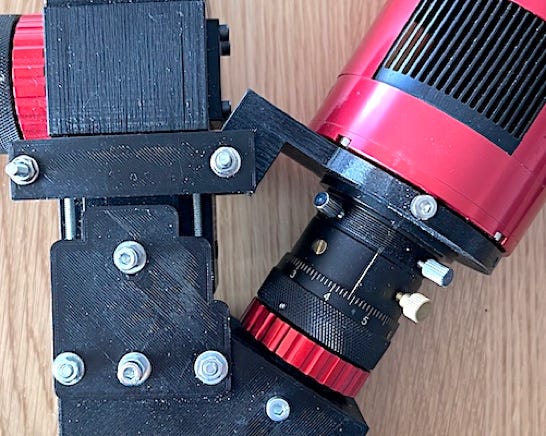
On the mechanical side, the image below shows the parts to be produced in 3D printing. They are relatively few:
You can download the corresponding STL files by clicking on the following link (ZIP archive): guidage_kit.
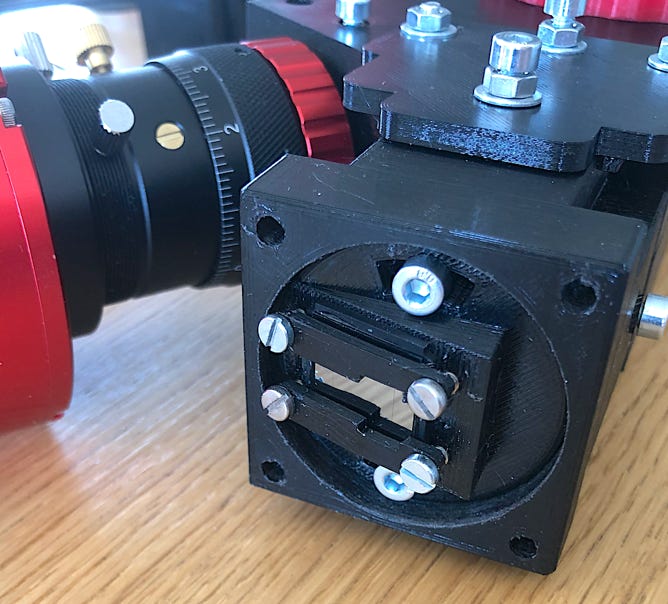
You have noticed, the guidance system includes a camera, and also a focusing system, which is undeniable comfort. It can be seen that the production of the guidance module still requires a certain financial investment, even if initially, the guidance camera can be replaced by a guidance eyepiece (guidance is then done by eye, to the "old" in a way!).
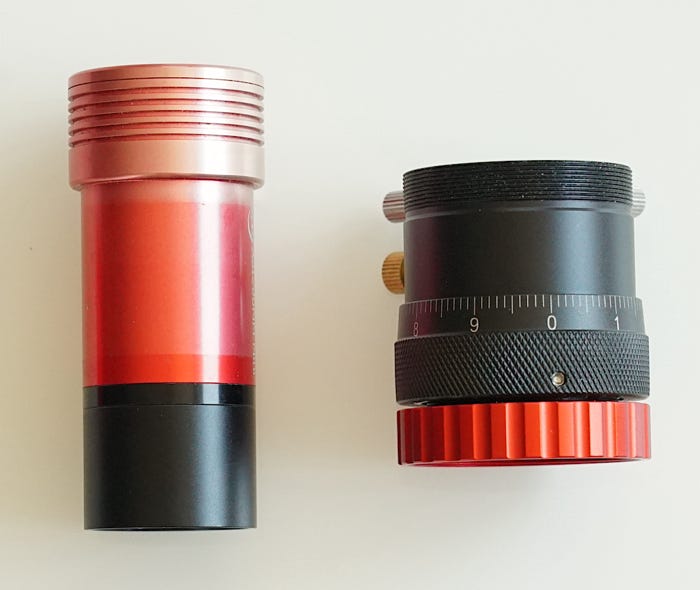
A miniature camera model does the trick perfectly. For my part I use an ASI290MM mini camera, but we can easily find the equivalent at QHY or elsewhere. The focusing device is the helical system in the example on the right, but more economical models, or even 3D printed models can be used.
Once these parts have been printed, you can proceed with assembly.
There are 7 RUHEX M3 inserts to be fitted in the parts, 3 in the part "guide tube # 3", and 4 in the part "guide cube #11". The procedure is described in detail in the "Construction" section of Sol’Ex.
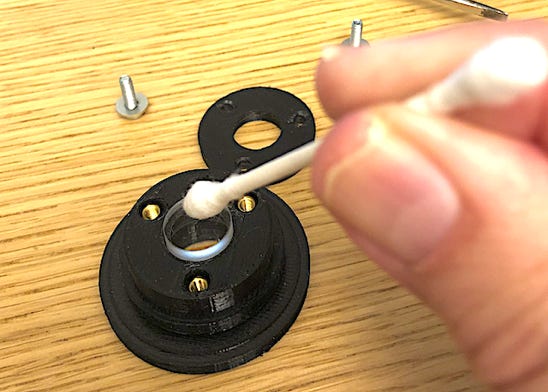
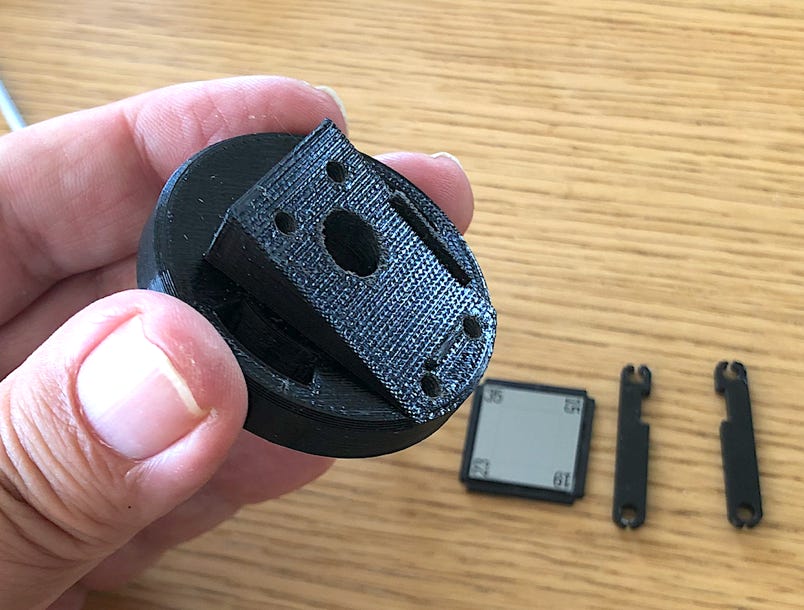
The proper assembly requires gluing the 15 mm mirror in the inclined support # 2. This is the only part that needs a little attention. The assembly of the lenses amounts to a simple stacking, taking care in the direction of assembly:
The following photographs show the appearance of the guide tube that integrates the two lenses.

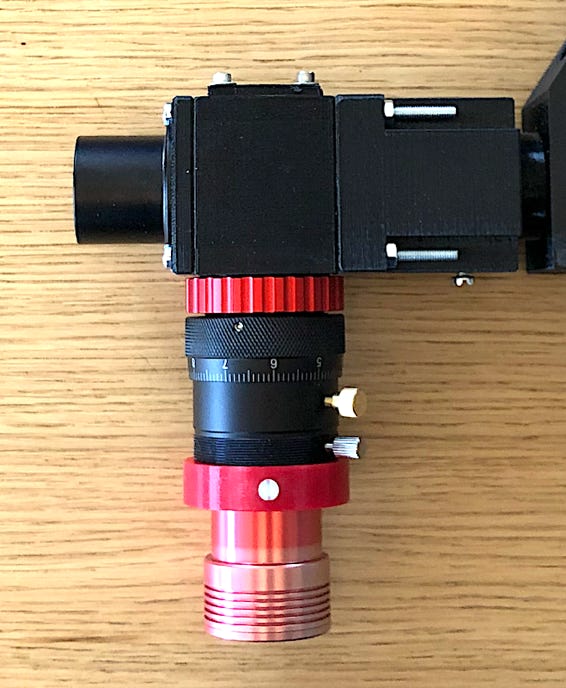
The following photographs show the appearance of the guide tube which integrates the two lenses.


Part 2: Adjust the guiding camera
Before heading towards the telescope or telescope, a good idea is to set the guiding / pointing cameras by day and on the table. The aim is to achieve a sharp image of the slit on the detector and to orient it correctly. Compared to imaging the Sun with Sol'Ex, with Star'Ex the performance in terms of sensor reading speed is not a concern, the slit is oriented vertically to benefit from the maximum width of the sensor according to the spectral axis and thus cover an enlarged spectral domain.
The following video explains how to make this adjustment.
Part 3: First Star’Ex observations
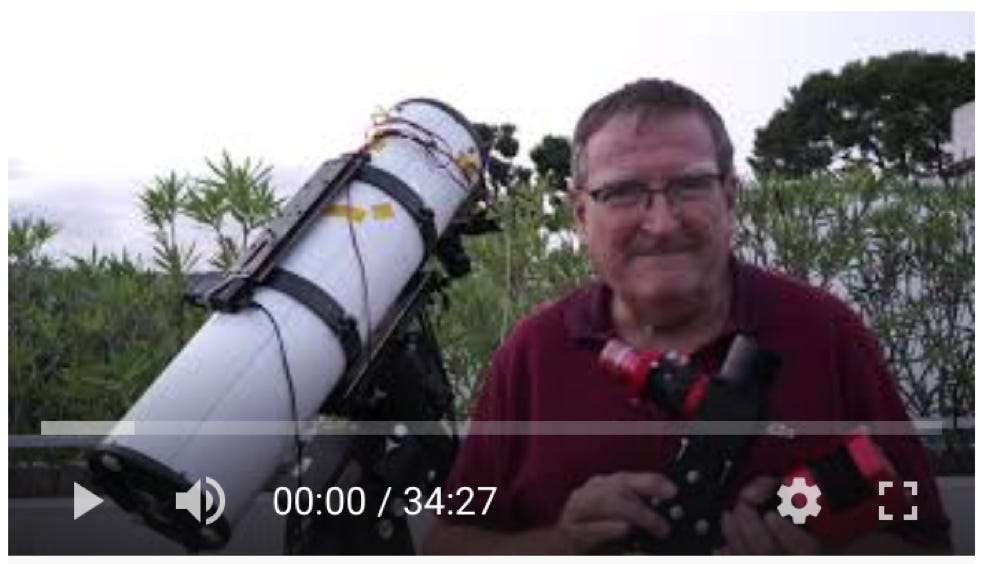
I propose to put you in the situation of using Sol'Ex in a configuration as close as possible to that of the Sol'Ex kit: a slit of 10 microns, a network of 2400 lines / mm and the collimator and camera objectives of 80 mm and 125 mm respectively. Likewise, for the camera, we select an ASI178MM (or equivalent), common in solar observation, but not having a sensor cooling system. This last point is potentially critical when it comes to capturing the spectrum of stars, faint objects that sometimes require exposures of several tens of minutes. Here we are far from the possibilities of a camera with a cooling system: the maximum exposure time is at most that which does not allow exposures of 3 to 5 minutes at most, with the result of very strong thermal noise. Yet this is how I suggest you get started with stellar spectrography, if you are in this situation. There are good surprises at the end of this path and a universe that opens up. You can watch the following film on Observational Spectrography with Star'Ex to learn more.
This video explains how to make these first spectra with a digital camera, how to position a star on the slit, how to calibrate the observations ...
As indicated above, the use of a camera equipped with a sensor cooling system will make it possible to observe stars of shards much weaker than that of Vega./ Among the other options that allow you to go to this direction the choice of the grating (engraving density) as well as the width of the slit (which increases in proportion to the diameter of the telescope).
For example, here is the spectrum of the symbiotic star CH Cyg observed with the video configuration (very high spectral resolution), except that a cooled camera (ASI183MM) is used, which changes a lot of things:
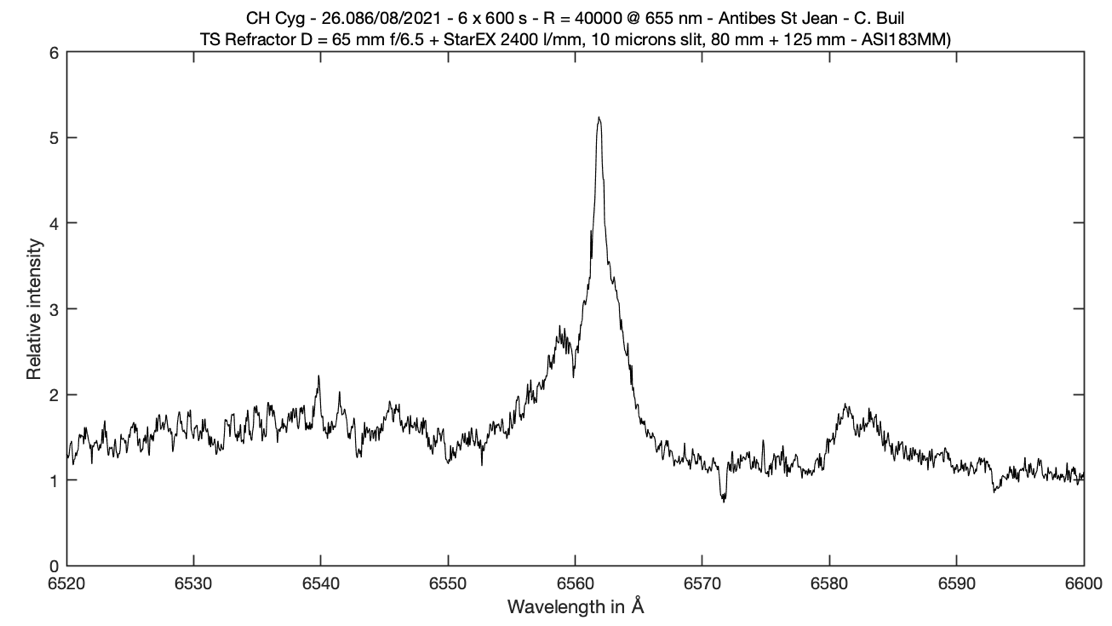
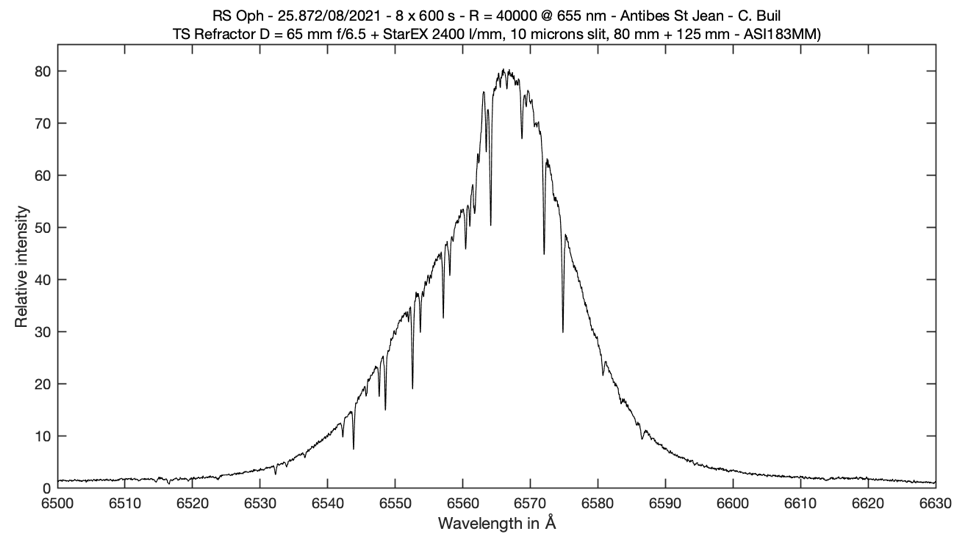
Detail of the very high resolution H-alpha line (R = 40,000) in the spectrum of the star CH Cyg (magnitude close to 5), produced with a telescope only 65 mm in diameter.
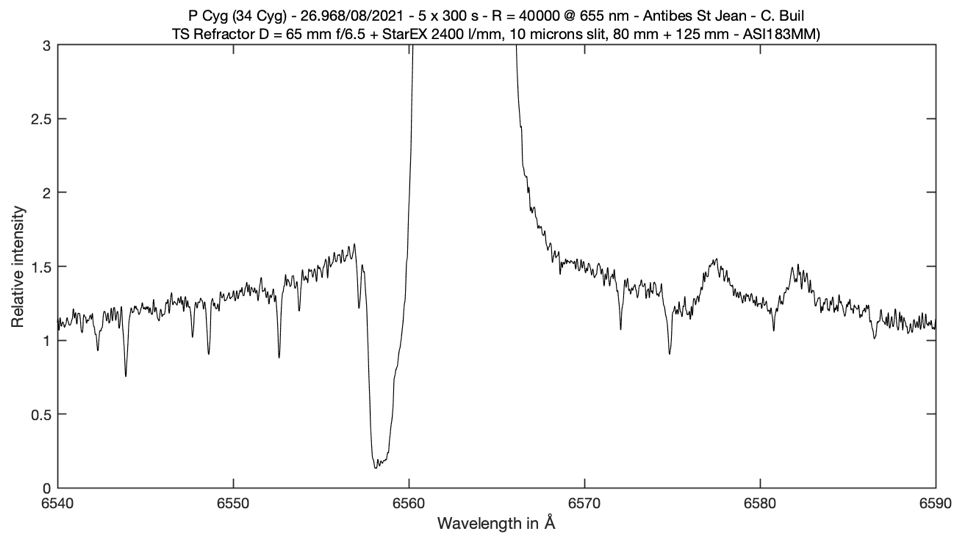
The following spectrum, of the star P Cyg (34 Cyg), still taken with a 65 mm diameter telescope, is remarkable in the sense that it allows to detail the heart of the blue wing of the H-alpha line, may be a first in amateur astronomy, which demonstrates the potential of Star'Ex, which is also a research instrument which rises to the level of a much more expensive instrument:

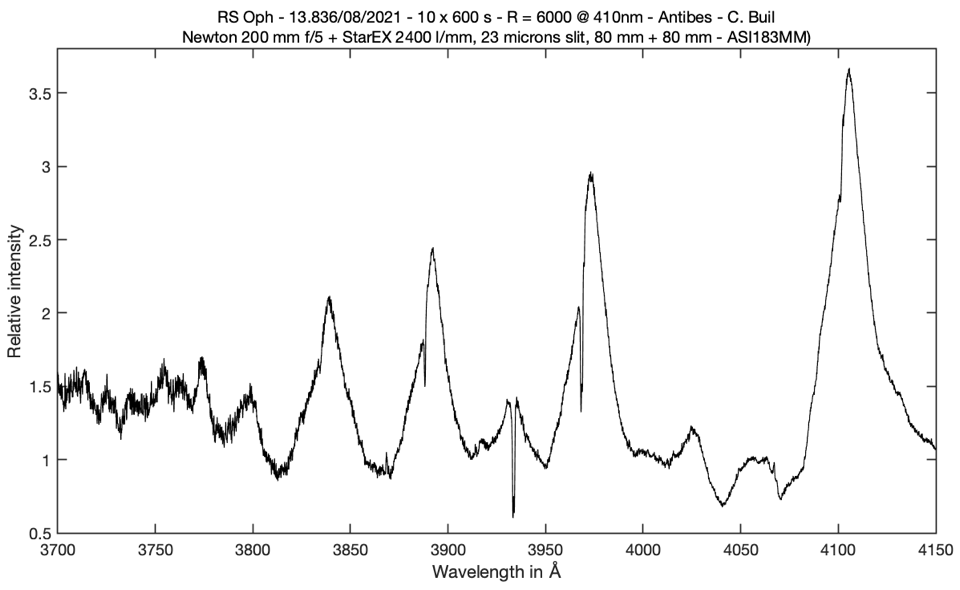
Use of Sol'Ex solar configuration (10 micron slit, 2400 t / mm grating, 125 mm camera lens, small telescope) used to detail H-alpha lines of the star RS Oph during the outburst of 2021 - an observation made possible by the use of a mid-range cooled camera (ASI183MM):

Some of the options that can be used with Star'Ex are described below.
Part 4: The options
Part 4.1: Use a Lhires III slit
Designing a spectrograph like Star'Ex is a matter of compromise. In part 3 (see video) I showed that this instrument can observe stars with a slit of only 10 microns wide. The performance in spectral resolution is then remarkable (close to R = 40,000). But however on one condition: use of short focal length telescope (and relatively modest diameter). As soon as the focal length approaches one meter, the slit blocks too much of the light rays before they reach the detector due to the enlargement of the image spot induced by turbulence or tracking errors. .
This is where the trade-off comes in: you have to sacrifice a bit of spectral finesse to compensate for increase photons flux into Star'Ex. The solution is simple: you have to use a slit larger than 10 microns. You can't have it all simultaneously.
It is perfectly possible to combine Star'Ex with a wide choice of slits, with widths that even allow our instrument to be mounted on telescopes that can be 1 meter in diameter! I took care of this, because my desire is that the Sol’Ex / Star’Ex project be as flexible as possible.
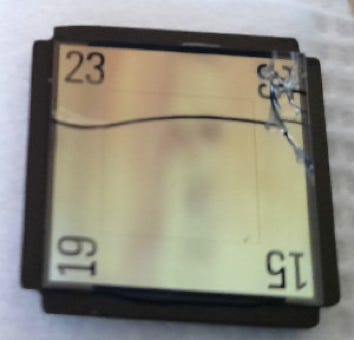
To do this, I chose to use the set of slits provided for the Lhires III and LISA spectrographs from the Shelyak company. These slits can be ordered from the latter company. They are based on the same principle as the 10 microns slit in your possession for Sol’Ex, with high precision photolithography etched on a thin chrome layer (the substrate is a thin transparent glass blade) . Shelyak references of available slits: SE0116 (recommanded), SE0122, SE0194. Your only job is to print a specific support ring that replaces the current Sol’Ex support ring .
The STL files (slit support and two flanges) of the parts allowing the use of the Shelyak Liters III slots can be downloaded by clicking on the following link: fente_kit..
How to mount and adjust these slits is explained in the video below.
Be very careful when tightening the two clamps as the slit is a fragile glass object. These clamps are only used to obtain a light hold. Tighten the 4 screws in small increments to obtain a simple pressure of the clamps on the slit. In no way should you tighten them strongly, as this could lead to breakage:
Part 4.2: The telescope and camera
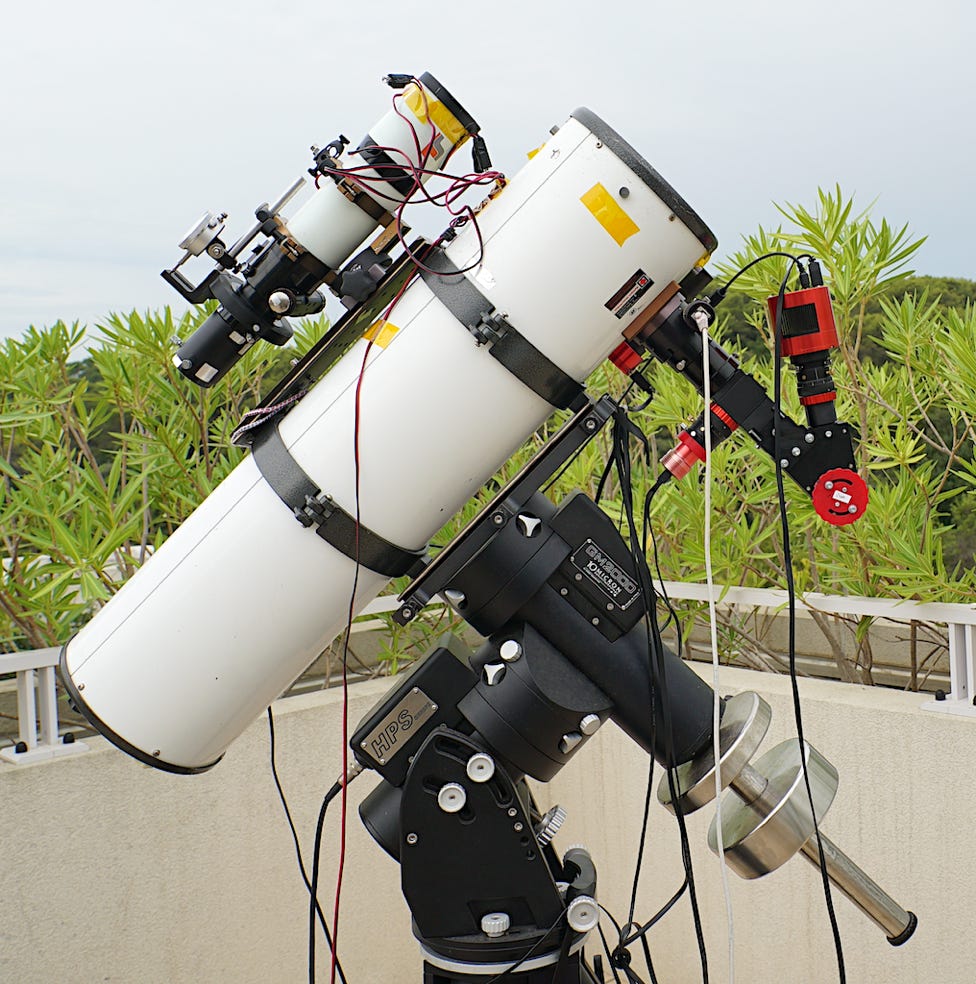
You can very well use Sol'Ex at the focus of a telescope. Compared to a refractor, the gain will of course be very significant thanks to the larger collecting surface and the absence of chromatism. A Ritchey-Chretien telescope open at f/8, for example, will do very well. If you have a Schmidt-Cassegrain open at f/10, I recommend using it as it is, without adding a focal reducer because of the optical defects that it introduces, which are clearly visible in spectrography. With a Newton open at f / 4.5 or f / 5 (see photograph below), I recommend adding a Barlow lens, however, to bring the aperture between f/8 and f/10.
La largeur de la fente à l’entrée de Sol’Ex détermine le pouvoir de résolution spectral atteint (voir la section « Théorie »). Mais c’est le seeing et la précision de guidage que permet votre monture qui va en fin de compte définir la largeur de la fente. Depuis un observatoire normal pour les amateurs, je recommande que la largeur angulaire de la fente sur le ciel soit comprise entre 3 et 4,5 secondes d’arc.
When using a 2400 lines/mm grating, or even 1200 lines/mm, the internal vignetting of Star'Ex is quite severe if one is using a fast telescope, which causes a loss of signal (see the “Theory” section). The situation is even more critical with a reflectiong telescope, because the image of the secondary mirror projected onto the grating occupies a significant portion of the surface grating. Since the instrument is more open than f/6.5, I recommend for stargazing to add a Barlow lens in the optical path which artificially increases the focal length of the refractor or mirror telescope. A Barlow so the magnification is 1.5 to 1.8 is often a good choice.
The difficulty when adding a Barlow lens is the appearance of chromatic aberration, especially in the blue part of the spectrum:
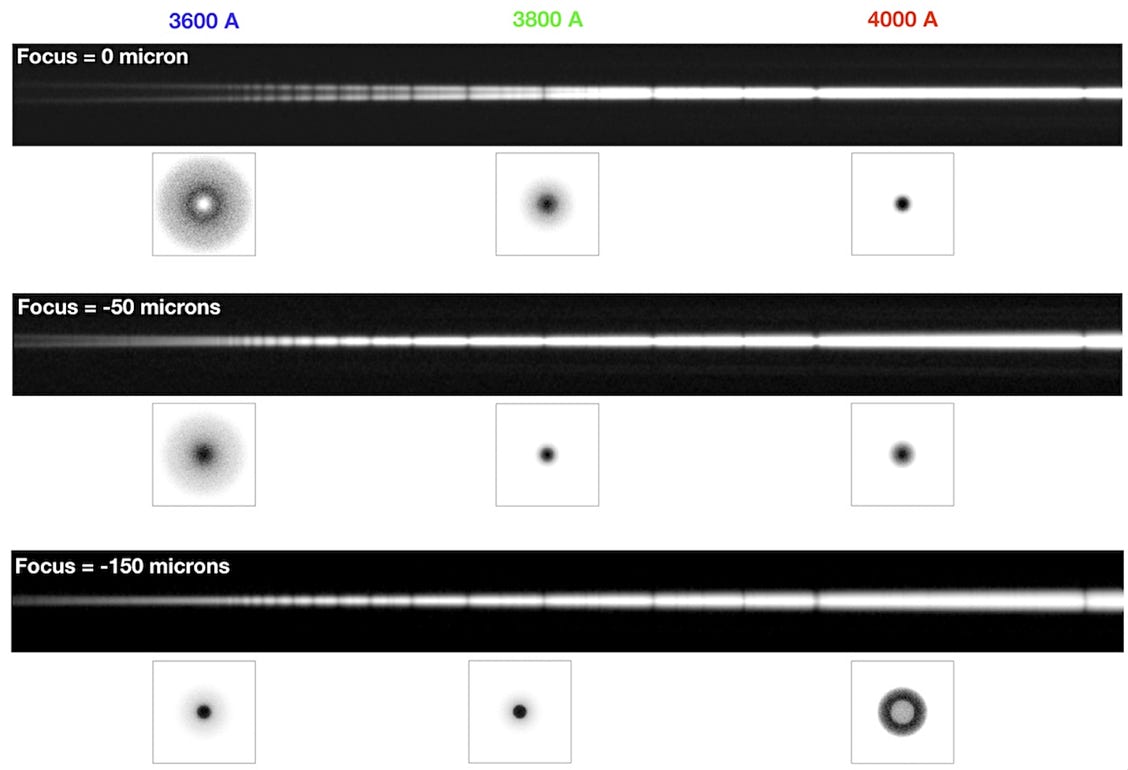
Observation and optical simulation with an old X2 Barlow lens model (CLAVE) on a 250 mm f/ 4. Newton telescope. The star observed is Deneb (alpha Cyg). We notice the widening of the 2D trace of the spectrum going towards the ultraviolet. By adjusting the focusing (50 microns, 150 microns, ...) it is possible to refine the trace at certain wavelengths, but unfortunately to the detriment of other parts of the spectrum. This is a typical chromaticism defect.
The APM X2.7 lens model, described as "apochromatic" by the manufacturer, reduces this aberration by using special glass. I was able to see this by theoretical analysis and by observation:
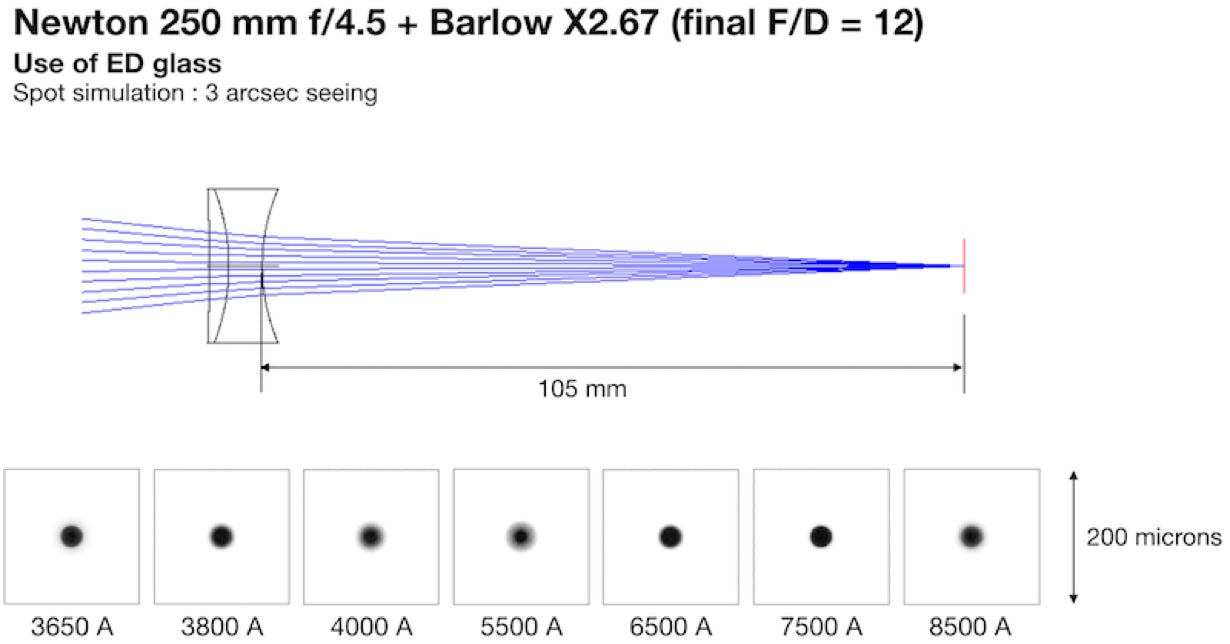
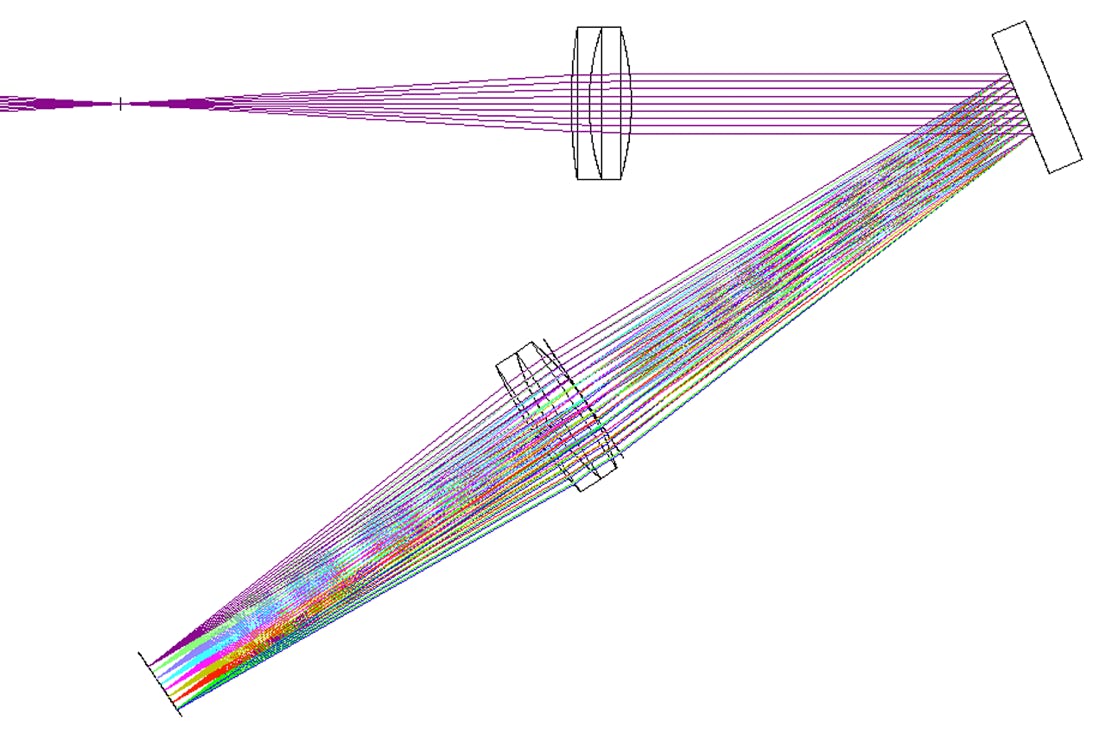
Optical simulation of an APM X2.7 type Barlow lens used on a f/4.5 Newton telescope . The color correction is very good, with uniform image quality from ultraviolet to infrared. An excellent result, especially for spectrography.
Unfortunately, the short focal length of the APM X2.7 lens makes it difficult to use when aiming for a magnification of around 1.6 to 1.8. Recall that the magnification A of a Barlow is given by the formula:
A = 1 - d / f
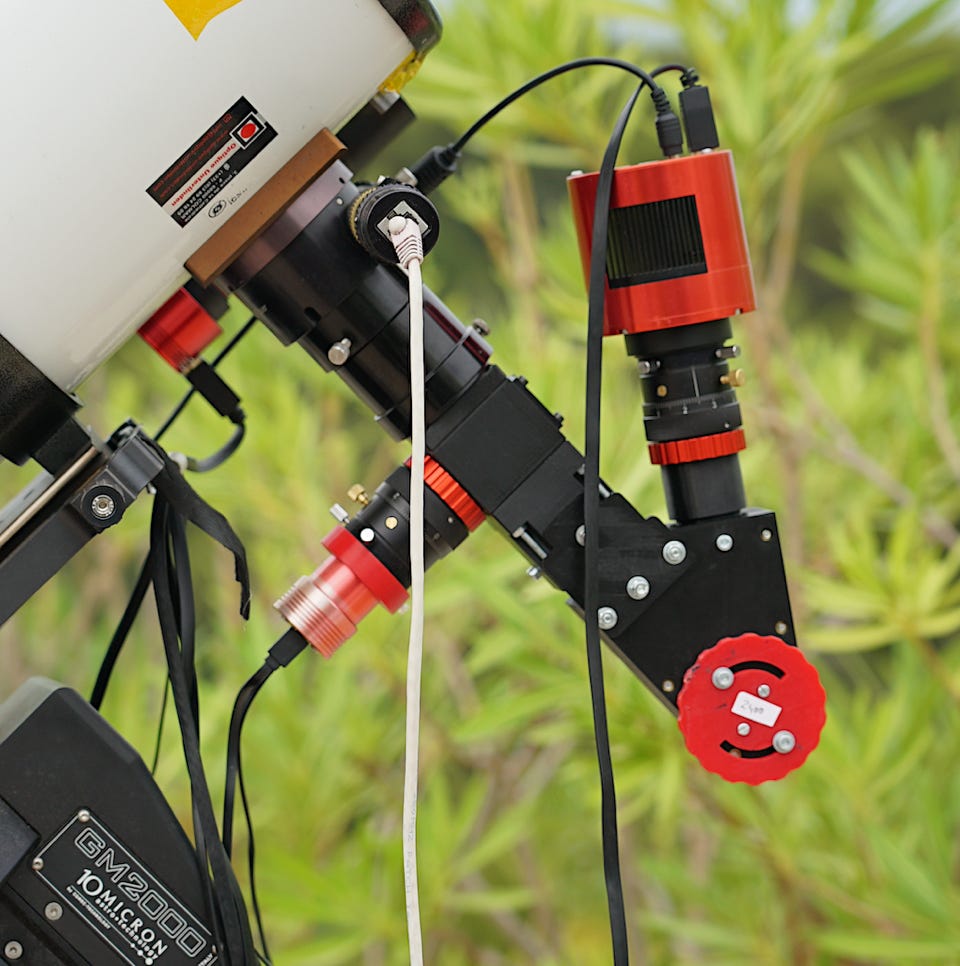
with d, the distance from the Barlow to the detector and f, the focal length of the Barlow. In the case of the Barlow APN, the focal length is f = -60.3 mm and will easily verify that the lens must be approached very closely to the slit to achieve the desired magnification of X1.6, which generates new optical aberrations (aberration of sphericity, because the component is not calculated to be used in this way). A longer focal length lens will be preferable, like the Tele Vue 1.8x with a focal length of f = -133mm, which I have had the opportunity to test successfully over a large part of the spectrum accessible to Star'Ex. In this case, the magnification of 1.6 is obtained with a lens-detector distance of 80 mm, which is relatively close to the nominal value. Notice in the photograph below that I housed the lens in the 50mm slider after making a small 3D printing adaptation piece (in the interest of having a 3D printer!).

Tele Vue 1.8x Barlow Tele Vue 1,8x at 80 mm distance of entrance slit of Star’Ex.
With a 200mm f/5 Newtonian telescope, this arrangement takes the focal length to 1600mm, i.e. an aperture of f/8, judged to be a good compromise between the (partial) reduction of internal vignetting in Star'Ex and the loss of resolution induced by increasing the width of the slit. A 23 micron wide slit here represents approximately 3 arc seconds on the sky and a 35 micron slit approximately 4.5 arc seconds. One can hesitate between these two values, the configuration with a slit of 35 microns being more comfortable during the observation, because causing less loss of flux, but reducing the spectral resolution by a factor 23/35 = 0.66 .
Taking into account the duration of exposure times in stellar spectrography, which can reach 15 to 30 minutes on individual images, the use of a camera with a detector cooling system is strongly recommended, see opposite. use of an ASI183MM Pro.
A review of some usable cameras can be found in the "Construction" section. Note that it is not in itself the level of the thermal signal that is responsible, because it is eliminated by calibration, but the noise that this thermal signal produces, which cannot be eliminated. However, we have seen that it is perfectly possible to use an uncooled camera in part 3 of this section, at a minimum to get started.
Part 4.3: The grating choice
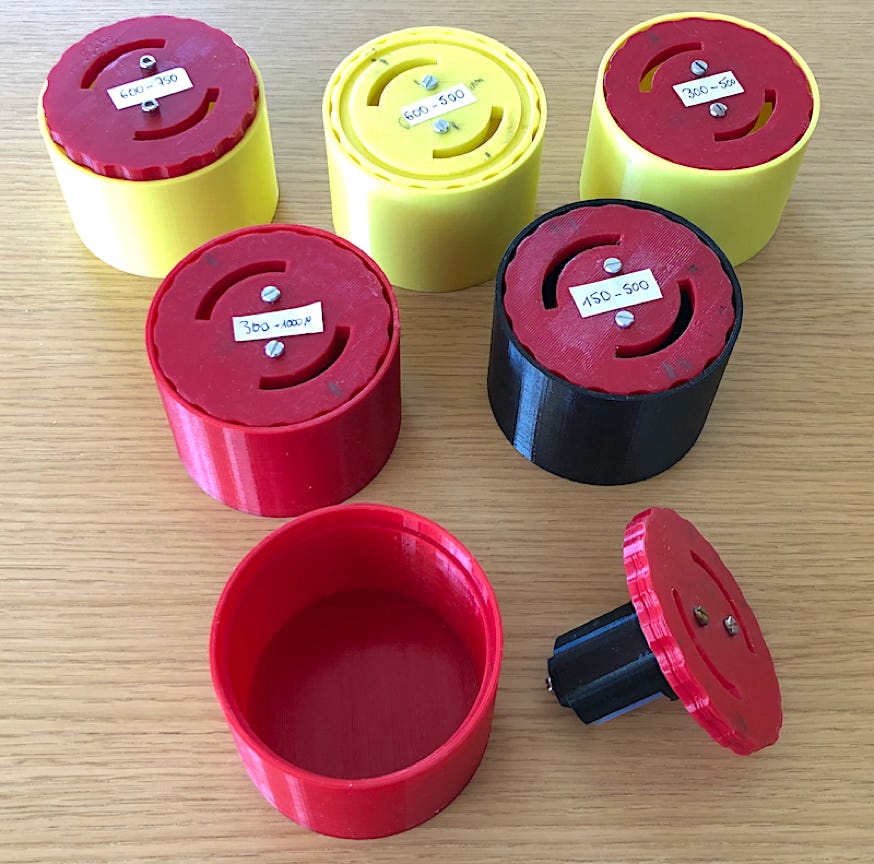
The design of Sol'Ex / Star'Ex offers the possibility of network choice, which considerably multiplies the possibilities. Any 25 x 25mm x 6mm grating can be used as is (I recommend printing as many grating support and storage boxes - see "Construction" section). We will find in the “Theory” section what to calculate the performance to be expected from the available networks.
Compatible grating will be obtained from ThorLabs or Optometrix. Orders are also possible through Shelyak Instruments, this inquire.
A grating is characterized first of all by the engraving density. The standard values are 150, 300, 600, 1200, 1800, 2400 lines/mm. The higher the etching density, the more dispersive the grating. For some applications, we will look for a low dispersion by force of circumstance, because the object to be seen is very faint. It is also possible to wish to cover a large spectral range in a single image.
Another characteristic is the blaze wavelength. Depending on the manufacturing parameters (shape of the lines), the grating can preferentially concentrate the light in a specific region of the spectrum. For visible part applications, the blaze wavelength is 500 nm. But there are also grating whose peak performance is located at 300, 750 or even 1000 nm, for example. Thus, to observe infrared (which Star'Ex is very good at), we will choose a blazed grating at 750 nm or 1000 nm.
Here are for example observations of the infrared spectrum of stars obtained with Star'Ex at a wavelength longer than 1 micron, which is really exceptional in the amateur world. We use here a weakly dispersive grating (300 t/mm), blasted at 1000 nm. The optical configuration of Star'Ex is modified for the occasion: the 125 mm objective is replaced by an 80 mm objective specially optimized optically to realize good quality spectra of the infrared region of the spectrum (see the following sections).
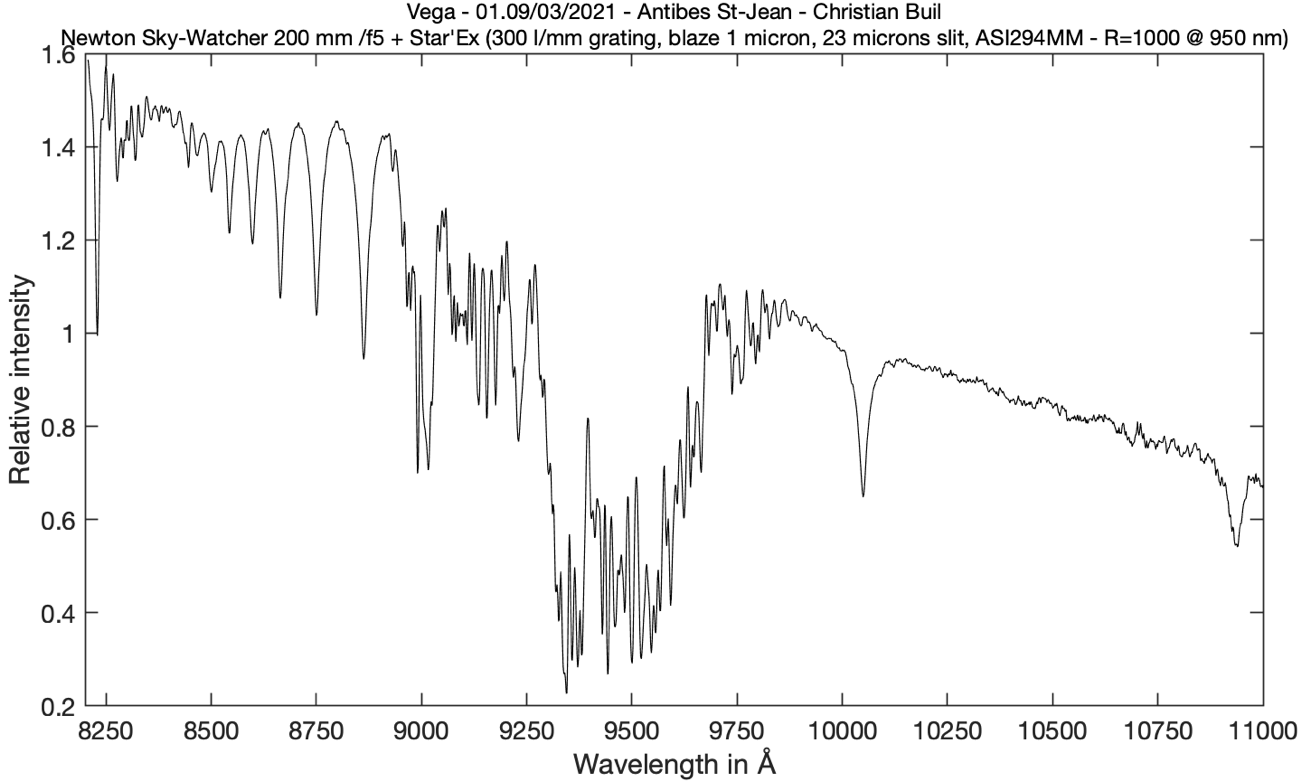
Infrared spectrum of the star Vega produced with Star'Ex mounted at the focus of a small Newton 200 mm f/5 telescope. The spectrum shows the Pashen hydrogen line # 8 at 10049 A, and especially the Pashen line # 7 at 10938 A, which is a probable record in amateur astronomy. Note the use of a grating whose blaze angle is optimized for 1 micron wavelength. The camera is equipped with an ordinary CMOS sensor (here we are at the extreme limit of the sensitivity range of silicon technology detectors).
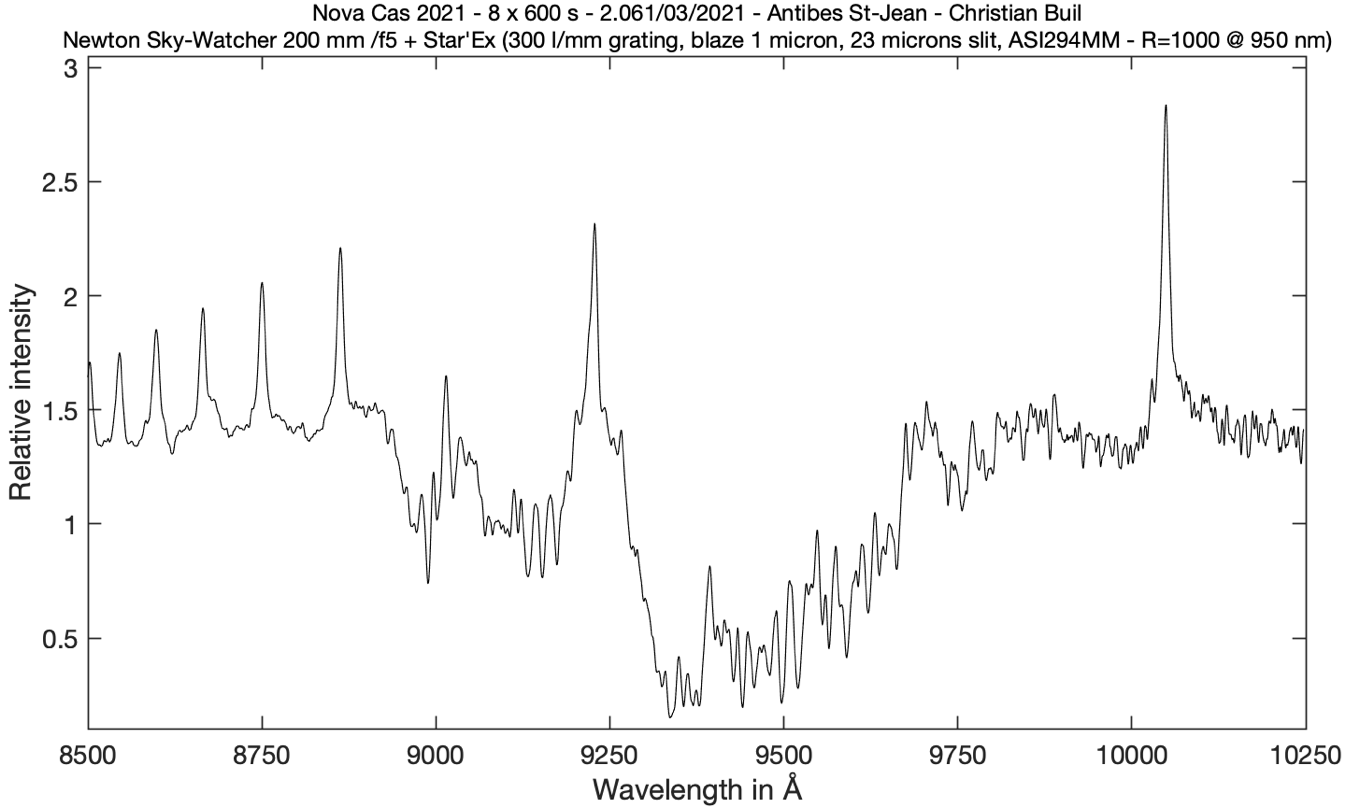
The infrared spectrum of the nova Cas 2021. All the lines of the Pashen series are in strong emission.
Star'Ex can be used perfectly to observe non-stellar objects as long as the spectral dispersion is well adapted. We can even tackle extragalactic objects, as in the following example, with the Messier 51 galaxy as a target, observed with a telescope only 85 mm in diameter and a 300 lines/mm grating (the "redshift" of the galaxy can be measured!):
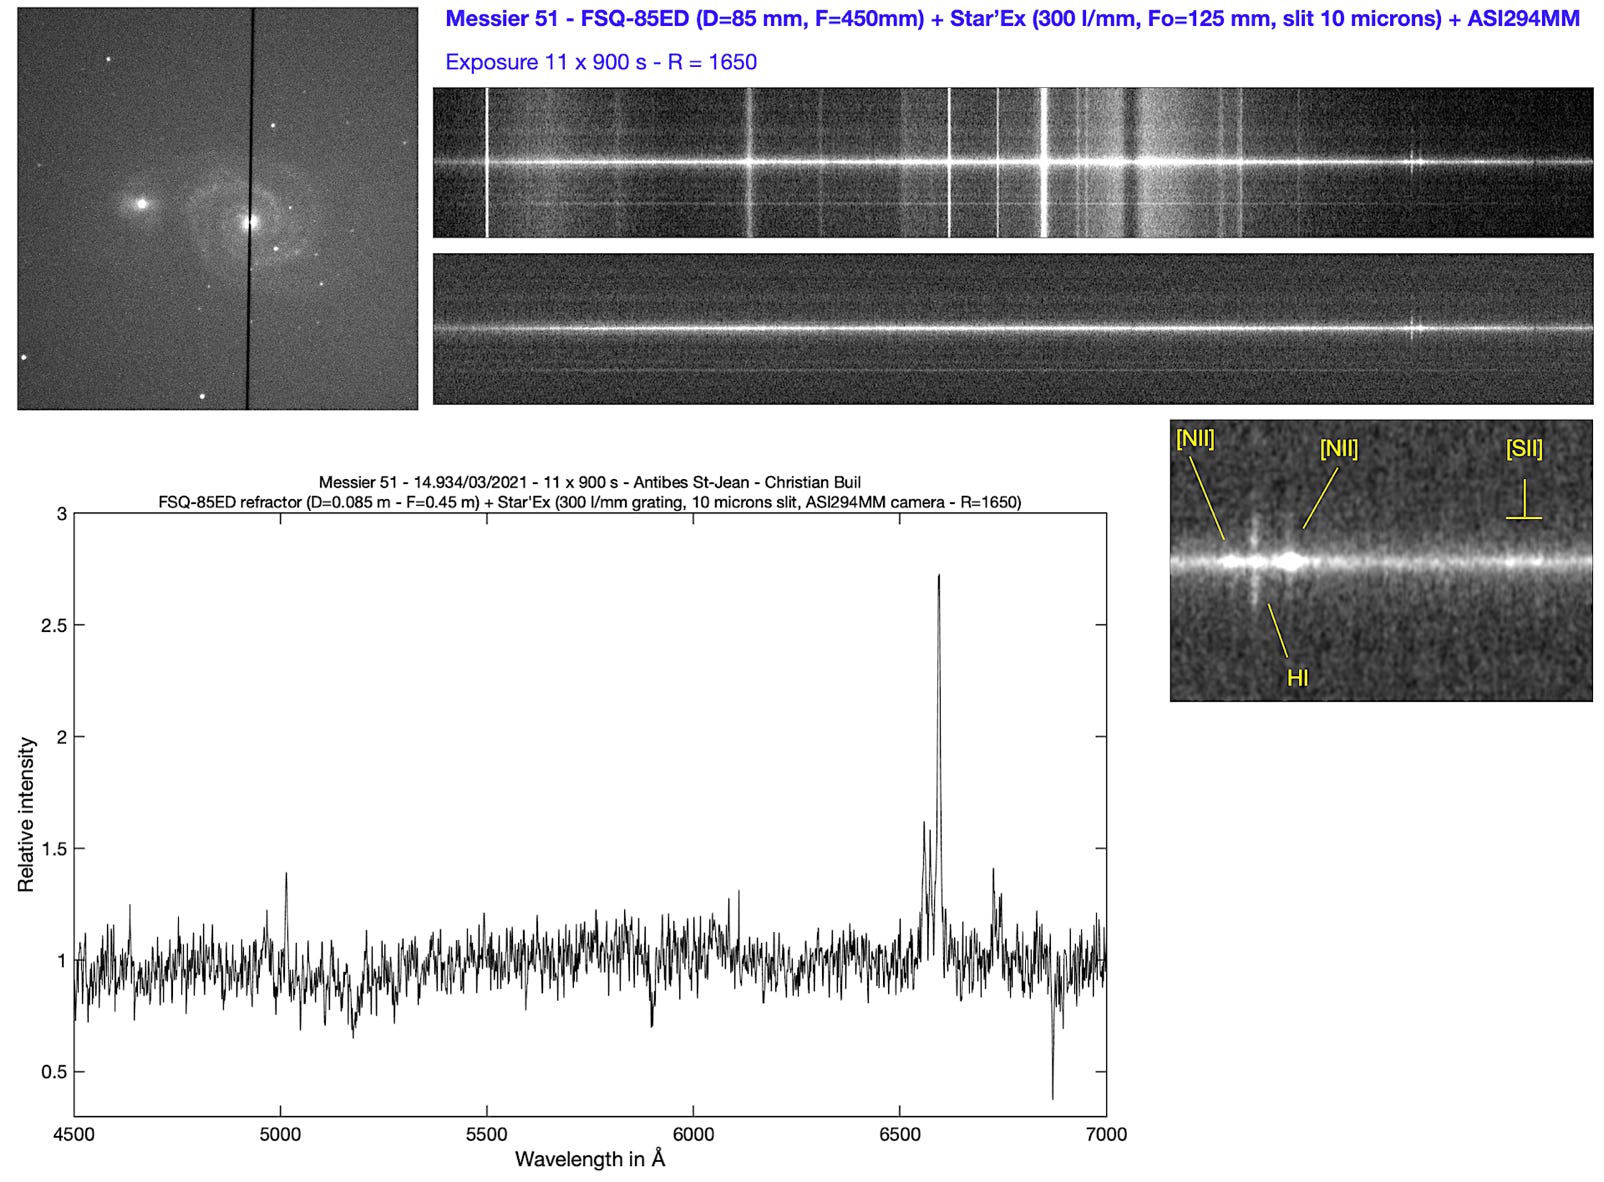
Note how the core of M51 has been positioned over the slit to capture maximum light. The example to follow also concerns a non-stellar object, the Messier 42 nebula (Orion nebula) using the same equipment (a 85 mm refractor):
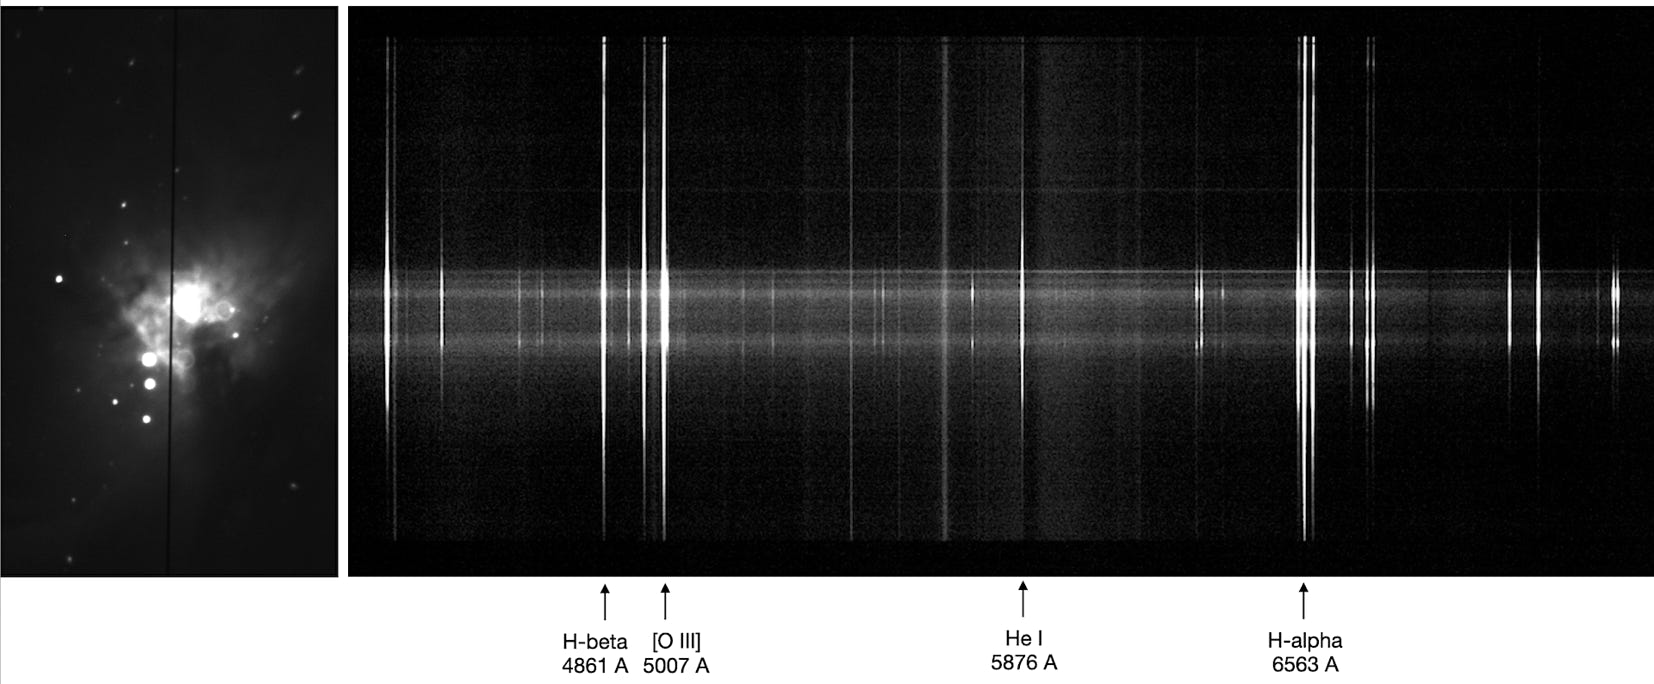
The analyzed nebula "slice" can be seen in the guiding camera image on the left. On the right, the spectrum shows many very fine emission lines. The shape of these lines changes depending on the chemical element, which is the origin of the color in this object seen in the photographs.
We can easily see that for stargazing we can be led to use weakly dispersive gratings by sacrificing the spectral resolution when aiming at objects of low brightness. For solar applications (Sol'Ex ), the 2400 lines/mm grating is preferred (but also usable on stars, as we have seen in part 3). For solar again, a 1200 lines/mm grating can also be interesting, in particular for making images of the Sun in the ultraviolet region, at the level of the H and K lines of Ca II (compared to a 2400 lines/mm grating , higher brightness, sufficient spectral resolution, good image quality).
From experience, and this remark is important, if you are new to stellar spectrography, high spectral resolution should be preferred. It's not immediately intuitive, but it's much easier to observe and calibrate a high-resolution spectrum than a low-resolution spectrum. Astrophysically, you will also get results more immediately (spectra "move" faster in high resolution than in low!). So, for your first few weapons with Star'Ex, select a 2400 lines/mm and/or a 1200 lines/mm.
Part 4.4: The « 80 mm / 80 mm » configuration
It is relatively easy to convert a Sol'Ex instrument into a Star'Ex instrument allowing to observe stars with a high spectral resolution. But the Sol'Ex/Star'Ex project offers additional possibilities, by allowing also low spectral resolution observation. The counterpart of the passage from high to low spectral resolution, is that it becomes possible to observe objects of much weaker brightness.
The low spectral resolution configuration of Star'Ex is distinguished by the fact that the camera lens changes from a focal length of 125 mm to a focal length of 80 mm. The collimating lens is always the same, whether you use a Sol'Ex, a Star'Ex HR (High Resolution) or a Star'Ex BR (Low Resolution). The "low resolution" configuration of the Star'Ex is often called the "80 mm / 80 mm configuration" because the collimator and camera lenses have the same focal length (but they are optically different).
There are in fact two versions of the 80 mm lens that are placed in front of the camera: one optimized for the visible part of the spectrum (probably the most commonly used), the other optimized for the infrared part of the spectrum (for more specific work). See the "Contacts" page for an overview of these various options.
The "80mm + 80mm" optical combination, here with a 300 lines / mm grating, spectral coverage ranging from 390 nm to 750 nm and an input beam at f/8.
A specific camera interface, supporting the optimized 80 mm objective and adapted to the ZWO helical system, must be produced. It is simple and very similar to the "digital camera kit" described in the "Construction" section, part 4 (only the lens locking ring is slightly thinner here). You can download STL files for this 80x80 configuration by clicking here. Note that it is compatible with the use of a cooled camera ZWO ASI183MM, ZWOASI1600MM… or the QHY equivalents, for example.
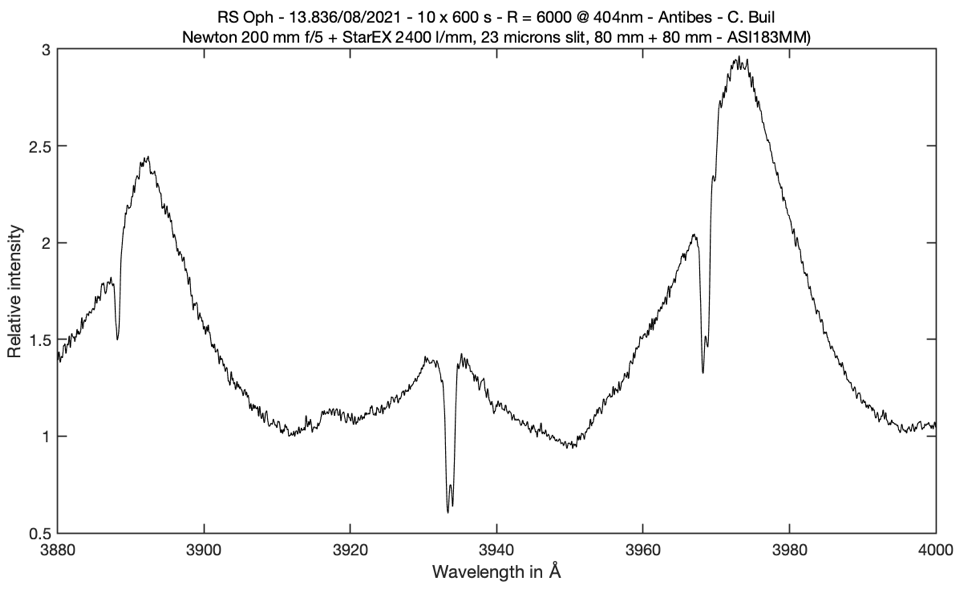
To appreciate the performance of the "80 mm / 80 mm" option of Star'Ex, here is for example an ultraviolet spectrum of the star RS Oph (in outburst) obtained from a Newton telescope of 200 mm at f / 5 and a 2400 line/mm grating. The performance is such that it is possible to detect an emission in the heart of the H and K lines of Ca II:
Below, with the same configuration, the ultraviolet spectrum of the star Vega (exposure time of only 28 seconds with a Newton 200 mm f/5):
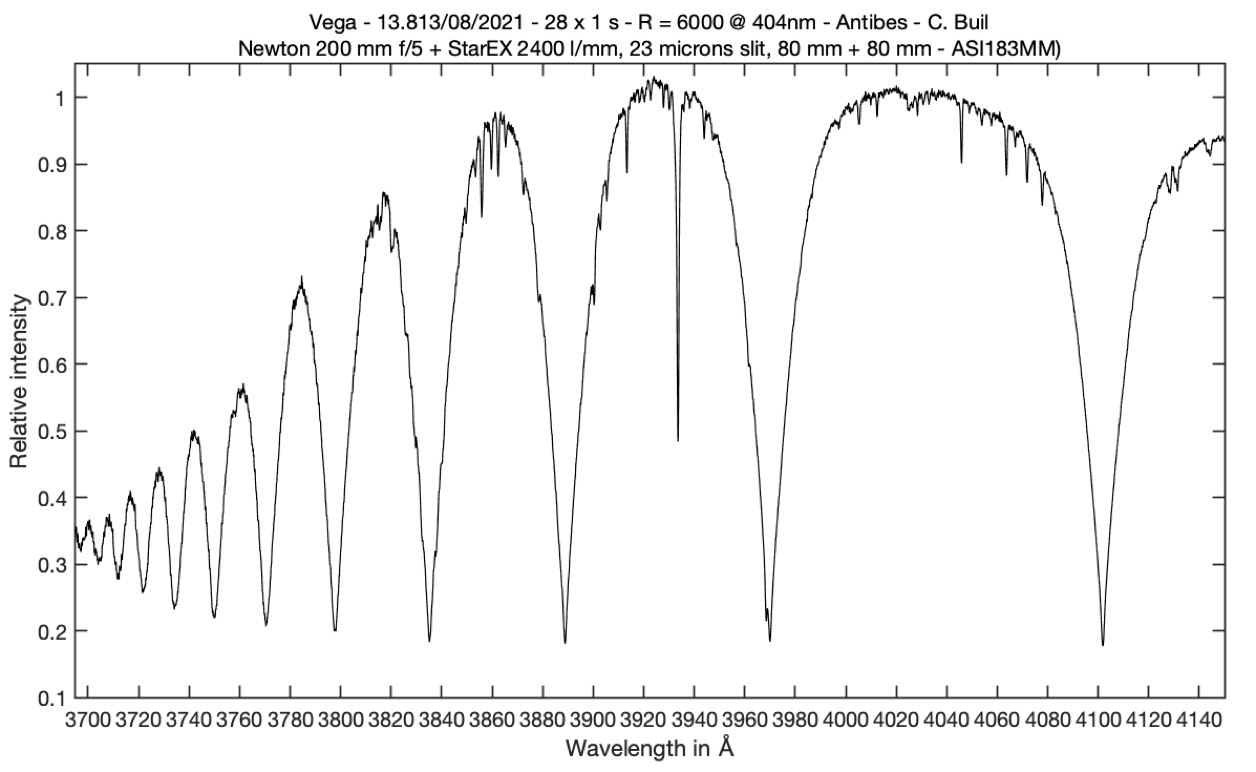
Note: below 3680 A, the absorption of the lenses becomes too severe.
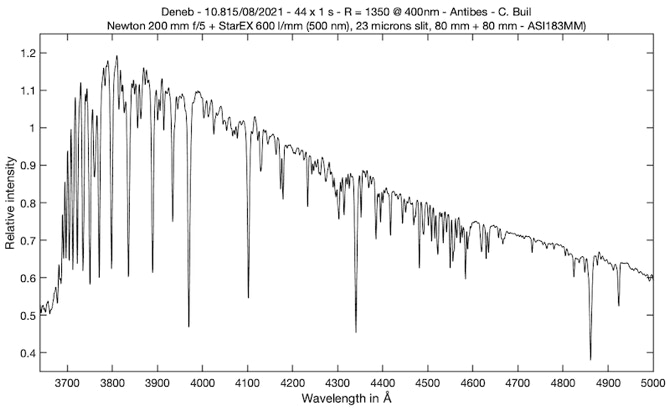
The blue part of the spectrum of the star Deneb with the 80 mm / 80 mm configuration and a of 600 lines/mm grating (44 seconds exposure):
Below, the appearance of the solar spectrum (daylight) and emission line lamps in the form of images (called 2D) produced with the « 80 mm / 80 mm » configuration:
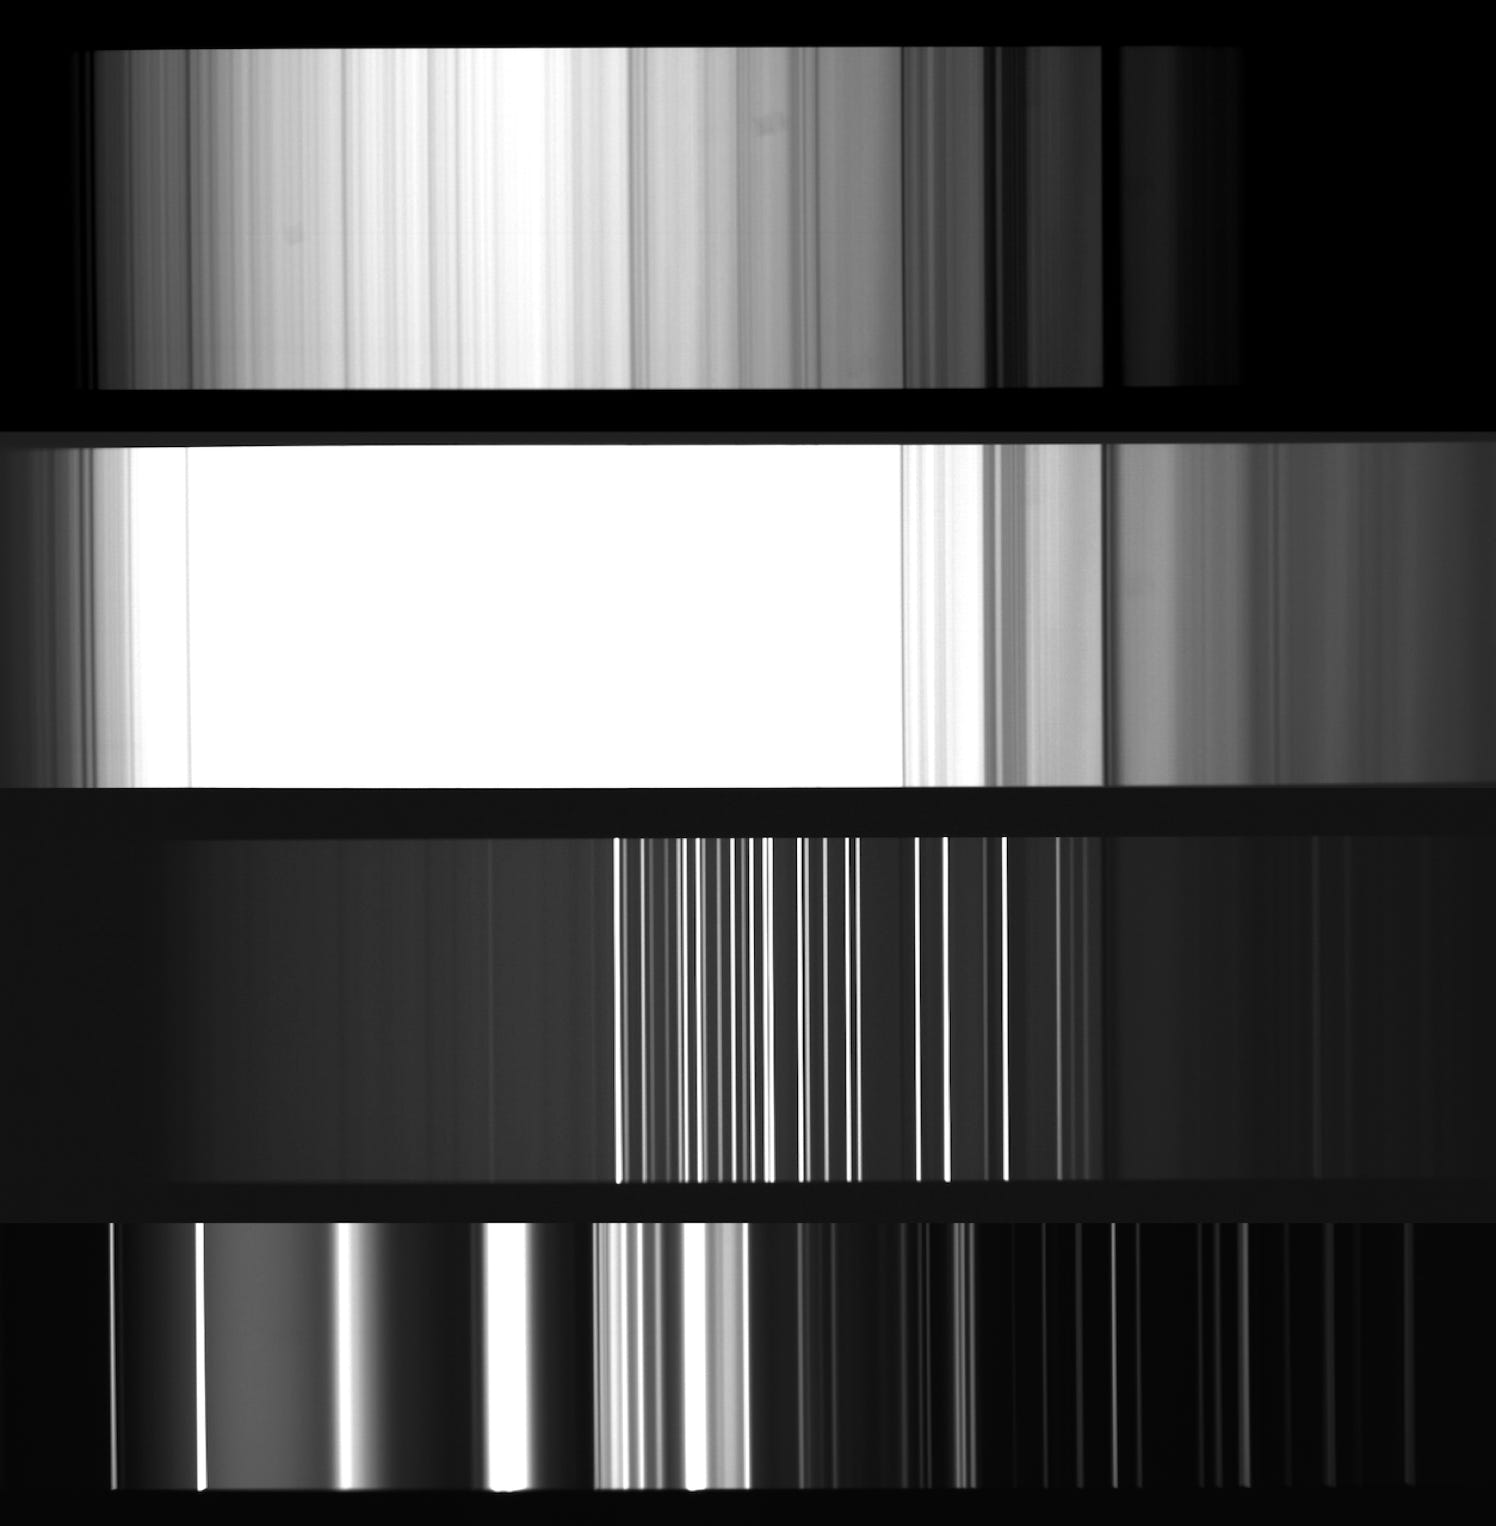
From top to bottom, the daylight spectrum, the high contrast daylight spectrum (notice the H and K lines of Ca II on the left and the infrared spectrum on the right), the spectrum of a neon lamp , the spectrum of a fluorescent lamp (fluo-compact).
The following video (click on the image) explains how to mount the 80mm x 80mm configuration, then how to use it on a telescope, with examples:
For more information about the installation of Star’Ex for a given telescope configuration, click here (text in French for the moment).
Part 5 : The order filter
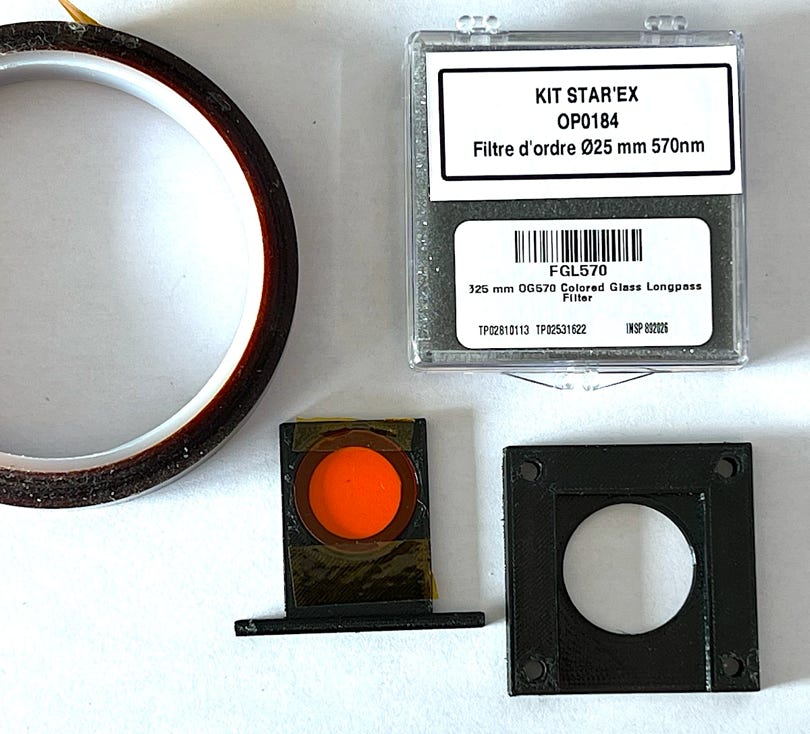
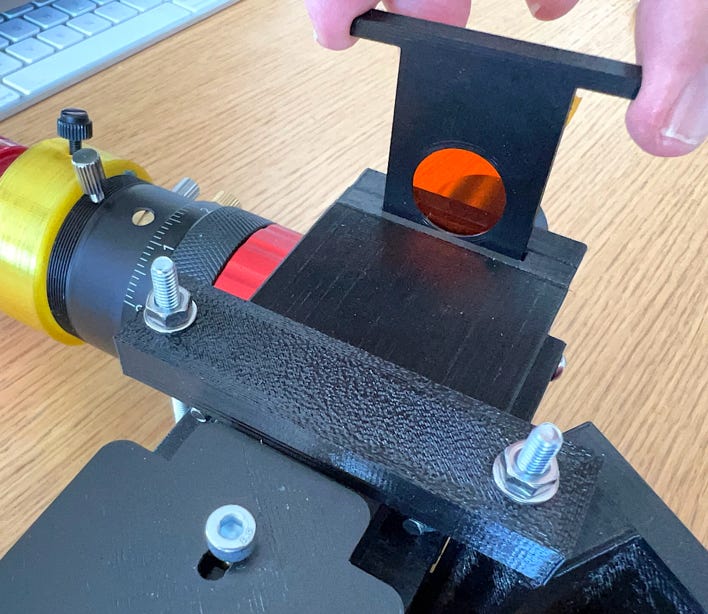
The use of the infrared version of Star'Ex requires the addition of an order filter in front of the entrance slit in order to eliminate the blue part of the second order spectrum which would otherwise cover the first order infrared part that we wish to observe.
This order filter, of orange color and of the high-pass type, is provided with the Star'Ex low resolution infrared optical kit (see the "Contacts" part of the site). You can download the STL files of the filter holder (two pieces) by clicking here. The filter can be fixed in its housing with adhesive tape (Kapton for example, ideal for optical parts).

About the importance of order recovery:
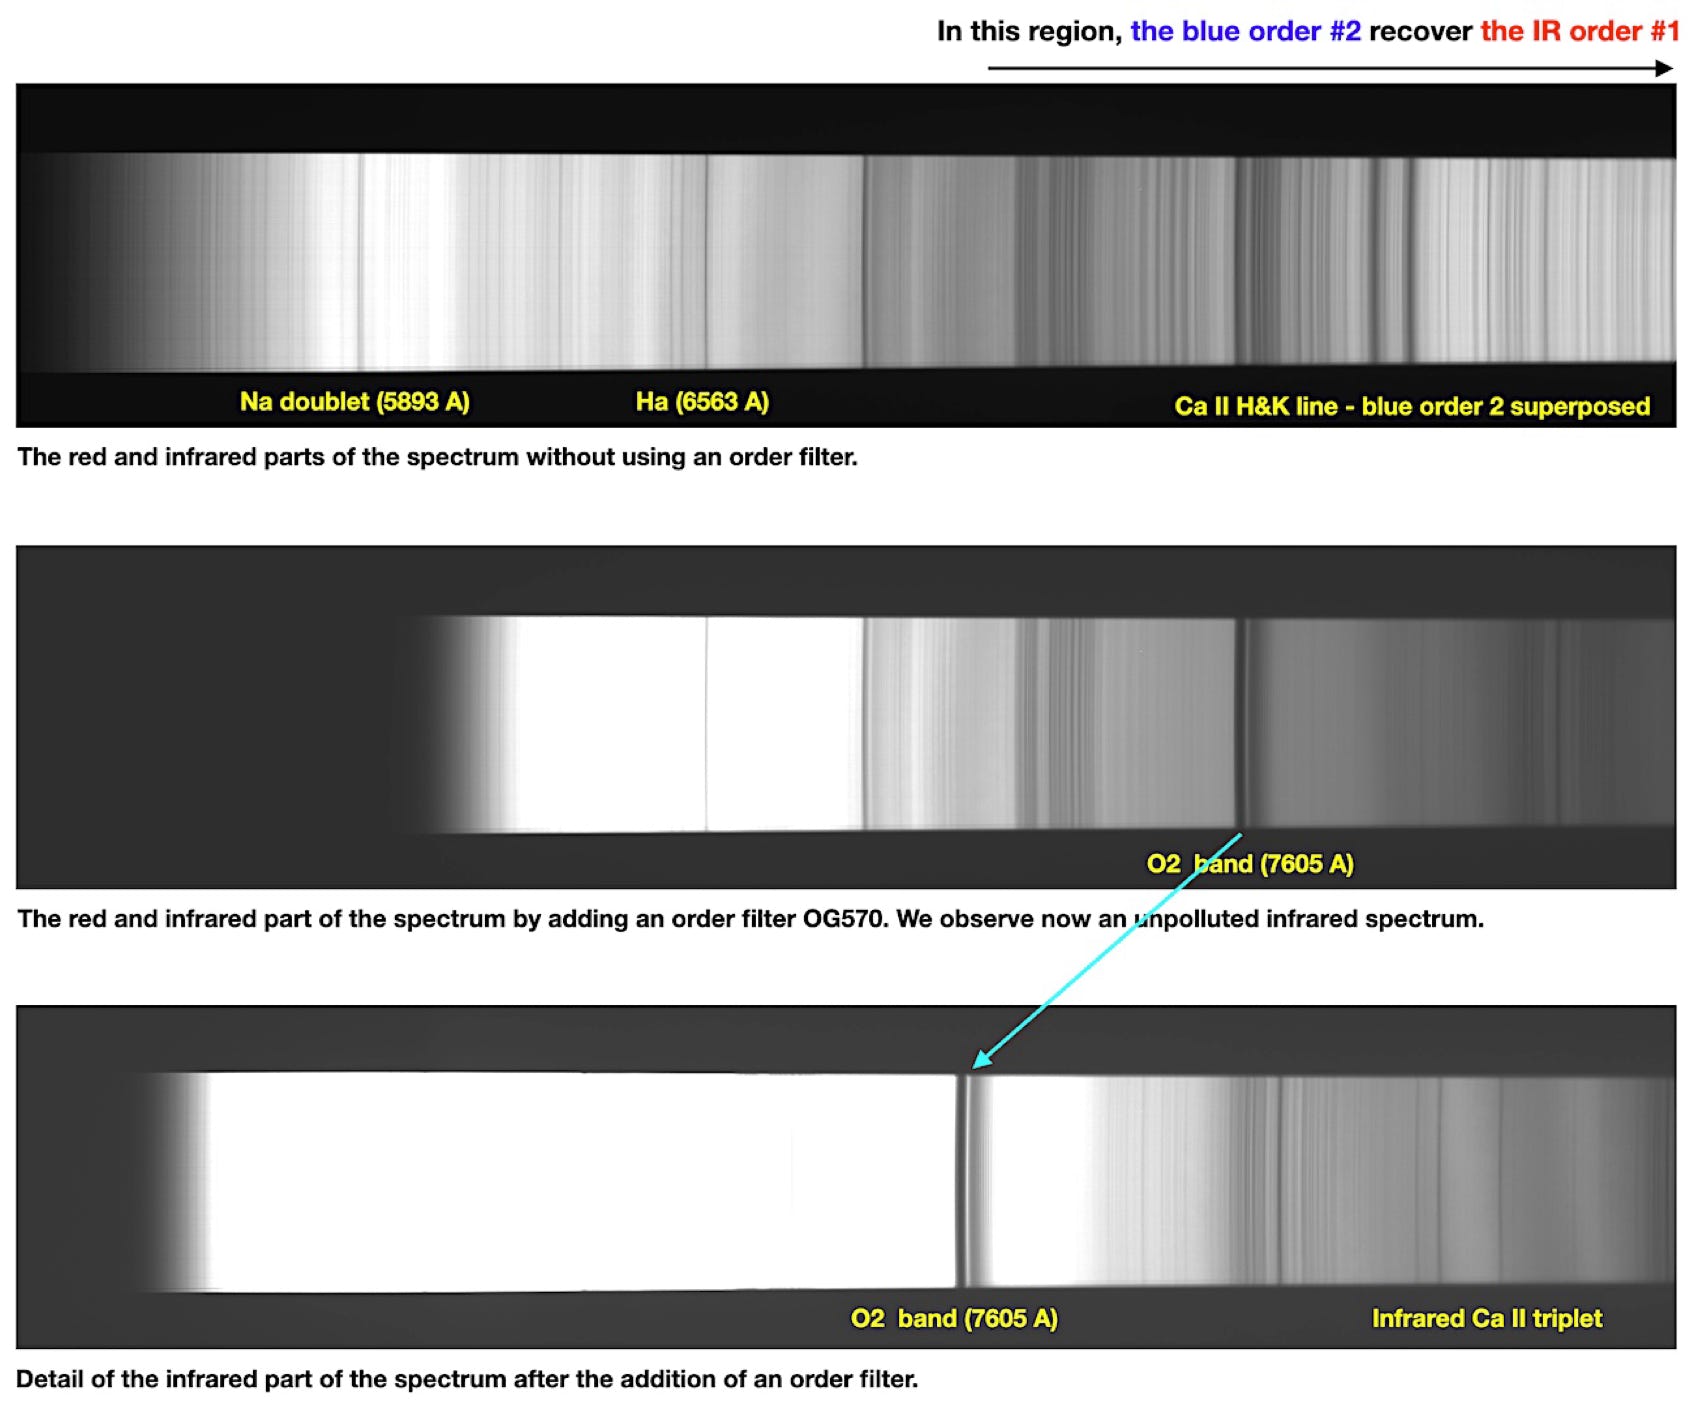
It is possible to observe the infrared part of the spectrum with a Star'Ex low resolution "visible" by rotating the wheel supporting the grating, adding the filter holder described in this section and arranging the filter in question.
Unfortunately, the result obtained will not be optimal. The ideal solution is to buy the infrared extension of the Star'Ex kits, which offers, in addition to the order filter, a diffraction grating with maximum efficiency in the infrared and a camera lens calculated to obtain a sharp spectrum from 6200 A to 10000 A. The ideal is of course to have two spectrographs, one covering the visible, the other the infrared. In this configuration, luxurious it must be recognized, it is recommended to systematically use the filter holder in order to keep the same focal point of the telescope if one is led to exchange the spectrographs (on the left a Star'Ex "visible", on the right a Star'Ex "infrared"):
Part 6: The spectra processing
The processing of the spectra consists of classical operations of removal of the thermal signal, offset and division by the flat-field. Then come the tasks specific to spectrography, such as geometric correction operations, extraction of the spectral profile or calibration in wavelength and relative or absolute flux.
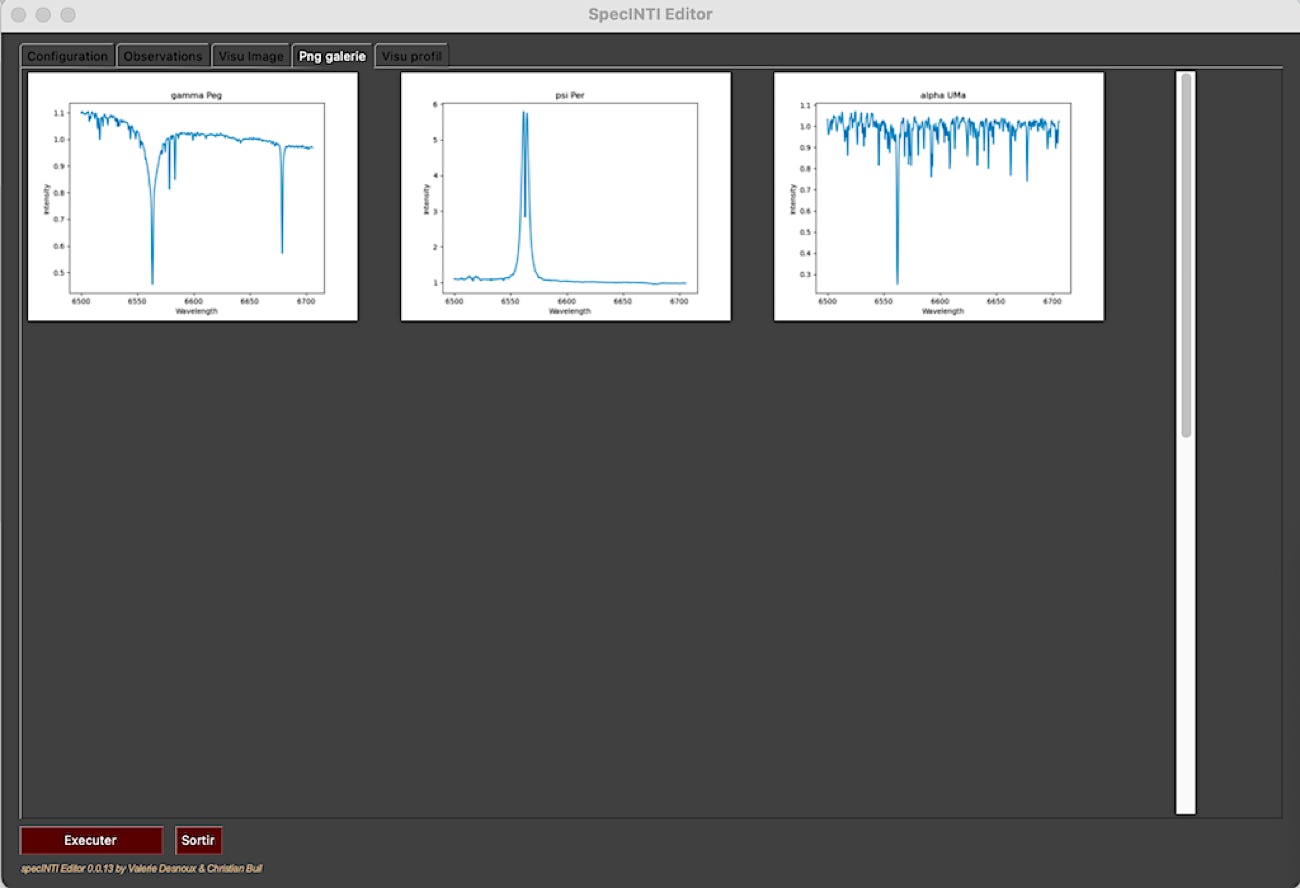
These operations, relatively numerous, are facilitated by software like VisualSpec, i-Spec or ISIS. But, in the context of the Sol'Ex/Star'Ex project, and also its spirit, a processing software has also been created, it is specINTI, and its graphic interface specINTI Editor. It is free of charge, written in Python language and can run under Windows or Mac OS X.
To download specINTI and consult the documentation with many examples, click here. Feel free to search and experiment by yourself.
Part 7 : Lab’Ex
Although Sol'Ex and Star'Ex are used to observe the Sun and stars, these instruments can be used for many other applications. The Lab'Ex extension, for "Laboratory Explorer", was designed to measure the optical transmission of filters, liquids, etc. It is a real low-cost laboratory instrument for scientific and technical measurements in a wide range of fields.
This measuring bench can be declined in various forms. One of the most complete is surely the version of Olivier Garde. All the details for the construction are given here :
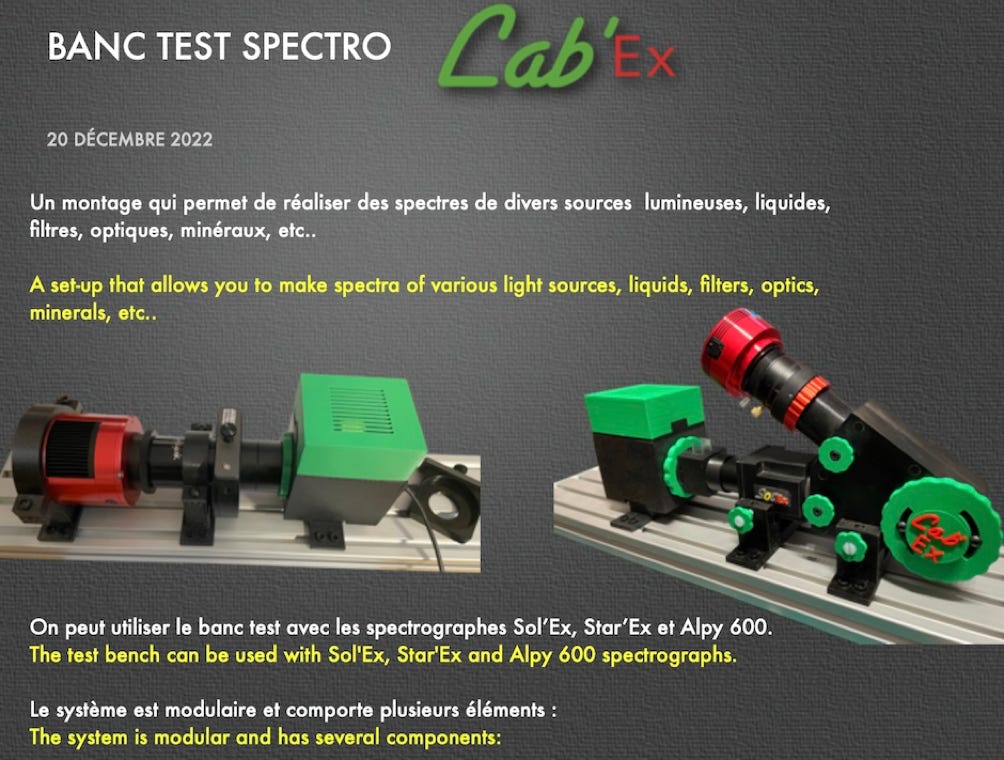
Click here for a simplified form of Lab’Ex :
On this page you will find information on how to use specINTI in a very simple way for these laboratory applications, with many examples.
Part 8: how to quickly turn Sol'Ex into a stellar spectrograph
If you have a Sol'Ex and if you are curious to see what this equipment can do in stellar spectrography, without any extra cost, even if you don't have a cooled camera, then :
1 - Replace the current 10 micron wide slit on glass, with its tilted mount, with a much more rudimentary 2 mm wide slit to be 3D printed (or DIY). There are only two screws to remove and you do not change any settings. The new slot, called "wide", can be made by printing the two small parts defined by STL files that can be downloaded here. Here is what these two pieces look like:
2 - Watch this Youtube video (click on the image):
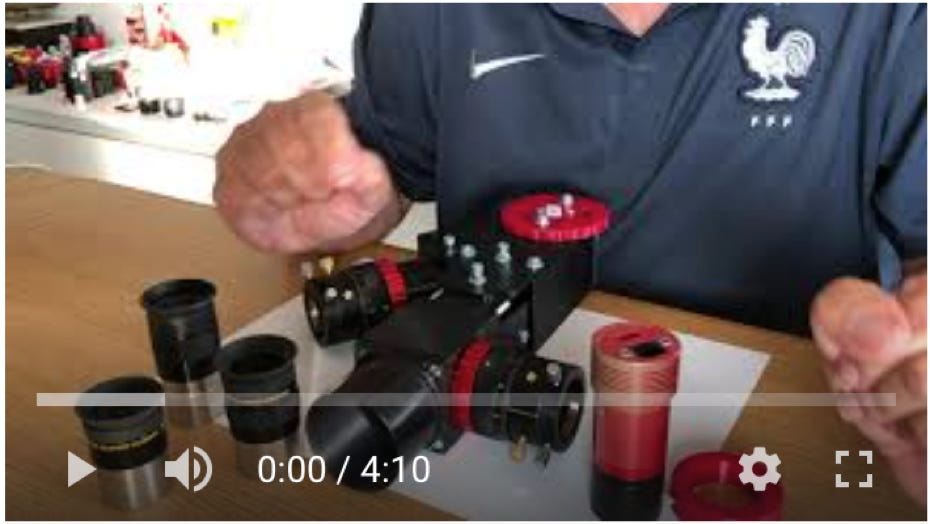
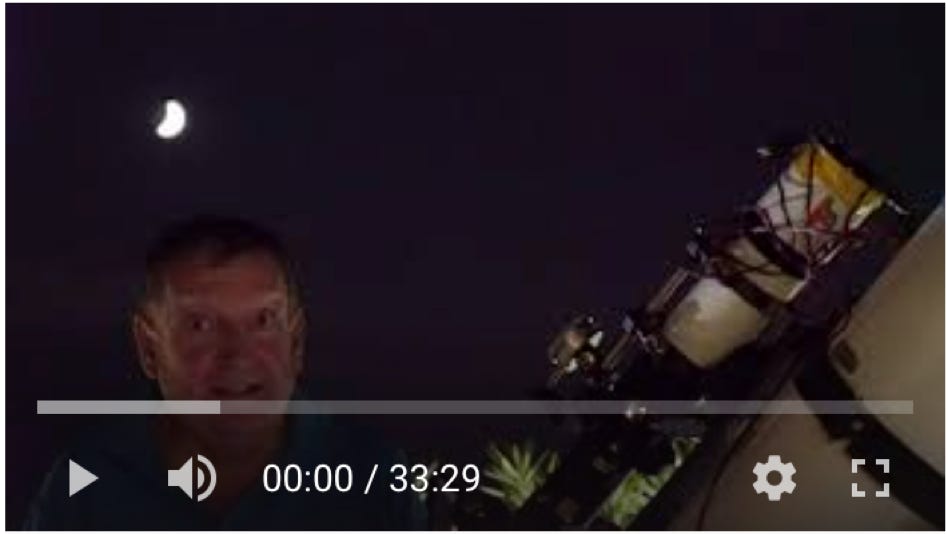
Part 9: Getting started with Star'Ex
You have at your disposal a video in two parts which introduces the use of specINTI, which is based on observations made with a 100 mm diameter telescope in high spectral resolution:
Video #1 - day: click on the image
Video #2 - night: click on the image

As a bonus: how to capture the spectrum of stars in daylight
Sol'Ex / Star'Ex is a living project which generates a number of exchanges and also developments (do not hesitate to subscribe to the Sol'Ex discussion list or go to the Facebook page of the project - see the Contacts section of this site). One of the subjects raised concerns the overall stability of Star’Ex because to observe the stars it is equipped with rather heavy cameras (models where the detector is cooled by the Peltier effect). The consequence is the presence of mechanical flexions, which vary according to the direction of sight of the telescope on the celestial vault. These differential flexions are in particular the cause of spectral calibration errors. In the previous videos, it is mentioned a technique, effective, to erase a good part of the problem. However, it is possible to increase the overall rigidity of Star'EX at the cost of a little effort, and it would be a shame to miss it. I suggest you watch the video below to see what it's all about and how to easily and effectively increase the rigidity of your Star 'Ex:

To download the STLs of this stiffener, suitable for the 80 x 125 mm + ASI183MM pro configuration described in the video, click here.
To download the STLs of this stiffener, suitable for the 80 x 125 mm + ASI183MM pro configuration described in the video, click here.
To download the STLs of this stiffener, suitable for the 80 x 80 mm + ASI183MM pro configuration, click here.
Copyright (C) 2020-2023 Christian Buil
Web : www.astrosurf.com/buil