'Easy' RAW mod for Philips and Logitech Webcams ;o)

Pour la version Francaise,
Cliquez ici :o)
|
'Easy' RAW mod for Philips and Logitech Webcams ;o) |
Pour la version Francaise, Cliquez ici :o) |
|
- Click Here for LAST NEWS... !!! :o) |
|
The RAW mod for everybody ? YESSSS it is now possible !!! :o))) To know more about what is RAW (and why to use B/W CCD), just click here... (Thank's a lot to Philippe Bernascolle for this PDF doc... and to Eamonn OFearchain and David Moore for translating ;o) ) (New: Nederlandse Vertaling here !!!) First, i want to send a BIG THANK'S to all people who help on this new features for our webcams !!! Linux users for their 'extended drivers', Jack Reed for the work on how to access eeprom via I2C, and of course all members of TWIRG group who worked a LOT on this project, and are still working on it at this time !!! (This webpage is only a part of the beginning of a lot of improvment to come.... ;o) ) |

RAW vs Normal comparative... |
|
DISCLAIMER !!! I'm not responsible for damages you could cause to your webcam because of errors in realizing the described eeprom upgrade... |
|
What you must know before proceeding :o) |
|
The RAW mod's are made to modify the datas in the EEPROM of our webcams... The eeprom is a little electronic memory INSIDE each webcam, we modify it with WcRmac and the macros. We only modify ONE webcam at a time, and the only thing written on the PC is the backup of the original data of the eeprom, the original drivers of the webcam are not modded (this webcam will then keep in RAW mode, even if used on another computer) The macros i offer you, for upgrading your eeprom in RAW mode, match automatically to the type of webcam connected, but you must choose yourself the good macro regarding the type of CCD you have on your webcam, i mean B/W CCD in place of original color CCD, or Color CCD if you have the original CCD still installed ;o) They are compatible with Philips Webcam, Vesta's (std, Pro or Pro Scan), ToUcam Pro (or Pro II), ATK from Perseu, SAC7 from SAC and Logitech QC Pro 3000 and 4000... and of course with different eventually long exposures mod, and different CCD size, 1/4", 1/3" ou 1/2" eventually installed on your webcams :o) Actually, the RAW mod on webcam B/W CCD equipped is directly usuable with actual softs, acquiering or processing, but for COLOR CCD equipped webcams, the RAW mod need a specific new processing for EACH frame after acquiering, to get a final RGB picture with the 'Iris V4.00' soft for example... I hope we will have soon new version of our favourite astronomical acquiering softwares who will handle real time RAW to RGB conversion, or at least an automated and optimized post processing to make all files or Avi's RAW to RGB in one time, just before the standard processing :o) BTW, in the two possibilities (B/W or Color CCD's) the RAW will bring you finest pictures and even more sensitivity in low light :o))) You will also see that the noise will be really less present in frames with the Sharpness OFF... Last important point to know, those macros makes TWO job's: First the put the webcams in RAW mode, then the set 'Factory parameters' used by the drivers for optimized RAW use... (Manual mode, Sharpness OFF and White Bal perfectly equalized) So for well using RAW mode, it is ESSENTIAL to 'Restore Factory Settings' after upgrading the eeprom and before each acquiering session, and to put the speed saving to 5 images/second to avoid disastrous compression effect on RAW mode... (To restore the new special Factory Settings, you just have to access webcam parameters in your acquiering soft, and click on 'Restore Factory Settings') On the other hand, the RAW mode is absolutely compatible with actual Acquiering Softs, Avi's or Frame by Frame Long exposures :o) Only RAW COLOR CCD's have to actually be re-processed after acquiering... |
|
Well.. So How to Make the RAW mod ??? |
|
Very easy, you just have to make the detailed procedure below : INSTALL: 1.1) Download the package here with Martin Burri's Soft and my 'Easy RAW Mod' Macros: WcRmac Webpage 1.2) UnZip the file in a new temporary folder 1.3) Double-click on 'Setup.exe' in the new folder to install the software and macros (If you got an error 430 under Win98 you may proceed here: according to some logfiles it seems to be the scrrun.dll - just found an article on the web describing the 430 error related to an outdated scrrun.dll on Win98 so follow this link http://support.microsoft.com/default.aspx?scid=kb;en-us;Q254166 and download the newest version (5.6 for Win98) you may have to reboot after it Hope it helps - at least 'til now it helped all ;-) Martin ) |
WcRmac Screen... |
|
HOW TO USE WcRmac: 2.0) Click here for the last NEWS about RAW, (and NOT RAW)... !!! :o) You can download the last macros before to continue... and read the exact descriptive of what does make each macro 2.1) Connect your webcam to USB, Launch an acquiering soft of your choice, K3CCDTools, QCFocus, Iris, Astrosnap or what you want that is able to show real time pictures from your webcam (click start or preview eventually), even if you have no lens on the webcam 2.2) Launch 'WcRmac.exe'.... 2.3) Chose the Webcam to upgrader in WcRmac by the menu 'WebCam/DS Interface' 2.4) SAVE YOUR EEPROM DATA using the 'binaries' screen and the 'Get current and save as' button, with a name like 'MyBaseEeprom' 2.5) Check the 'OK - I take fulle responsibitity using this program' box to authorize eeprom writing... Next, the two possible choice to access RAW mode are: 'Set B/W RAW Mode and Special Factory Settings (for B/W CCDs)' For webcams with B/W CCD in place of the original color CCD, or for ATK-1HS from Perseu users, OR 'Set COLOR RAW Mode and Special Factory Settings (for COLOR CCDs)' For webcams with color CCD's.. OR NEW !!! A third macro from a J.B. Butet idea ;o) : 'Set OPTIMIZED COLOR (NON RAW) Mode AND Special Factory Settings' bring's you the possibility to use an OPTIMIZED Mode, for color webcams, with almost all the RAW possibilities, but without the need of decoding RAW colors....... :o))) This Mode is made for those who doesn't want to spend time with decoding processing, but want to use the other good things of the research of twirgers ;o) OR If you want to all reset in original configuration (after testing actual color RAW mod or if you don't like it) : 'Restore Original Datas and Factory Settings' (with two options for Vesta's, Old or Recent, try the best for you...) 2.6) Select and Check the macro you want in the 'Macros' Screen, click on 'Run checked' then 'Ok' After a few seconds, you should see a 'macro successful' message, and your eeprom is now upgraded !!! 2.7) DON'T FORGET to restore specials 'Factory Settings' in your acquiering soft AFTER setting 5 image/second mode to really see the RAW mode...(very important for good results with the long exposure modded webcams without external LE switch like the "babacool" mod) WELL DONE, you can now try tu use RAW mode, but i'll tell you how to use it, especially for Color RAW Mode who still need special processing ;o) |
|
So.. What do we do with our RAW frames ??? |
|
If you are a B/W CCD webcam owner, you just have to smile with really fine frames, no more "ears" artifacts, with a really excellent litte CCD for DSO (if long exposure modded of course) or Planetary B/W pictures, and there is nothing to do but to use the webcam exactly as before, just remembering that the finest pictures will only be accessed at 5images/second, but you can still try other parameters of course :o))) The picture processing will also be exactly the same as before, but you can for example use now the first level of wavelets because the noise in frames is really less visible !!! In DSO use, the Darks become REALLY near real Astro CCD darks... Here are 3 SAME parts of 30 seconds Darks without any processing, from a Vesta Pro with B/W CCD, 30% Gain... |
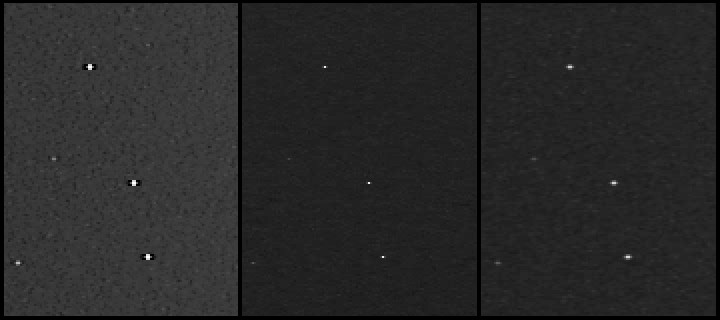
From Left to Right : Std Settings (Sharpness ON), RAW with Sharpness OFF, NON RAW with Sharpness OFF... |
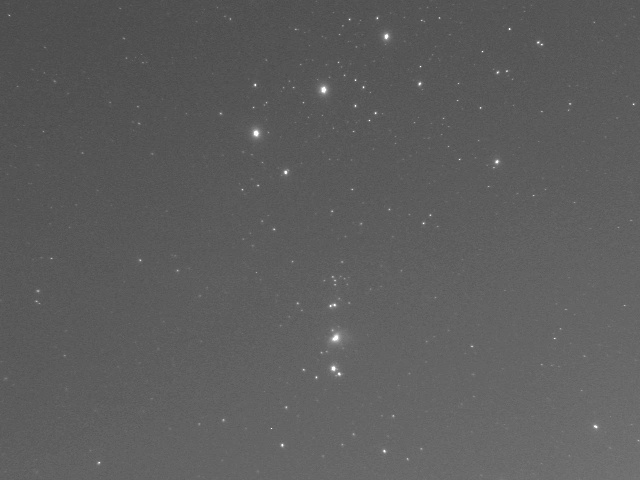
Exemple of one 10seconds exposure wide field unprocessed, B/W RAW (There are only one or two hot pixels visible, the other 'hot pixels' are Stars... ;o) ) |
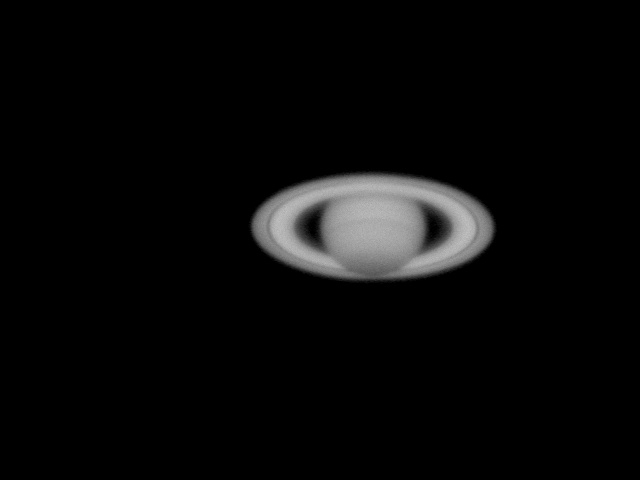
Planetary Exemple of one unprocessed frame, B/W RAW |
|
And if you want to try RAW mod with color CCD, you just have to use 'IRIS V4.00' and select the menu 'Webcam/Previsualiser', Restore ' Factory Settings', Set Save Speed to 5images/seconde, Set Shutter Speed and Gain to have not too much saturated RAW frames, and click on 'monocoup' to capture a frame... (The Color RAW frame is in B/W, this is absolutely normal for RAW frames ;o) ) Then to decode RAW frame, you must click on the little camera icone, and choose the GOOD decode version... For the ToUcams Pro 1 or 2 , the 'old' Vestas and the color ATK Perseu, select the 'NIKON' mode (not Nikon10D) For the 'recent' Vesta's, select the 'CANON' mode and click 'OK' You just have now to select the menu 'Photo Numerique/Conversion d'une image CFA' and if all is ok, you should see a color picture decoded from the B/W RAW frame you have just before :o))) Your RGB picture seems to have really strange colors ??? Don't be afraid, if the first test don't work, just retry with another frame, i often have this problem with the first try... :o> There is also another possibility of bad colors, if you have a Vesta, she is older or younger than you thought..., then you just have to select the other RAW decode mode, NIKON ou CANON and make another test ;o) Here are some examples of the same picture in deifferent modes with a ToUcam Pro... (The result in Color RAW mode is less good at this time with the Vesta's, but that will be better soon with a specific RAW decode for the Vesta's ;o) ) |
Central part of a 'standard' frame (with just Sharpness to zero) |
Central part of the EQ frame in RAW mode |
Same picture as previous frame, but after RAW to RGB decoding under Iris, with just auto color, contrasts and saturation under PSP7 (You can see that the details are also thinner than with the std settings, even in Color RAW mode...) |
|
Good Testing !!! Etienne Bonduelle :o) |
|
LAST NEWS... !!! |
|
If you want the last macros update, (and of course if you have already installed WcRmac) click here --> 'Macros Bond version 1.4' You just have to unzip this file in the macros directory of WcRmac: C:\Progam_Files\TWIRG\WcRmac\macros Or in the path where you installes WcRmac This will replace the 3 original files by the last update :o) (don't worry, the macros to restore original settings are still available ;o) ) What you need to know is that there are TWO different parts in the eeprom, and that every macro makes an upgrade of the "UPPER part" of the webcam eeprom, by upgrading some parameters, theorically unavailables, such as activating RAW mod or setting offsets to zero, and on the other hand, the "LOWER part" of the eeprom to set some "good" parameters in the "factory memory" to be used by a "restore factory settings" in the acquiering soft :o) You must understand that those two eeprom parts are REALLY handled separately by the webcam, and if you only restore "user settings" to avoid new "factory settings", that will not restore the "upper part" eeprom datas... The only way to de-activate completely the RAW mode is to use a new time WcRmac and choose "restore original datas and factory settings" :o) Here is now the details of what does every macro in the 1.4 version: 1) 'Set B/W RAW Mode and Special Factory Settings (for B/W CCDs)' - This RAW macro for B/W CCD first mod the upper part of the eeprom by activating RAW mode, setting offsets to zero, equalizing "theorically color" gains for real B/W before to "enter the new vertical RAW matrix" ;o) (this part is activated in real time when you click on 'run checked') - The macro also upgrade the "lower part" of the eeprom, the "factory settings parameters" by setting "good values" for astro imaging that will only be activated each time you will click on "restore factory settings" within the driver of your webcam in your acquiering soft just before acquiering... Those "Bond Astro Factory Settings" are: Noise Reduction to zero Auto Mode Off White/Bal in manual mode (fixed) Shutter Speed to 1/7th second Gain to 60% White/Bal settings for optimal B/W RAW mode Sharpness to Zero Brightness to 40% for Vestas and 50% for ToUcam Gammas to 0% - This mode for B/W CCD doesn't need any RAW decoding because there is no colours to decode !!! :o) - You can use your acquiering softs and processing softs as usual ;o) 2) 'Set COLOR RAW Mode and Special Factory Settings (for COLOR CCDs)' - RAW macro for COLOR CCD, almost equal to the macro for B/W CCD, but the color gain values of course, to have a final picture with colours :o> The horizontal and vertical gain are also set unuseable to avoid a sharpened raw disastrous for the colours ;o) - For the "factory settings", the parameters are equal to the B/W macro :o) - This COLOR RAW mode give B/W RAW datas that MUST be decoded, for example with the last version of softwares like K3CCDTools, Astrosnap, AviRAW, QCFocus or Iris... to recover colours 3) 'Set OPTIMIZED COLOR (NON RAW) Mode AND Special Factory Settings' That's the new NON RAW macro for color CCD's, without decoding needed, but with the advantages of RAW macros like Sharpness and offset to zero for less noise, less artifacts and better low light :o))) With this mode, you can work exactly as before, and the only difference with real RAW Color mode is the impossibility to try a better RAW decoding than the internal webcam original decoding... (Theorically, a good Color RAW decoding can improve lightly the final resolution of the picture) - In this case, there is no RAW activating, no color gain adjusting, no special matrix, only offsets and vertical and horizontal gain are set to zero... - For the "factory settings", that's almost the same as other macros, but the White/Bal adjusted to have good final colours :o) WARNINIG, if you want to try this OPTIMIZED macor on a Vesta webcam, and if you tried first the Color RAW mode, you need to execute a 'Restore Original Datas and Factory Settings' macro BEFORE to execute the optimized macro, to restore original colour pre-matrix gain... (no risk foor the webcam, but if you don't do that, you will have B/W pictures) 4) 'Restore Original Datas and Factory Settings' - As you can read in the title of this macro, she is made to get back to a "standard" webcam eeprom, by replacing modded values of the upper part of the eeprom by original datas (no more RAW, pre-mat gain standard, original matrix, offsets and HVGain)... Those upper eeprom re-load are effective immediately - Same thing for the lower part of the eeprom, by re-loading original "factory settings" parameters, but in this case, you also need to click on "restore factory settings" in the driver of the webcam in the acquiering soft to activate those old/new parameters !!! WARNING, for the Vesta's, there are two possible restore macros, because there are two different series of Vesta's, old or recent... If one of the two macros give you strange pictures colours with banding after a "restore factory settings", you just need to choose the other macro ;o) (don't worry, there is absolutely no problem for the webcam if you choose the wrong macro :o))) WARNING: When you are using the 'Restore Original Datas and Factory Settings' , in fact WcRmac don't restore the original backup eeprom of your webcam, but he know's what type of webcam is connected, VP, Tuc or une Atik, and he only restores the standard values that were modded by the macros :o) That's ok for having almost, or even exactly the same eeprom as the original one, BUT, if you think this is not the case, the only way to restore the entire exact original eeprom is to use another WcRmac function, i mean the "Load into cam" in the "binaries" folder on WcRmac screen, where you can choose manually the REAL original data file if you have made a backup before the mod of course, and then you will restore ALL the eeprom original data :o) WARNING, this function is a lot more time consumer than a simple macro, you must choose the GOOD backup file, and you must ABSOLUTELY wait for the end of eeprom writing before to unplug the webcam... You can now use the EXCELLENT 'AviRAW' (click on the link) Soft of Carsten A. Arnholm to directly convert Avi you take in Color RAW mode, in different Avi formats, from a stantard RGB 'debayerized' Avi to different layers LRGB Avi's for best processing :o))) If you use this soft, you can simply convert RAW Avi's to 'standard' avi's (but better than from non RAW webcams) that you can process directly as usual with your favourit processing softwares... Thank's a lot to Carsten for this excellent work, you can now keep definitively your Color CCD webcam in RAW mode ;o) Other news, 'the V4.10 of Iris soft' , with optimized commands for the Color RAW mode of our webcams, and also an : 'EXCELLENT DOC' (at the end of the webpage) of how to use the new commands of the V4.10 for best possible results in Color RAW mode :o))) BIG THANK's too to Christian Buil for all this work ;o) Other acquiering softwares can now handle RAW decoding in real time, for example 'Astrosnap PRO software', or 'QCfocus V2.0' :o))) And if you are using Linux, don't forget 'Qastrocam software' who now handle perfectly the Color RAW decoding :o))) ENJOY !!! ;o) |
|
Back to "Trucs et Astruces" Page (French)
|