How do you Display your Own Images?
C2A allows you to display your own images
and observations and to associate these with specific objects on
the map displayed on the screen. The types of images with which your images can
be associated are as follows:
- deep sky objects other than those in the
BT Atlas (which has its own images)
- objects from the RNGCIC
- SAO stars
- user objects
- Tycho2 stars
- Hipparcos stars
- UCAC1, UCAC2, UCAC3 or UCAC4 stars
- planets, Moon, Sun, satellites
Supported image formats are FITS, PIC, JPEG, GIF and BMP.
To associate an image with an object, do as follows:
1 – Define in the Paths tab of the options dialogue box the
path to the directory containing the user images (User images field)
and user observations (User observations field). This action
needs to be done only once. Once the paths have been defined, all user images
and observations must be located in these directories or they will not be
found by the program. The default directories suggested by C2A are C:\Users\<user
name>\My Documents\C2A\User Images and C:\Users\<user name>\My
Documents\C2A\User Observations.
2 – Rename the file containing the image
using syntax of the form <name>_<x>.<extension>
where <name> is the name of the objects as it appears in the
field Name in the object information window,
<x> is an index number
which must start with 1, and <extension> is the extension
corresponding to the type of image (fit, fts, fits, pic, jpg, gif and bmp
are the only valid extensions). It is very important that the root <name>
of the image file name matches exactly the name displayed in the object
identification window (for example, an image associated with IC 1396 in the
RNGCIC catalogue will have the name IC 1396_1.jpg – take care to the
space between IC and 1396). The only exceptions apply to objects in the SAO,
UCAC1, UCAC2, UCAC3, UCAC4, Hipparcos, Tycho-2, GCVS, Gliese and WDS catalogues,
in which case just put the name of the catalogue at the beginning of the file
name. For example, you would name an object from the UCAC2 catalogue: "UCAC2
266785_1.jpg". Similarly, an image associated with the star SAO
159918 would be named SAO 159918_2.fts. It is possible to associate
several images with the same object. To do this simply increment the counter
<x> in the file name. The only exception to
this naming convention is the Messier objects: in this case, you can use the
Messier name rather than the NGC or IC name. For example, for the object Messier
1 (which is aslo called NGC 1952), you would create an image M 1_1.jpg
rather than NGC 1952_1.jpg.
3 – Put the
image file in the directory of user images or in the user observations
directory (see point 1 above).
There are two ways of displaying an image associated with an object:
| 
|
a) Double-click an object on the map to
identify it. In the object
information window, click the Image button. If no image
is associated with this object, the Image button is disabled. Once the
Image button has been clicked, the image processing window, containing
the user image, appears on the screen.
|
| 
|
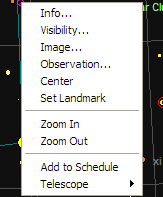
b) Right-click an object on the map and
select the command Image… or Observations… in the contextual
menu which appears. If no image is associated with this object, the Image…
and Observations... commands are disabled. Once one of these
commands has been selected, the image processing window, containing the user
image, appears on the screen. Note that this is the method to use if the
Control Panel is displayed in the main screen since in that case the Object
Information window is not displayed (information on the identified object is
directly displayed in the Control Panel).
|
| 
|
If several images are associated
with an object, the two arrow buttons in the image processing window let you
move from one to the other.
|
| 
|
You can associate text with any
image (for instance, the place and time of capture). To do this, just create
a file in the same directory as that in which the user image or observation
is to be found (see point 1 above) and give the extension .txt (the
body of the file name must be the same as that of the image). The information
contained in the text file is displayed in the image
information window which is accessed with the image information
button at the top of the image processing window.
|
Example: Suppose that you
have three images of the diffuse nebula IC 4605 in JPEG format. These three images should be named "IC 4605_1.jpg", "IC
4605_2.jpg" and "IC 4605_3.jpg" respectively. Furthermore, they
should be located in the directory of user images (see th Paths
tab of the options
dialogue box). If you want to associate text with these three
images, just create three files "IC 4605_1.txt", "IC 4605_2.txt"
and "IC 4605_3.txt" in the same directory.
Once the images and observations have been located in the
directories correctly declared in C2A, you can also access a list of objects
found by using the command User images and observations… in the Images
menu. An image and observations management window is then displayed on the
screen (see the User
images and observations section).
Table of Contents
![]()

![]()
![]()