Construction of an amateur Spectroheliograph
History
When I open a magazine of astronomy that has a monochromatic image of the sun, I am always amazed by the richness of the detail in the chromosphere. These photos are a far cry from the images taken with a White light solar filter. In the most cases, conventional imaging only shows two or three tiny spots against the smooth solar background.
To see the real detail you must observe the sun in monochromatic light at 656 nanometers (H-alpha).
In 2001, I became interested in developing a simple way to observe the Sun in H-alpha. The amateur astronomer interested in the observing of magnetic disturbances in the upper layers of the Sun, was at that time, limited to using a sophisticated narrowband H-alpha etalon filter (i.e. Daystar). These filters were mounted at the rear of a telescope which also had to be fitted with an energy rejection filter (ERF) at the objective. This solution allowed detailed observations of the Sun.Unfortunately, the price of these filters, was equal to the price of a good 200mm telescope!
After much thought, I decided to build a pocket sized Spectroheliograph.
For the record, in France, in the late 1800s, Janssen and Lockyer already obtained images of the H-alpha prominences around the solar disk but not the full disk of the sun.
The spectroheliograph was invented in 1892 by George Hale in the United States (Yerkes) and jointly by Mr. Deslandres in France (Paris) Deslandres installed a spectroheliograph at Meudon Observatory. At the time this unit was very heavy and filled an entire room!Is it possible today for the price of a White light solar filter, to build a system which allows you to see the prominences, filaments and faculae? The answer is yes, if like me, you kept your old unused astronomy equipment! You’ll also need a computer and a webcam. But that’s all you need; equipment that most astronomers already have!
I'll tell you my story with the Sun:
My first purchase was an astronomical telescope of 60 mm aperture and a focal length of 400 mm. After several years of observations, a more powerful telescope left this first telescope in storage.In 2001 solar spectroscopy tempted me. I made a small solar spectrograph based around the telescope and camera optics.
I used this telescope, as a collimator, and added a grating with a very simple adjustment. A telephoto lens, followed by a webcam, completed the spectrograph. The whole stands on a plank of wood.
This is a solar spectrum obtained with this setup. (Fig1.)
Fig1.
In late 2001, the idea of making a spectroheliograph began to take shape. Can I switch from a classical spectrograph to a spectroheliograph?
A scan of the Web led me to the Internet page of Fredrick Veio an American who has built an amateur spectrohélioscope. Its installation is extremely interesting! I also discovered the website of Philip Rousselle. His portable spectroheliograph gives impressive images.I'm building a spectroheliograph that emphasizes simplicity, using any available material.
I use two telescopes, a telephoto lens and a webcam. It will record 640 lines per image, I just need to keep one! So, basically, I just converted my original solar spectrograph. I added my first telescope to the front of the spectrograph, and the webcam Spectroheliograph was finished! The use of a webcam can greatly simplify the installation.Construction
My spectroheliograph uses a plank of wood, originally one of the shelves in my closet. The assembly and testing were performed in one week. After some modification, it was almost complete. The camera is not shown in the photo (Fig2)
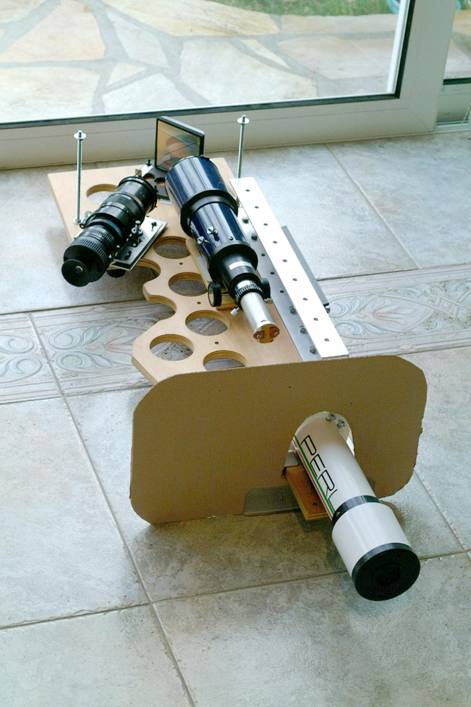
Fig2.
By letting the image of the sun drift across a slit 20 microns wide and simultaneously recording a movie, I can reconstruct an image of the sun by adding the thin slices, taken every tenth of a second.
Many problems arise. The spectrum is inclined, the spectral lines are also wrong. The spectrum has many horizontal lines due to defects in the slit. Fig3, one of my very first pictures, very striped.
Fig3.
We are now at the beginning of June 2002, I go through all the astronomical websites dedicated to webcams. At the time nobody has tried this type of arrangement with a camera. So I have to pick up the pieces! I write a specialized computer program.
The program, written in Visual Basic allows you to reconstruct a detailed image of the sun at any wavelength.
On June 26, 2002, the program is completed.
The program, SpecHelio.exe, allows anyone with a telescope, a spectrograph and a camera, to instantly transform it into spectroheliograph. I publish details of this arrangement on the AstroCam Web forum, and make the program available for downloaded from my site. Fruitful exchanges with colleagues from this forum, give rise to some new improvements.July 2002 is sunny. I get good images.
I try all the known spectral lines and of course, I start the legendary H-alpha. The first images are rather poor.My grating is not performing well. A new grating improves things Fig5
On the program window, the white line is placed on the middle of the selected line to select and n'additionner a vertical band. This column is one pixel wide at the height of the image. The brightness adjustment during acquisition must be pushed to a slight overexposure, as shown here.
The program will add all the columns acquired every tenth of a second. It forms in this case, a BMP image of 2400 pixels wide. The image is oval. An image processing software will later make the image of the sun circular.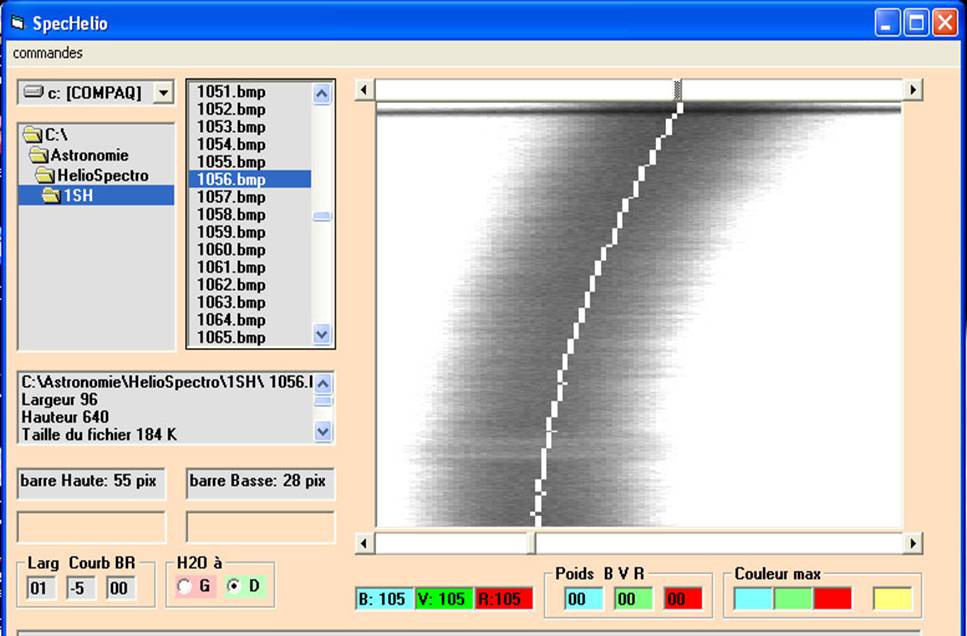
Fig5.
The various assembly components shows its simplicity Fig6.
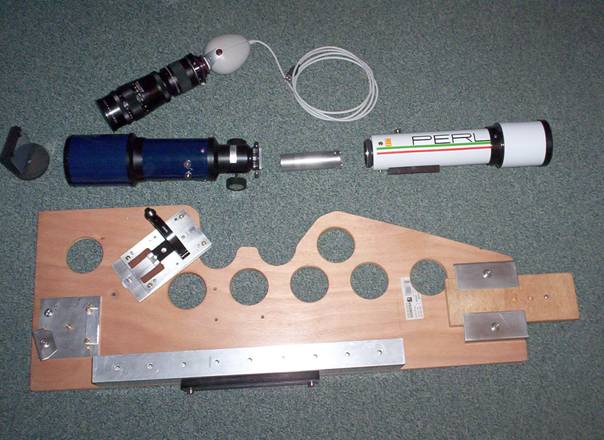
Fig6.
A 60mm telescope forms an image of the Sun on a slit made with two small metal plates. The edges of the slit are smoothed with emery cloth, then polished to a Mirror finish.
This slit is positioned at the end of a metal tube, which installed in place of an eyepiece, on my second telescope, reversed from the first. The slit is the focus of this telescope, now turned into a collimator. With the focuser, I can carry out fine adjustments. The grating placed before the lens of the second telescope, is mounted on a threaded rod, this allows fine tuning of the rotation. The grating returns the beam to a 200mm telelens. By changing this lens various magnifications can be achieved.It remains to construct the slit carrier.
It is best to choose 32mm aluminum tube, and to reduce it slightly in diameter so it can easily sit in the standard 1.25” eyepiece holder.Length of this tube would allow the slit to be positioned precisely at the focus of the two telescopes. Fortunately, there is the focuser for fine adjustment.
The tube acts as an aluminum radiator to dissipate heat due to the focusing of the sun on the slit. Fig7.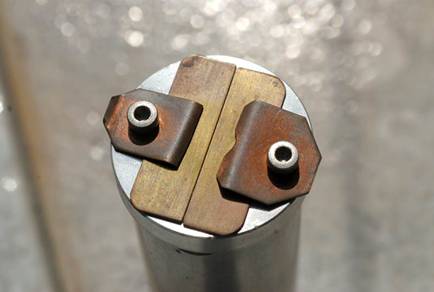
Fig7.
The basic settings are made, I start the computer and webcam. I turn the grating to the H alpha line. The spectrum of the sun appears as a clear band with fuzzy edges.
Adjusting the focus of telelens, I get the edge of the spectrum (black-white area) as sharp as possible The top and bottom edge of the spectrum is sharp, but not the spectral lines. Using the focuser of the collimating telescope, I bring the spectral lines into sharp focus. After this adjustment, the slot is placed exactly at the focal point of the first telescope.Simply center the H-alpha and we have finished the mechanical adjustments.
All this sounds complicated, but it becomes a very simple operation. In one minute everything is done! I vary the gain of the camera for an image similar to that of the Fig8a.
Fig8a.
My first slits are stainless steel. Further trials and experience made me prefer slits made from thick brass, which is far easier to polish and resists as much heat.
The slit gap is adjusted by hand, making the gap as small as possible by observing the blue sky through the tube.The eye easily sees if the blades are parallel or not.
For a finer adjustment of the slit gap, I use the diffraction pattern from a laser, Fig 8b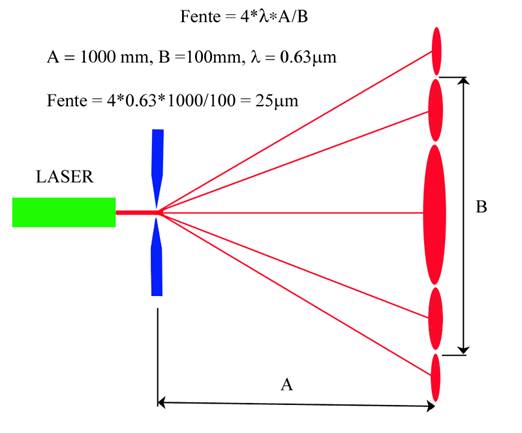
Fig. 8b
I now place the image of the Sun just to the side of the slit. I run a recording at 15 frames per second.
The Sun, thanks to the rotation of the earth, smoothly scans across the slit.
This method uses no telescope drive and is free from all unwanted vibrations.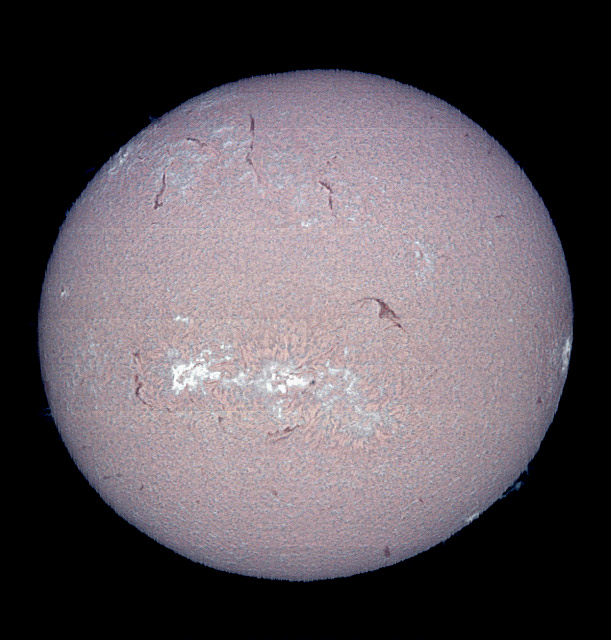
fig9
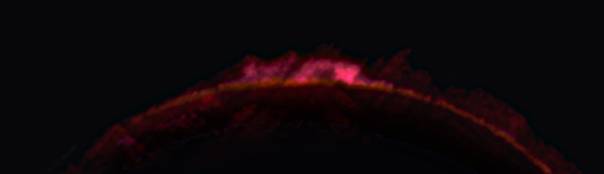
On the reconstructed image in false color dark markings show the faculae and filaments. The Sun, the original ovoid, is now circular and shown with improved contrast.
Viewing the prominences
By changing the acquisition settings and pushing the gain during image processing, we can also see the prominences. Fig10
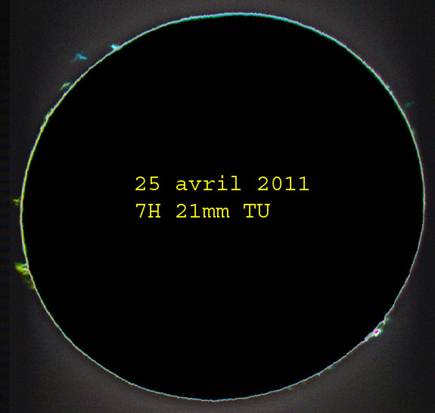
Fig10.
Precautions
Always remember to pay the utmost attention to the dangers of the Sun. Carelessness in observing the Sun can cause serious eye damage.
Always make sure the equipment is safe before handling.This assembly, only 6 kg, can be installed on a large tripod and does not require any equatorial drive. However positioning it on an equatorial mount is much more convenient.
If you already have a 60mm telescope in your closet and a webcam, like many amateur astronomers, for less than 200 euros you can construct a pocket spectroheliograph. The performance is impressive, maybe not as much as an H-alpha PST, but you've built it yourself. Perhaps the most important part of this process.I have spoken only of the monochromatic H-alpha but you have other options.
With this instrument you can watch the sun in other interesting wavelengths other than hydrogen. The lines of the Calcium of course, but also helium, why not the rays of Magnesium or Iron?You could compare your images with those of professionals.
Conclusions
I am the first to write software to achieve a spectroheliograph output based on a Webcam - "SpecHelio.exe"
My method "2D" allows the user to choose, using the program, a column one pixel wide in the image of a spectrum given by a regular camera.Only a few experienced amateur astronomers were making spectroheliographs before 2002.
I know of 10 new spectroheliographs since that date (2010) They are all using my method "2D" associated with a camera.I am happy to have contributed, by my examples and my first program, to the growth of interest in spectroheliographs.
My first picture was released June 26, 2002, message 31161 on the Astrocam list (astrocam@yahoogroupes.fr). Although this work was being done completely alone at the beginning, has been enriched over time by the assistance of many people.Thanks
I thank in particular the following amateur astronomers:
- M. Libante
- M. Veio
- M. Rousselle
- M. Canicio
- M. Harrison
- M. Rondi et M. Rondi
- M.“Polo”
- M. Grillot
- Philippe Le Hégaret (for the web page design)
These amateur astronomers, contacted me, kindly gave their assistance, their recommendations and their time throughout the development of this device.
Finally some pictures.
The program SpecHelio.exe.