|
|
|
Infrared and ultraviolet photography
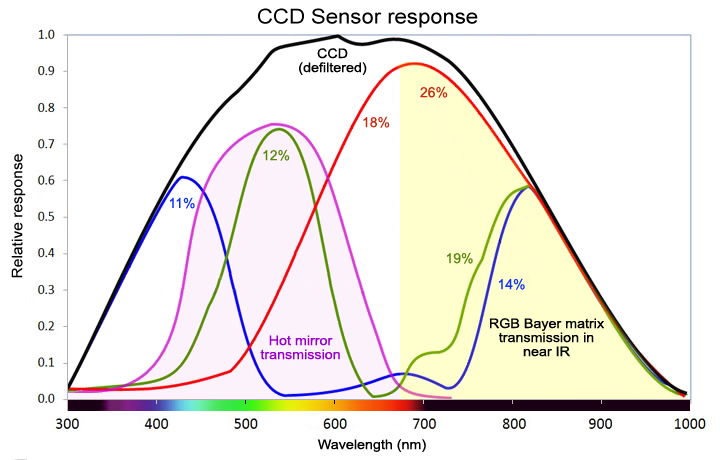
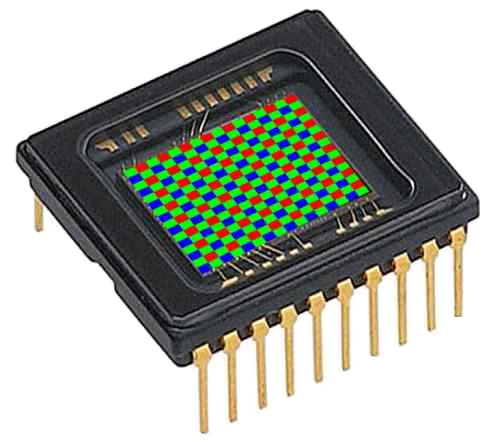
Color IR photography (III) In a digital camera, color coding is "logical" contrary to IR emulsions (see end of page). So, it is the Bayer matrix placed on the sensor that allows the image processor to build a color image. In fact, a camera performs a signal interpolation what could be the radiation he records as all photons reaching the sensor are converted in some electron flow. In other words, the sensor does not make any distinction between the IR radiation and visible light (or UV) as does the human eye :any signal generate more or less electrons. If this seems to be a disadvantage, in fact it is a advantage because the sensor converts all radiations to which it is sensitive to RGB colors. And being given that nobody has never experienced the feeling of "IR color", we may as well accept the arbitrary choice made by the camera; it is worth surely more that the Ektachrome approximate solution that we will see later After have modified a camera so that it can record near-IR radiation, its spectral response becomes twice more extended as we can see in the below graph. That said, to produce an image conforms to our vision, the Bayer matrix of a camera includes twice more green elements that blue and red elements. In other words, the sensor records twice less blue and red light than green light. Taking into account of this factor, in a defiltered camera RGB light represents 40% of radiation reaching the sensor against 60% in the near-IR part where we note that the sensor shows an excess of sensivitity in the three RGB channels
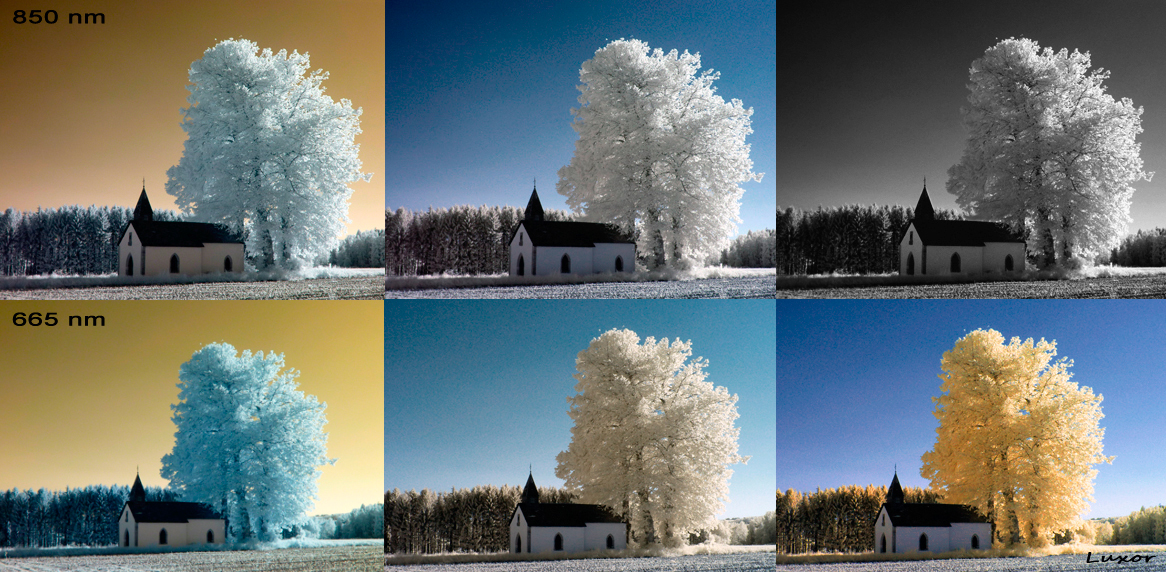
One understand that depending on the IR filter bandwidth, this sensitivity extending e.g. from 615 or 770 nm will produce a different effect on the rendering of IR pictures. If you wish to process your images in false colors, choosing the right IR filter is thus important. Rather that a long speech, next video shows the look of an IR image in various shooting conditions, the mosaic showing the rendering of a scene under different IR filters and after image processing.
To watch : Turns
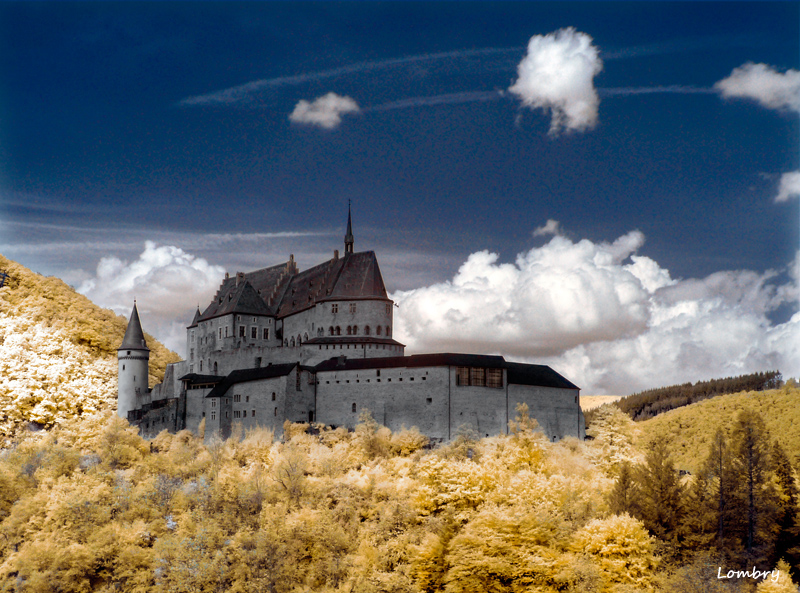
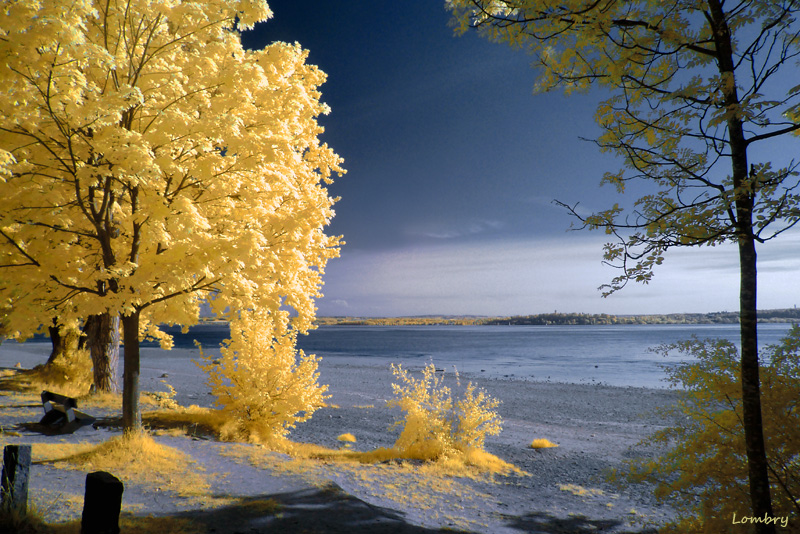
Around (IR color video), by Carol Deflandre IR Landscape at 665 nm recorded with a Nikon D90, by the author Modified Canon 1000D for Full Spectrum Successfully under a Hoya R-72 filter, without filter and under a X-Nite CC1 filter, by Ghonis
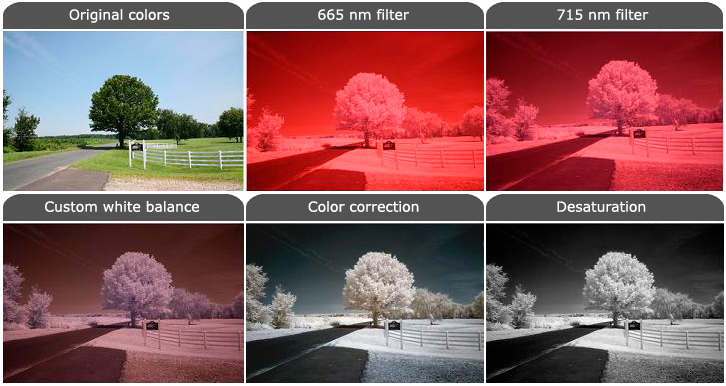
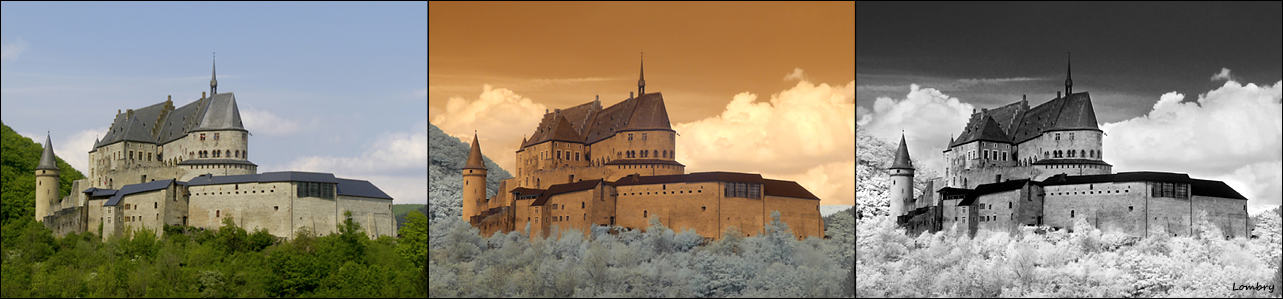
Document Digital Silver Imaging. In IR photography, several factors influence the image colors : - the filter cut-off frequency - the filter transmission curve - the white balance - the color temperature of light - the reflecting power of the subject - light properties (incidence and polarization). The filter cut-off frequency The filter cut-off frequency shows advantages and disavantages. Indeed, in using a "High-red" filter like e.g. B+W 090, Schott RG665 or Hoya R-72, some red light will interfere with the infrared image; many green of brownish-red objects will be bright although in reality they reflect maybe very few IR radiation above 750 nm and should be dark (it is the case of wood, firs, building material, the sky, etc).
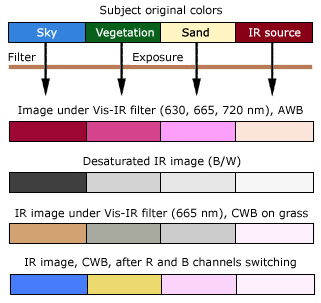
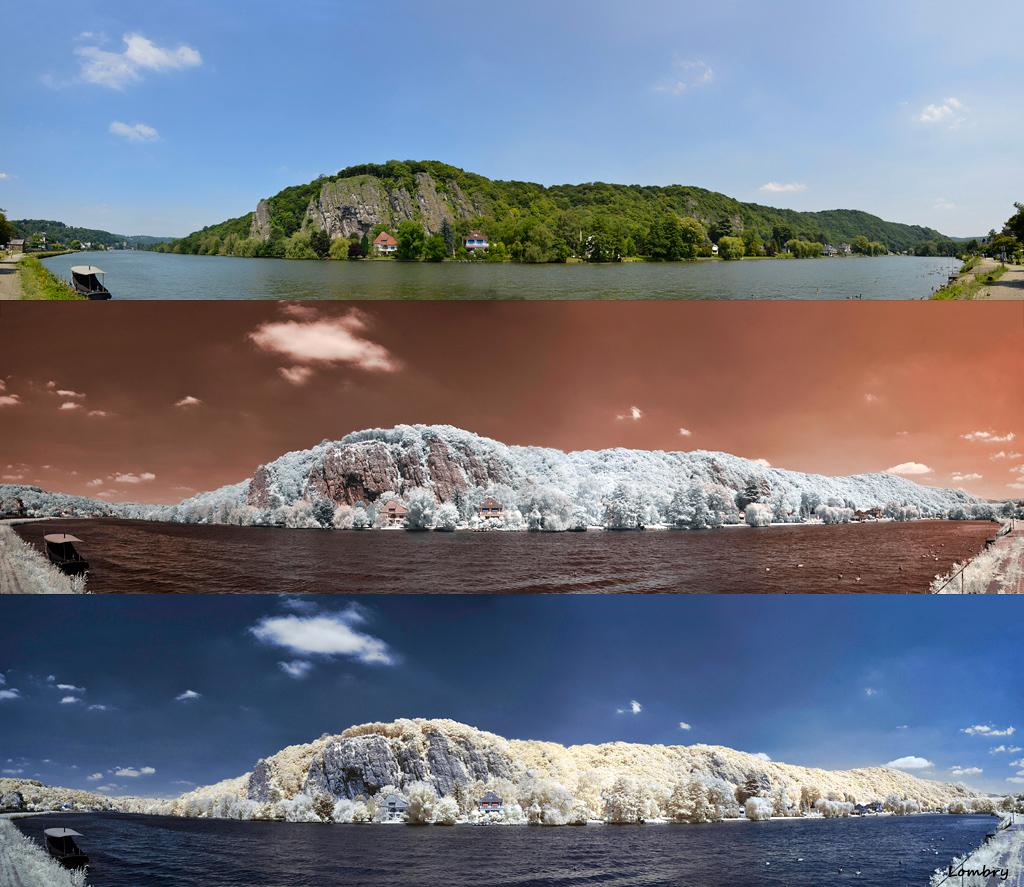
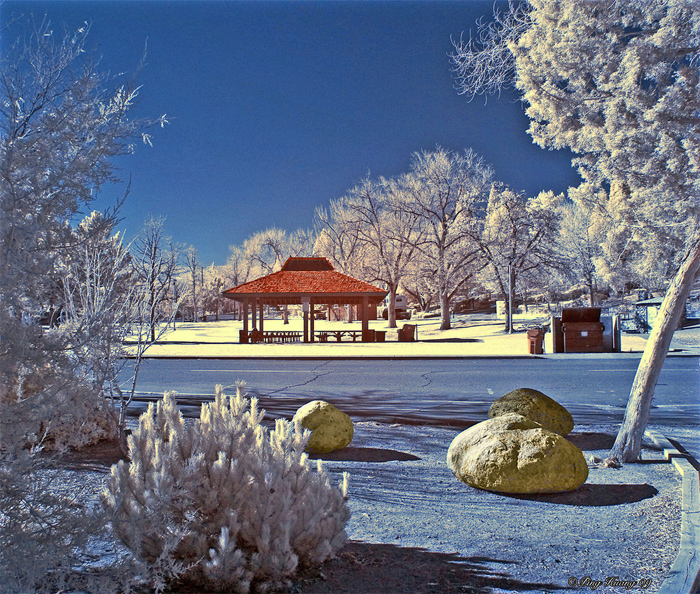
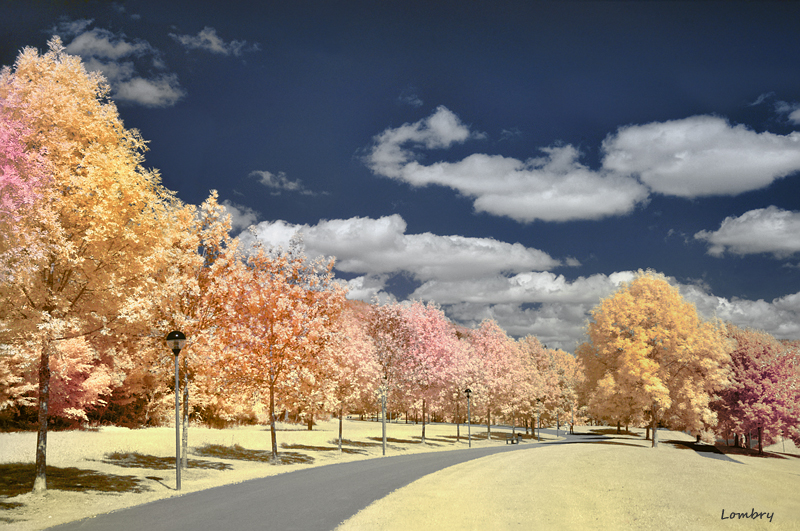
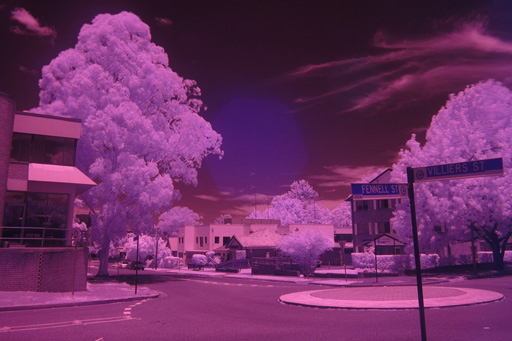
On the other hand, the fact that these filters are slightly transparent to light (up to 10% of sensitivity to red from 600 nm and up to 30% in all) will allow the sensor to record colors that you can then modify in an image processing software. In practice, thanks to RGB photons, it will be possible to keep the sky color and to modify the color of the vegetation or of other colored objects of the image as we see at left. To cut all white light (and increase the contrats of IR images if you want to desaturate them later)), you have to use a filter blocking any radiation below 730 or 750 nm (using filters like Hoya IR-76, Kodak W87, Schott RG830, etc). In blocking all visible light, the image will be a bit darker but if the subject is bright and the scene exposed to Sun, the exposure will be instantaneous (e.g. 1/20th s at f/7 at 100 ISO). If the image is really dark but correctly exposed, by image processing and alteration of RGB channels you can always add artificial colors. The filter transmission curve The filtre also distinguishes by its transmission curve. Depending on brands, material used and manufacturing processes (mass colored glass, dichroic coating, etc), a filter "similar to RG630" for example could cut any radiation above 1050 nm or remain more or less transparent behond 4000 nm. This extent to shorter wavelengths will influence the amount of IR radiation recorded by the sensor (remind that it is sensitive to 1200 nm) and thus the vegetation response in term of brightness. Unfortunately all filter providers do not publish the transmission curves of their products, and in particular companies importing low-end products from China. Others release graphs but show the curves up to e.g. 1000 or 1100 nm because their filters are opaque over that wavelength but they omit to tell it... The white balance Like in white light, the rendering of colors depends also on the white balance. It is a calibration or parametering of the sensor according to the spectral power, i.e. the color of light. If you choose the automatic white balance (AWB), under the daylight the resulting IR image will always show a pink dominance (that we can also qualify as violet, purple or magenta) depending on the filter transmission curve. Why ? Remind you that pixels do not know that your are shooting in IR and consider the spectrum through the Bayer matrix. Moreover, by design the sensor shows a high sensitivity in the red In other words, photosites located under the Bayer matrix red prixels remaining sensitive to IR radiation, they will restitute an image showing a strong pink-magenta dominance.
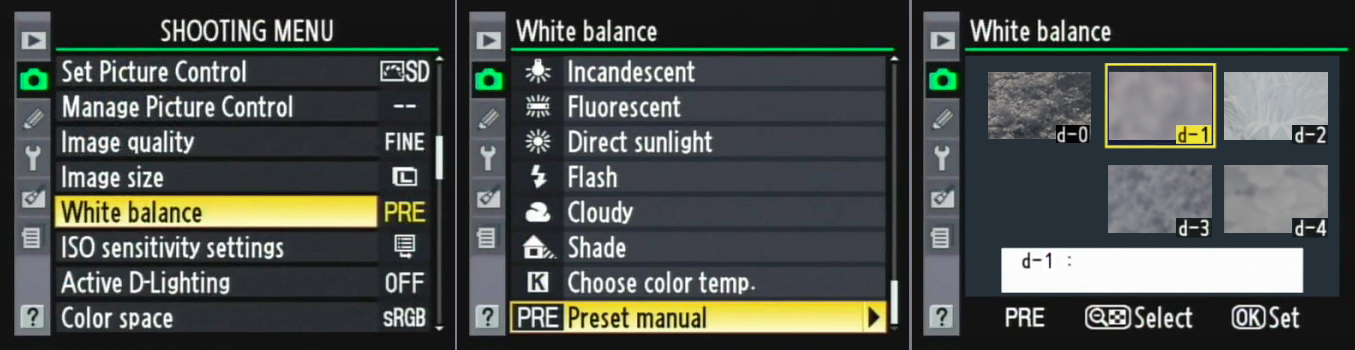
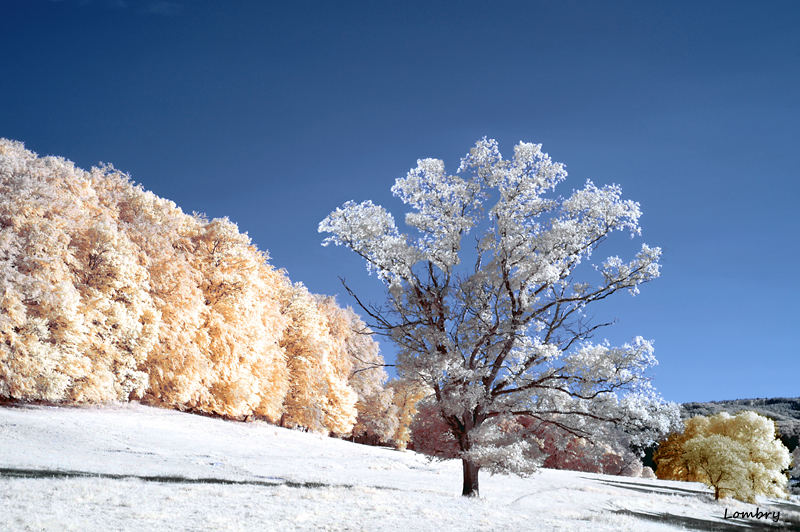
On the other hand, if you made a custom white balance (CWB) on a color, grass or green foliage, the sky will take a brownish-orange color while vegetation will be slightly bluish. It is using this customized mode that you can later bring colors to the IR image recorded under a filter partly transparent to light. We will come back on this subject. We explained previously that it is more flexible to work in RAW format. Even in this format it is recommended to make a CWB. Altough the raw converter allows to adjust the white balance after shooting, in performing a custom white balance you will have less adjustments to perform during the image processing and more freedom to manage colors. If you choose the AWB, not only the image will be pink but it will be very difficult to check on the camera monitor whether the image is correcytly exposed. You can well check the histogram to verify the exposure but the graph is sometime misleading in IR. For all these reasons, always perform a CWB in IR photography. Note that on some DSLRs and in particular on Nikon's, it is sometimes difficult to perform a CWB on a colored subject like vegetation, the system (after having switched off the Life View) displaying a "no good"message on the control screen (cf. p101 of the D90 User's manual). To prevent this message, you need to underexpose of -2 EV at shooting (sometimes to overexpose, that works as well) and then made a CWB on a well lighted up subject and slightly out of focus. You can then shoot in IR in Auto (A) or Manual mode (M) if you like. To watch on YouTube : Nikon D90 infrared video test with a CWB on foliage, by DrKissAkosZoltan
On some compacts digicams and DSLRs (in particular Nikon D90 and D300 among others), you can select a picture stored in the flash card and use it as reference for the custom white balance. This way of working is very useful when you begin in IR or take a new series of snapshots and want to compare pictures using a standard CWB, independent of shooting conditions (excepted the light). DSLRs offer 5 or 10 "preset", reference images that can be used for the CWB. Drawback, these images can be overwritten by new ones. In this case, you can no more retrieve the original reference and colors used for the CWB of some pictures. It is annoying because during the image processing if you get a nice color but can no more reproduce it, during your next outdoor session you will have to grope around again to find back the best green that will give you that marvellous golden color that you searched for ! To prevent this issue, create reference images either in picturing specific objects (lawn, dark green hedge, succulent plant, palm leaf, etc) or create images in a graphic editor, including a 18% gray scale and save these documents in all flash cards of your camera. So, you will have them always at hand to establish a CWB with the assurance to get a larger number of images showing the same color range if shooting conditions are identical. For lack of preset image, to ensure some constant in the color of your IR images, you can made a CWB on matt cardboards of different colors. Inconvenient, you will never get the spectral curve of vegetation.
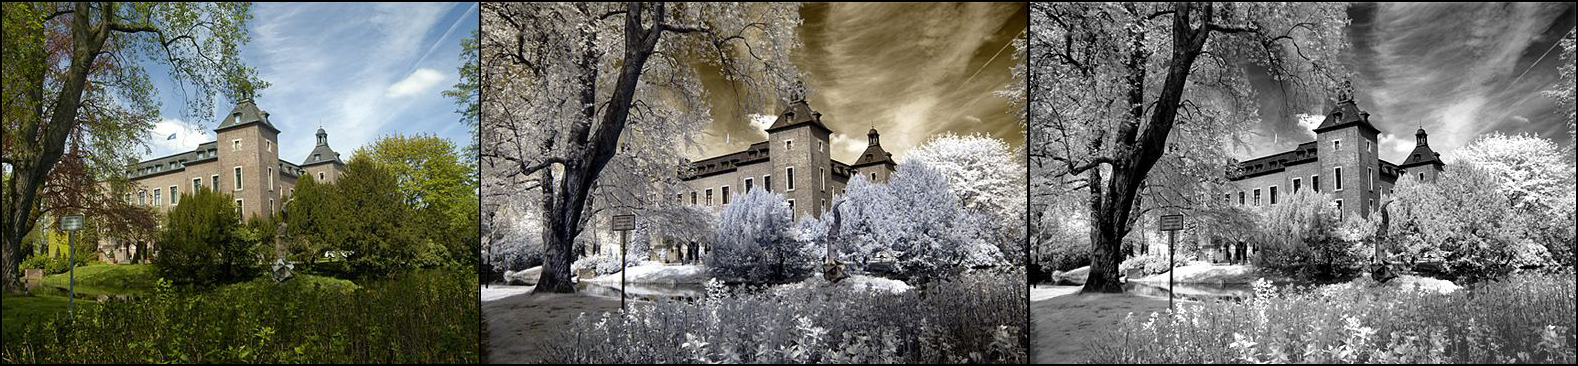
If you work with an IR filter blocking all visible light (e.g a 730 nm or 850 nm IR filter), the CWB will have no more effect; set on the sky, the foliage or on a colored objects, the image will loose all saturation and will be recorded in B/W. In this case, why is the image monochrom ? As we explained about the B/W photography, in using an IR filter opaque to colors, the Bayer matrix does not play any function; the image is litteraly filtered and does only contains luminance variations without any tint nor saturation. In other words, the processor does only see a grayscale and can only build a B/W image. Despite the B/R channel switching, if you note a light color on foliage or in the sky, it means that the concerned filter does not totally cut light and till transmits some pourcents. The color temperature One can also modify the image tint in playing with the color temperature, to not confuse with the white balance.
Note that in photography the color temperature does not refer to the concept used in physics or in colorimetry (black body). It only applies the same scale and restrict its usage to the relative intensity of blue and red colors. Most cameras allow to select an arbitrary color temperature between 2000 K and 10000 K by step of 100 K with or without compensation and to look directly the result on the monitor. According to manufacturers, the "daylight" standard corresponds to a color temperature ranging between 5200 K and 6500 K, the average being of 5500 K. Under a IR filter of 630 nm, in using a AWB, the image is pinky as we see at left (AWB, 5500 K example). Below 5500 K the image will progressively become magenta then bluish while above 5500 K it will tend to the pink and red, its tonality and luminosity depending on the filter transmission curve and the exposure time. Remind that due to the high sensor sensitivity to IR radiation, a picture taken under a IR filter blocking all visible light below 750 nm will also show a pinky tint if by example the white balance has been set to automatic or to "daylight". The dominance will be exactly the same in selecting a color temperature close to 5500 K. Without being useless, say that changing the color temperature in IR is optional as we can also made a CWB on an object of the scene, usually on grass or foliage (above, CWB example). Light properties
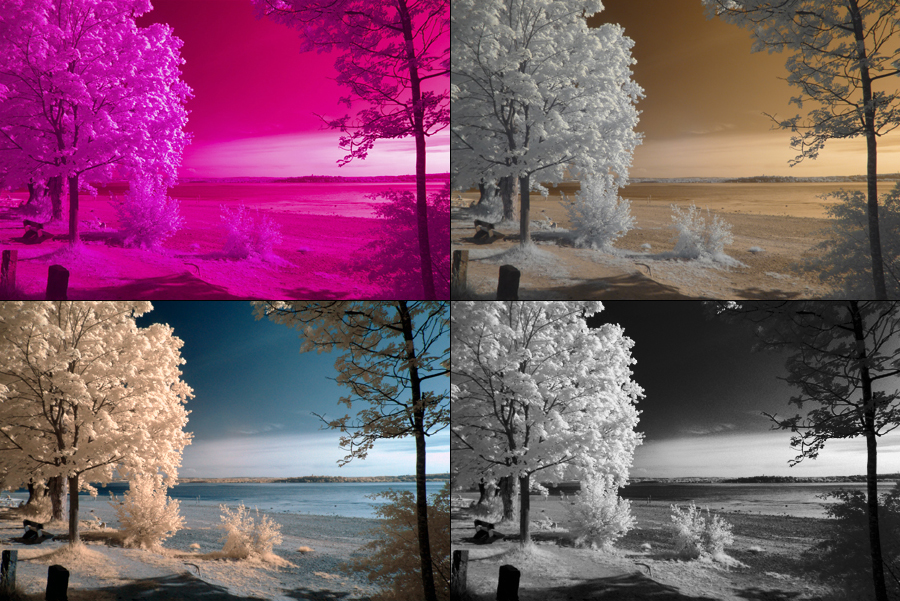
At last, light properties and in particular its incidence angle, the fact it is direct or indirect as well as its more or less polarization will affect the image brightness and contrast. Do combine all these factors together, endly you will get images showing colors and brightness noticeably different, a very light variation can easily be enhanced by image processing and alter the color of some objects. The result depending on the sensor, the filter, the light and the subject reponse to IR, the best advice we can give is to make tests and then process images on computer in following the same procedure to define ourself what technique offers the most of flexibility and the best rendering according to the shooting conditions. This leads us to deal with the image processing that we introduced earlier, this step being essential and inherent to digital IR photography. The image processing It is hard to avoid the image processing when we are interested in photography, and near-IR imaging does not derogate to. With the many image processing software available on the place and sometimes free, and online tutorials, with some habits you can modify an image in a few minutes with endless color variations. As we explained, without any postprocessing and an automatic white balance, in near-IR color imaging the landscape is plunged into a red or pink-magenta dominance of which it is difficult to be satisfied. A color is defined by its tint (tonality), purity (saturation) and its luminance (brightness). In modifying one or several of these parameters on computer, with some know-how we get all the nature color chart (or at least the range supported by your screen). As introduced before, there are many ways to modify colors of a picture, that you work with images recorded in RAW or JPEG format. To get for example a blue sky, very appreciated by amateurs of special effects, it is imperative that the IR filter transmits some light; it must transparent from e.g. 590, 630 or 665 nm. In this case, on computer it is enough to switch red and blue channels. To read : Review of Imaging software
For example, in Photoshop (Adjustments / Channel Mixer) modify next parameters : Red channel : R = 0%, G = 0%, B = 100%; Blue channel : R = 100%, G = 0%, B = 0%, the green channel staying unchanged. A similar function exists in Nikon Capture NX (Edit List / Camera Settings) which method is described on Jeff Meyers' blog. However, it gives a result different from Photoshop one's. For Photoshop, there is a batch processing file (Actions file) named "Khromagery FalseColours" that you can download for free. This program modifies levels, colors and switch Blue and Red channels in a fraction of second. But this does only represents a part of the image processing. Indeed, after have applied the Khromagery and have enhanced colors, if the result is not satisfying yet (all depends on the filter, the subject and light conditions), it is recommended to use the U-point technology to enhance colors of some details, in particular in using the Viveza plugin for Photoshop. To download : Action file for Photoshop "KhromageryFalseColours.atn" file to save in /Presets/Actions/
If the IR filter cuts all visible light, switching the B and R channels has practically no effect. The best is to let red and green channels as they are (100%) and to only adjust the blue channel in adding some fraction of red. Blue channel : R = 50%, G = 0%, B = 100% then to process tints and their saturation. The alternative is to perform a CWB on a color thenL'alternative consiste à effectuer une balance des blancs manuelle sur une couleur puis d'ajuster sa teinte et sa saturation sur ordinateur. This channel switching is useless if you do not use any IR filter and record all the spectrum between 390 and 1200 nm. In this case, it is enough to remove the magenta dominance due to IR radiation and the blue sky will appear naturally. Then it remains to modify the color of vegetations according to its reflectance (albedo). Remain one intermediate case, the one where the IR filter cut the light below 600 nm, thus transmitting partly the red light (X-Nite 630, Schott RG665, Hoya R-72, etc). In this case one can also get a blue sky after switching R and B channels. To read : How I process the 665 for color, Michael
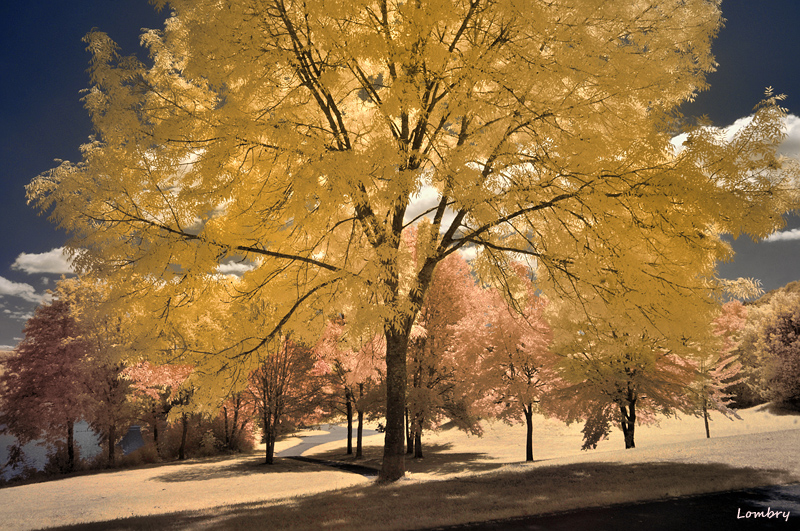
Tonalities will depend on the filter used, white balance but also on the image processing. If you like warm colors, as displayed above you will have to modify the sky color for either gives it a warmer color or a more deep or more neutral tint, and give a warm color to the composition. For this, apply first a CWB on foliage then take the picture in choosing subjects well exposed under the Sun. Then on computer modify the tint and saturation of blue and cyan and adjust optionally the brightness of the black. Vegetation showing usually a magenta, brownish or yellow dominance according to the filter or the exposure time, you can enhance warm tonalities in modifying the yellow, red and magenta tints among others. Conversely, if you look for a cold atmosphere or pastel colors, you will have to lighten or darken the sky and reduce the color of the vegetation up to become white or creamy as one see on below examples. The result depends on your own tastes. Note that if the filter is opaque below 720-750 nm, as the sensor will record a relatively low percentage of RGB colors or none, almost all tonalities will show some noise. In this case, you need increase the exposure time and active the noise reduction function but you will never getthe same range of colors as you had using a more transparent filter.
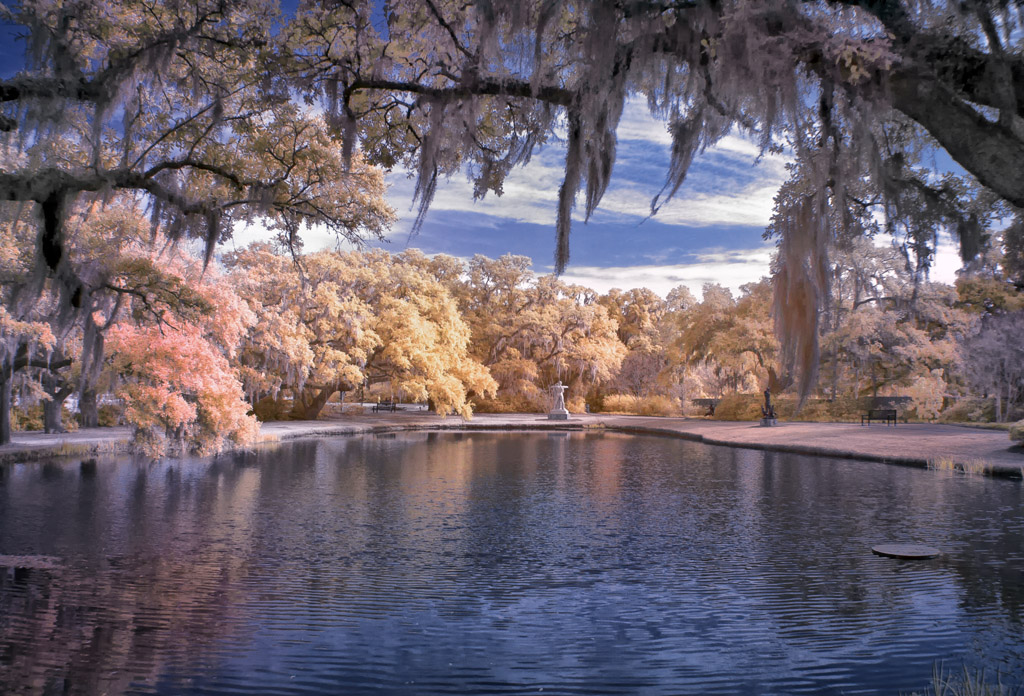
That said, if the IR photography offers much freedom and allows more color variations than classic photography, to get a nice result there is no miracle. Not only the vegetation must be blooming (rich in chlorophyl a which emission peak is located in the IR), exposed under the Sun to enhance the green color but the scene must be well composed and the image must show a good quality : sharp, correctly exposed, without noise and if possible free of preprocessing and compression. A blurry, underexposed or burned image cannot reveal details that do not exist or no more. It is also useful to work with 14 or 16 bits/color and in the Adobe RGB space color if you want to print of sale your pictures. At last, a minimum of skill in image processing is required, reason for which various links are listed on this page referring to forums or other commented images. If images showing a large dynamic interest you, know that HDR format work also very well with IR pictures. Only constraints, you need a tripod because you need to record at least two pictures of the same subject (one underexposed and another overexposed of ±1 à ±3 EV) what is easy to perform with exposures compensations ("bracketing"). The processing of these images also requires an imaging editor supporting that format and thus quite recent, e.g. Photomatix Pro. Of course as usual, recent versions of Photoshop manages it very well too. At last, although images published on this page show that it is easy to process JPEG images - what surely do most amateurs using compact cameras - if your camera supports the RAW format, use it, knowing that pixels stored more information than a JPEG picture where all these data are lost. Processing pictures in RAW format will allow you to modify directly the original shooting settings on computer prior any other postprocessing. The below two excellent tutorials describe the processing of RAW IR pictures in Adobe Photoshop. To
watch : White
Balance in Photoshop with IR Cameras, Life Pixel Infrared Photographic - Processing RAW images in Photoshop, by Imre Z. Balint
Note that if almost all DSLR's support the RAW format, only a handful of compact digicams support this format : Canon PowerShot G12, S95 and S120, Nikon Coolpix P7000 and P340, Panasonic Lumix LX5 and LX7, and Samsung EX1 (as of 2015). While small by their size, today the quality of their images revals with those of DSLR's (it was not the case ten years ago). Undesirable effects Reflections Camera sensors being very sensitive to infrared radiation and in wider spectrum that silver-based emulsions, the least reflect, the least bright light source will strongly affect the image. To reduce these parasitic images, do well clean up optics as well the objective filter before any shooting. The antireflection multicoating also loosing its qualities in IR, your images will show more reflections and ghosts images than in visible light, all depending on the spectral area that you record according to the filter and how close is the light source. For the same reason and till more than in conventional photography, avoid to picture against the light. In this case, internal reflections will be very important to the point that in worst conditions the image of the lens will reflect on the rear side of the filter. Use a sunshield or have always the Sun in the back or try to work in the shadow. Hotspot The central area of the IR image can show a brighter zone called "hotspot". It results of some coatings that are not transparent to IR. This underisable effect is generated by the many internal reflections in the lens body, often using optics that are not equipped with internal baffles. The stronger reflection is produced by the lens element the closest to the sensor. The hotspot is always diffuse with soft edges. However, when the sun is close to or in the field of view, depending on the optical design multiples reflections or a well delimited bright polygonal sun flare can appear which shape depends on the diaphragm aperture. To see : Canon G series Infrared (flickr)
The hotspot does not exist on quality optics. In this regards, Gisle Hannemyr's website DPanswers keeps update a list of optics showing or not a hotspot. This default that we can consider as an optical aberration can go unnoticed if it is superimposed to a bright and detailed background. It can however reveals during the image processing, when colors are enhanced. On the other hand, this default will stand out directly to the eyes of an advanced amateur on a dark background as on the above right image where it appears clearly at center. For an amateur of nice images, it is a default that must be eliminated either in purchasing a lens of better quality (but impossible with compact digicams) or by image processing. Indeed, software taking advantage of "U point" technology like Nikon Capture NX, Color Efex Pro (also available in Nikon Capture NX), DxO Optics Pro and other Viveza (for which there is a plug-in for Photoshop) allow to modify a area of the image in combining in one tool several functions (tonality change, saturation, brightness, on one or more RGB channels) or include a specific function allowing to darken or lighten the image central zone (e.g. "Darken/Lighten Center" in Color Efex Pro). If these software solutions are convenient, they are charged (a software at 180-300 €) and request some time and will never replace the use of a quality optics. Note that the discrepency with a low-end optics is similar to the price of the editing software. To everyone to make the best choice. Lateral chromatic aberration A secundary chromatic aberration called lateral can appear off the optical axis. It appears due to the relative modification of the subject size and is directly proportional to the wavelength. This aberration is thus more pronounced in IR than in visible andmainly on low-end optics where it is badly corrected. Diffraction When the diaphragm is closed (large value of relative aperture f/), IR focusing is affected with an uncertainty. If large relative apertures (f/8 on compacts, f/22 or f/32 on DSLR's) increase the field depth, difrraction effects will degrade the image resolution and thus its quality. The diffraction being proportional to the aperture, advanced photographers know that they need to avoid as far as they can to close the diaphragm to the maximum. In IR photography this issue worsening, it is thus careful to limit the diaphragm aperture to 1 EV or F-stop from the maximum. IR leaking As explains Klaus Schmitt on his blog Photography of the Invisible World with images taken by Andrea G. Blum, Nikon reflexes D3, D3S, D3X, D700 and D7000 have an internal shutter monitor that uses an IR LED for shutter curtain timing. If one of these models is converted to IR in using a clear glass, the IR LED will contaminate IR and UV photographs, making them unusable. For the Nikon D7000 LifePixel would have found a fix up to 1600 ISO but the problem remains in other shooting conditions. All other Nikon bodies are suitable for IR and/or UV conversion. Infrared emulsions Tackle for memory the issue of silber-based emulsions. Although the production of traditional camera has been stopped to most manufacturers and in spite of a very low demand on the second hand market, Kodak continue to make a color transparency film (for slides) sensitive to near IR, Ektachrome EIR or IE.
If you us this emulsion, after development you will get an image in false colors similar to the one displayed at left. Indeed, the transparency emulsion is only constitued on RGB layers sensitive to different frequency bands in the visible spectrum. According to the filtering process, the IR film will associate either the green or the red layer or both to infrared to build a color image. But as one of them shows a sensitivity shifted in IR, some colors will be shifted : the green becomes blue, the red becomes green while the IR component becomes red. So landscapes take a surreal color with a sky dark blue and blue-cyan meadows. Living vegetation becomes red or magenta while dried leaves become cyan, flowers sometimes yellow or oranges... One likes or not but one can criticize the coding process because on the 3 color channels, only one records IR radiation, the two others keeping their sensitivity to white light. The Ektachrome emulsion is only at 30% infrared. Because it is a transparent support, images are also more contrasted than a negative support or compared to those recorded with a digital camera. To reduce this contrast, one need to process to a preflashing during the reproduction. Once again, the alternative is to correct the gamma by image processing but it means a noticeable loss of the image dynamic. Feelings at the heart of IR photography Even more than in traditional photography, pictures taken in near IR show quickly a heavy emotional charge because we are not used to see such color mixing or such clarities. So, the simple IR photography of a leafy tree isolated in a meadow is already amazing when the landscape appears in all its whitening. A building showing an original design lost in a greenish scenery takes a surprising and surreal aspect that transforms you picture in a futuristic image. Conversely, picturing an old castel or a deserted industrial site, and you can easily create a fantastic atmosphere ! If in addition you venture in the image processing, combining different pictures and used special effects at infinite, you will touch quickly to the art photography, it is at least all thye best I wish you. Equipped with a defiltered camera, visit an arboretum, a natural park, ruins, walk undergrowth, along a river lined with trees, in wet lands, do strolling along beaches or in dunes to find inspiration, you will be gratified ! About thermal infrared or thermography For the memory, remind that any light or heat source is also a source of infrared radiation. Thermography deals with IR wavelengths between 8000 nm and 30000 nm. Instruments working in that range of wavelengths allow to measure the temperature of the body or objects with an accuracy of 1 or 2°C. Models depends on the temperature ranging (-10°C/+110°C, +110°C/300°C, etc). These instruments are very expensive (About 2000 € for a PCE TC3 camera, 4000$ for an EZTherm camera from MaxMax) and mainly used at scientific purposes, in the industry, including in the field of thermal isolation, as well as for security purposes. Hopefully, since 2014, FLIR provides a mobile solution for iPhone at 350$. Last chapter
|
|||||||||||||||||||||||||||||||||||||||||||||||||||||||||||||||||||||||||||


