|
|
|
Infrared and ultraviolet photography
Sensitivity to UV (IV) UV radiation extends from 10 to 400 nm. It is divided in two bands, the near UV extending from 200 to 350 nm nm and extreme UV (EUV) extending from 10 to 200 nm. Only the near UV is within the reach of amateur techniques. To not confuse with categories of UV radiation having an impact of the health, in particular the famous UV-A participating to the sun tan which wavelength is extending from 315 to 400 nm (divided in short UV-A or WA 2 between 315 and 340 nm, and long WA or UV-A 1 extending between 340 and 400 nm), UV-B which wavelength extends from 280 to 315 nm, and UV-C extending from 190 nm to 280 nm. Generally speaking, UV radiation is mainly used in astronomy, physics, botany, ethymology, biomedical research, clinical examinations, study of OH radical distribution, in metrology, the expertise of artworks, in criminology, sometimes in association with fluorescent light. Sources of UV light are also numerous, from the Sun to high and low pressure lights, some halogens, neon tubes, xenon lights, etc. UV applications are available to cameras (compact, DSLR or bridge) with more or less modifications and sometimes with factory models simply equipped with a suited lens or a simple selective filter as we are going to discover. Select the lens In UV photography, the problem is not the same as in infrared because this time these are the glasses and lens coatings that block shortwaves radiations below 320 nm on modern optics. One have thus either to appeal to lenses without coating or made of very few lens-elements (3 to 5) or use lenses made of phosphate or fluorite quartz 105UV to ensure the transmission of UV (fluorite transmits 85% of UV at 350 nm). Unfortunately these lenses are worth about $4500.
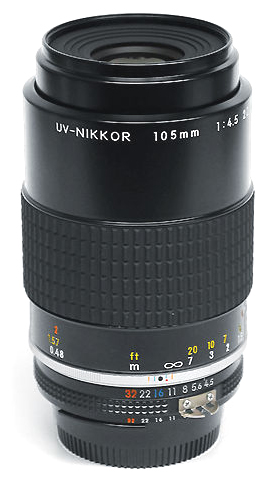
A cheap alternative is to use lenses for B/W enlargers because they allow photoprints up to 380 nm. However, their passband is too limited. One can also use old lenses although some used an anti-UV coating that must be removed. Among optics the most adapted name the famous UV-Nikkor 105 mm f/4 also called "UV-Micro-Nikkor" released in 1985. There is also the UV-Nikkor 105 mm f/4.5 S and previously there was a Nikkor of 55 mm f/4.0 UV Auto. The 105 mm f/4.5 is still manufactured by a Nikon daughter company, Nikon Tochigi. The lens is now labeled "Nikon Rayfact 105 mm f4.5 PF10545MF-UV". It is sold only through its distributor network such as Company Seven in the U.S.A. The 105 mm f/4.5 is also suitable for conventional photography at the condition to add it an anti-UV filter (Hoya UV HD or Skylight). This lens has a AI-S mount, which means that it uses a lug at the rear of the diaphragm ring to transmit the aperture value to the body (and consequently, all Nikon AF equipped with a diaphragm ring are AI-S.). It is a lens constitued of 6 quartz elements which transmission is ensured between 220 nm and 1100 nm. This lens is suited to macrophotography up to an enlargment of 1:2. We can also use optics from Nikon series E using 4 or 5 lens-elements without coating or which UV coating has been removed from the frontal lens with an abrasive cream : Nikon 28 mm f/2.8 E, 35 mm f/2.5 E and 100 mm f/2.8 E are suited to this radiation. More recently, the EL-Nikkor 63 mm f/3.5 lens showing a transmission up to 350 nm is also possible alternative but not much performing.
Among competitor lenses, name the UV-VIS-IR lens of 60 mm f/4 sold by Coastal Optics (Jenoptik). This lens is transparent between 310 nm and 1100 nm (it shows a light transmission up to 275 nm). This company also sales a UV-VIS lens of 105 mm f/4.5 transparent between 250 nm and 650 nm. The price of these optics is 4495$. At last, in searching in foreign online catalogs, in particular russians, one can find simple optics of 50 mm with a M42 mount. There are sometimes of bad quality for the conventional photography but enough for UV photography. There are also some manufacturers of UV optics. About DSLR's, note that since 2005, Fujifilm released three DSLR'sensitive from near UV (380 nm) to IR (1000 nm) : models Fujifilm FinePix S3 Pro UVIR, Fujifilm IS-1 and Fujifim IS Pro. Their price starts at 2599$ for the body and reaches 4999$ equipped with a Zeiss 50 mm f/2 mm Macro, as explained the review published on DPReview in July 2007. UV applications Note that an uncoated silica glass (fused silica or fused quartz) is transparent up to 160 nm while glasses based on oxide of boron are transparent to 172 nm and those based on phosphorus pentoxide are transparent up to 145 nm. This spectral band of near UV has numerous scientific and industrial applications : biotechnology, medical, criminology, mineralogy, radiometry, inspection, etc. UV filters In the field of photography, where most of us depend on the specifications of lenses and DSLR available in the market (only some scientists can manufacture custom-made optics), to restrict the spectrum to the sole near UV and to cut the visible light and IR radiation, the lens must be covered with an Andrea-U or Baader-U UV filter that does not show any IR leaking. Both filters are made of german optical glass. Most UV filters to name the Kodak Wratten 18A, Schott UG-1, B+W 403, Hoya U-360 or X-Nite 330 are partly transparent to IR radiation. The Kodak Wratten 18A filter for example is transparent between 300 and 400 nm but also between 700 and 800 nm with a peak of 10% close to 730 nm as explained in this document from MIT. It is for this reason that it is sometimes listed among infrared filters. The same for the X-Nite 330 filter that shows a 8% peak at 720 nm. It is thus mandatory to use a filter blocking not only the visible light but also any IR radiation. By lack of IR blocking filter (hot mirror) in addition to the UV filter, it is equivalent to picture in UV with an IR sensor ! being given that the image processor will record all these radiations, il will produce a very strange image but showing at the end a very low sensitivity to UV and an important loss of contrast.
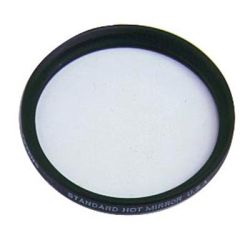
To cut the IR radiation, one needs to combine one of the five UV filters listed above with any other IR blocking filter : Schott UG-11x (or UG-11) that cut all light between 400-650 nm and only transmits 1% of IR radiation (and 90% of UV), a Schott BG-38 IR blocking or BG-40 IR respectively transparents between 310-700 nm and 305-800 nm, a dichroic X-Nite BP1 filter or even a compensation cyan filter CC20C absorbing the red color (transmission of 63%, density 0.20). Although most cameras have an internal IR blocking filte, some, like Nikon D2H, are till too sensitive to IR radiation. The same for many compact digicams. Their intention, manufacturers provide a specific hot mirror reflecting the excess of near-IR radiation. Its use will give sharper and more contrasted images (do no confuse this accessory with the IR "hot mirror" remplacemernt filter provided by Life Pixel or Baader that does exactly the contrary as explained page 1). Exposure modes and colors In UV photography, two exposure modes are also available : in B/W or in color, the selection being made via the camera menu or during the image processing. Like in infrared, due to the shift of focusing of UV light vs the visible light, one needs to compensate the focusing (some cameras allow it via the menu). One also needs to compensate the exposure because a filtre transparent to UV is black to light. UV photography usually requets a important exposure compensation between +6 EV and +15 EV. Thus in average, you will have to increase tenfold the exposure time. Obviously the tripod is recommanded, all the more for macrophotography. This longer exposure time is due to the fact that the number of UV photons is much lower than in visible light. In addition, lenses like sensors (emulsions or digitals) show a loss of performance below 400 nm as displayed on these spectra.
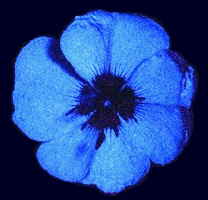
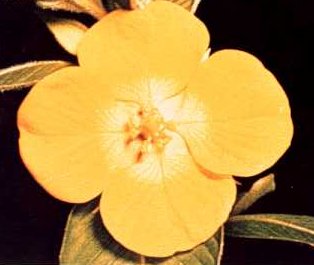
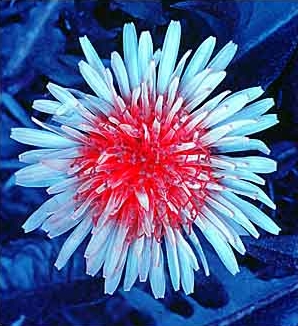
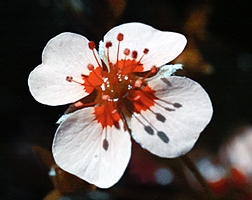
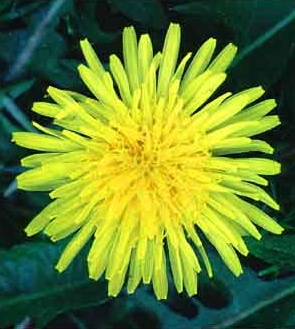
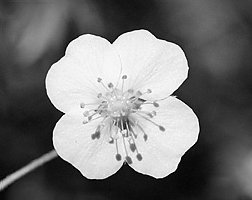
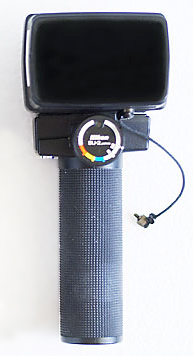
Based on performances of the UV-Nikkor 105 mm lens, the exposure compensation is ranging from +4 EV and +6.5 EV, similar to the one of a silver-based emulsion. +4 EV means an exposure time 16 times longer, +6.5 EV is almost 100 times longer ! The penalty is less severe, +1 EV to +2 EV only if one adds a hot mirror filter to reject the excess of IR radiation. However, the issue will be till more pronounced on optics made of fluoride crystal where the correction can be three times higher. When the subject is not lighted up enough by the UV light, the image takes a dark-blue color. Like in macrophotography, the solution consists in using an additional UV light, either a spot or a flashlight equipped with an UV filter. There is practically no more flashlight suited to that radiation. On the second hand market one can probably find the Nikon Speedlight SB14 or SB-140 suited to UV and IR. It must be completed with a SW-5UV adapter emitting "black light" (or a SW-5IR adapter for infrared). By lack of suited filter, one needs to adapt a UV filter of a standard flashlight, optionally completed with a light regulator (Nikon sensor unit SU-2 or SU-3). About colors, in UV all lifeless objects or that don't radiate in UV look blue or black as the sensor does almost record no radiation. The same if you use a lens blocking UV: the image will be very dark and without detail. On the other side, if the lens is transparent to UV, under a CC20C filter, foliage becomes pink-magenta. Flowers, when they are living, show colors ranging from white, red and pink as reveal this image gallery prepared by Bjørn Rørslett. At last, in underwater diving, somes corals become fluorescent under UV light. But these animals being alive, like in an aquarium one can not abuse of UV light (mainly UV-B and UV-C); its energy can break DNA strands and thus in the long term to kill the coral. A
voir : How
the Sun sees you (under UV) UV Diving with Underwater Kinetics UV Lights Canon DSLR UV Camera Conversion, LifePixel Undesirable effects The UV light does not focus in the same plan as visible light. Therefore images risk to show some reflections and a loss of contrast. The sole way to increase the contrast is to reduce the spectral window between 200-390 nm.
More than infrared, UV photography requests that no parasitic light enters by the visor to affect the sensor. The optional shutter to place on the eyepiece is thus welcome. Indeed, if UV photons are much less numerous that visible photons, they carry much more energy. Compared to visible photons, it is enough to record less than 50% of UV photos to saturate the sensor and to overexpose the image. As one stated, do not trust in data displayed on image histograms on the camera as the sensor risks to not correctly record the amount of photons. So, the green channel usually shows an underexposition of several EV while the real UV image is correctly exposed (as in theory only blue photosites were exposed). The ideal is to experiment and to work in RAW format. It is till easier with the new generation of cameras equipped with a "live view" mode that allow to directly appreciate the resulting image on the monitor before shooting. At last, if usually in full light the exposure time remains instantaneous, it is not excluded that you need to increase the sensitivity. If your camera has a noise reduction function (NR), active it. As for macro, as soon as you come near the 1:1 ratio, as usual it is recommended to use an extra light, this time a UV flashlight. By way of conclusion The rendering of IR and UV images is of course totally artificial, and at scientific purposes only companies expert in remote sensing (Spot image, NOAA, etc.) can tell you based on calibrated charts, why under a such lightiung such a plant is lighter or darker than another. Near-IR photography is much more opened to amateurs that UV photography. Knowing the upsetting effects of Moore's Law and how much prices of electronic items drop in a few years, if you are amateur and want to spare some money, I suggest you to use a second hand camera already converted to IR photography. As there are no many buyers, often vendors have to sacrify the sale price. So you can find used IR compact cameras at ~200 € and ~500 € for a DSLR body, modification (defiltering) and filters included. Near-IR photography gives excellent results in B/W, specially from 830-850 nm or longer wavelengths because except the composition, the main part of image processing comes down to a correction of luminance. In colors, you will get the best results in using a filter partly transparent to visible light (half-bandwidth at 630 or 665 nm) because it will allow to modify easier colors on computer, the processing becoming more limited if the filter is opaque to light. One cannot say the same about UV photography that requests before all a lens transparent to UV and preferably a UV flashlight. If you find these accessories and can pay for them, you are very lucky ! A new world opens to you ! For more information
|
|||||||||||||||||||||||||||||||||


