|
|
|
Assembling your antenna system
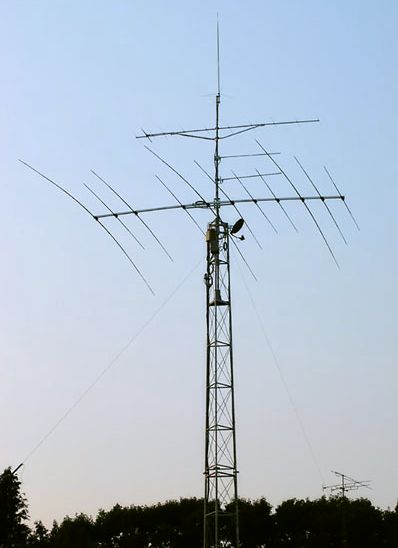
Assembling of the tower (IV) Although a tower is bulky and heavy, its installation on its base is not difficult at the condition to use the proper technique and good tools. The lightest towers 10 m high (33') supporting for example a 4-element beam or a small quad can be assembled by one person if you take your time and are conscientious. But as soon as you want to assemble an heavy duty tower or a large beam exceeding 20 kg (40 lbs.), you will need some help, usually one or two more people First, like building the concrete base, contact other amateurs who erected a tower to know what brand and design they selected, for what reasons, how they processed for assembling, what difficulties they maybe encountered, how they solved them, how long last the work, under what weather conditions they worked and, if necessary, if they could assist you in assembling your tower (for a free lunch and a visit to your hamshack !). Upgrade also of a few steps your security level. Climbing on a tower is dangerous, sometimes fatal, if you don't know what you are doing. So, to prevent useless injuries, check with the manufacturer if the structure of your tower, the hinged bases, the flat root mounts, etc, are intended to support the weight of a man (at least 100 kg). Otherwise I don't see many solutions to climb on top of your tower to install the antenna... except using a crane equipped with a platform.
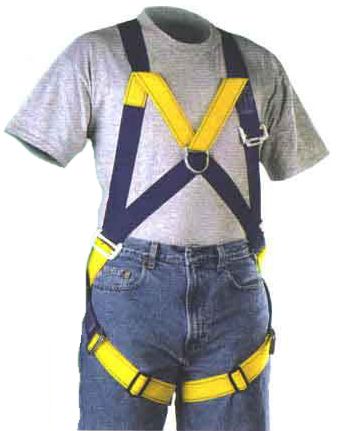
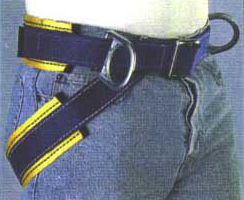
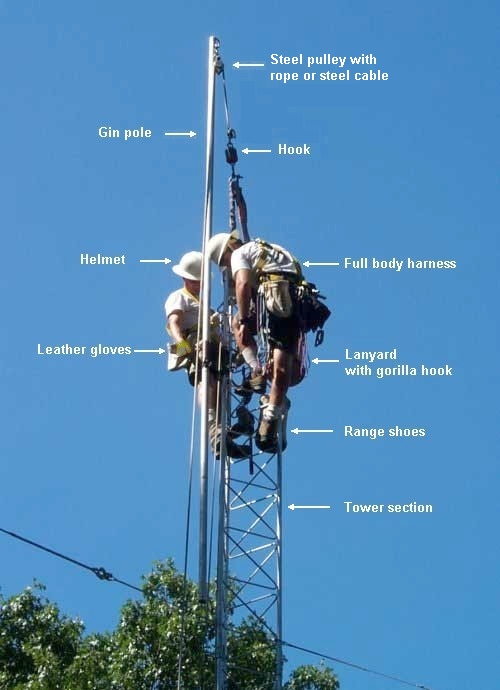
Follow thus strictly the instructions provided by the manufacturer and use the material and accessories of the highest quality; your installation has to last years, not a few days, and be safe for you and your neighbours if there are. When you are ready, plan the assembling of your tower and antenna during a sunny and no windy day. That will already prevent you enduring rain and wind gusts. Then, working whith heavy masses, sometimes unbalanced, with long steel wires or ropes well tight, handling tools a few meters high or climbing high over ground, each of this circumstance is at risk if you have not a clear view of what's the matter in the field. An accident does not always happen to others. Do not gamble on the chance when working on a tower. This is far to be a game and if you slip you can make not only your life in danger but the one of the other people too. So, plan your installation carefully and try to simulate at least once all steps of the assembling, including the role of each people, the tools to use, on paper before to begin. Tools and accessories Like all mechanical job, tower work requires a proper technique and dedicated tools. Among these last you will need of an helmet, screwdrivers, pliers, wrenches,... without to forget the essential bolts and nuts. Add some clothings like the welcome leather gloves very useful to protect your hands while handling the tubings and the rope and to warm your hands at winter time, an old denim (jeans), a light sleeve jacket with several pockets but allowing you to move freely, and shoes offering a very hard sole with a deep pattern like any good range boots. You can also use work shoes with steel inserts in the soles or even military "combat shoes". For your safety it is of the uttermost importance that you borrow or buy a safety belt. This is in fact a generic term that we must divide in 2 elements : first, the leather belt, at least 5 cm wide or 2", which length is adjustable to the perimeter of the tower like an ordinary belt. It is independent of the security hardness (but has to be attached on it). Then you need either of a strap snap or a safety belt with seat harness that you will attach around your waist. This is a 10 cm wide (4") belt including a leather belt and some fasteners to attach various steel loops or tools.
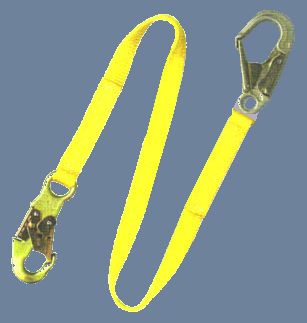
These items come in various designs including the full body harness crossed on your chest and in your back. For your information a safety belt with seat harness cost about $100. Take also some useful accessories like two steel loops (D-ring) for the harness or the strap snap, several gorilla hooks or lanyards 90 cm long (3 ft), one or more solid buckets to transport little tools or larger accessories on up the tower (no more than 10 liters or 3 gallons), etc. To put together the various sections of a tower three more accessories must enter in your collection of the most useful tools : - a pulley equipped with a ring and encasted in wood or metal to prevent the rope to jump out of the wheel. It will be attached on top of the gin pole (see below) or any convenient hook to lift heavy load on the tower. - a manila hemp rope. Twice as longer as the height of your tower, it is used with the pulley. Always select the rope offering the highest resistance, and the larger supporting the strongest strenght. A diameter of about 2 cm or 0.8" will make the job. - a gin pole. This is a special metallic pipe of about 4m long (13') on which is attached a sliding clamping device, a means to tight it, and a pulley on top. When the tower and antenna are installed manually, without assistance of a crane, it is used to lift the different sections of the tower and the antenna mast in order to assemble them without difficulties. We will develop a bit longer this subject below. This is practically all the tools and accessories that you need to assemble a tower and an antenna. As you see this is not hard to gather. If you do this job for the first time and maybe the last one too, I suggest you to borrow the climbing equipment and hardware to your radio club or even to a climbing or scout association. One of his member has maybe still this material under the dust of his workshop. Before using them check that the pully, thr rope, the gin pole, security belts, steel loops and snap-links are in good state. At the least suspicious remove the damaged part and replace the unit. How work all this stuff ? It's so easy that even a kid might use such equipment ! Before climbing attach your strap snap or your harness around your waist and attach a D-rings at each hip, the rounded side to the outside. If you use a full body harness don't forget to insert in the front harness the loop that will attach you to the tower.
Attach also on the right D-ring of your harness one or more gorilla hooks by their snap-link (the smallest loop), leaving the larger hanged on your side. One of this gorilla hooks (usually the one place in the middle of your chest using a full body model, otherwhise one of the ones located on your waist) will be used to secure you on the tower. The other one can be used to attach some tools or a bucket on the tower. Strapped ? Take your helmet and your gloves, we go ! Once equipped and strapped, you will probably look like one of these climbers or skycraper workers. Working with tubing sections, bolts and nuts you will quickly appreciate the use of these "refinements". While climbing or descending on the tower, do always attach you with the gorilla hook to the tower. When you are at good height pass the security belt around the tower and attach both snap-links to your steel loops. Attached the gorilla hook above your head, about 80 cm (30") up your waist. It can be loose. You are now safely attached around the tower. If you should have to slip you will be first retained by the gorilla hook which is only 90 cm long (3 ft), then by the safety belt placed around the tower. If you use a simple strap snap, adjust its the position in your back so that it is placed just on your waist, between your pelvis and your kidneys, never too high to prevent any potential injury if you do an awkward movement. A seat harness is easier to set from the moment that it is suited to your size and well placed like a seat. It offers a greater comfort than the strap snap. Strapped this way your first feeling will be to get entraved in your movements but after a while you will appreciate this security that will give you in fact all freedom of movement. Your safety belt will allow you to move safely around the tower, the feet leaned or not against the rungs. The strap or the harness will provide you also a large and sturdy surface against which you can lean with all your force when lifting and moving heavy pieces of material. But working on a tower do always think that you are not at ground level and that if you lose a tool, it will transform in projectile of a few kilograms falling at 60 km/h (40 mph) on the people underneath..., hence the utility of the helmet, also useful to prevent your head to knock on the tower rungs. The gin pole As introduced above, the gin pole is an handy device, made of a tubing, a sliding and clamping mechanism, a fixing system and a pulley attached on top. It is an essential tool when assembling manually a tower over the ground in using itself as support to lift the higher segments. Placed on top of the last section, it helps you to lift easily one tower section after another or any piece of material on the tower in pulling simply on the rope linked to the pulley. The gin pole is of course useless (or almost) if you assemble the tower horizontally and erect it in position in pulling at 15-20 people on ropes.
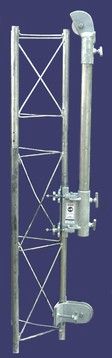
Gin poles are made to clamp onto rungs of Rohn No.25 to No.45 towers like the WB0W's HD-2 model displayed at left. Among the precautions to take, always attach tightly the gin pole on the tower and lift the load at the vertical of the pulley to avoid torque and a possible break of the pole. Avoid also to use a gin pole made of several short tube segments made of different metal (e.g. a narrow aluminium top section fit into a larger steel tube) to prevent weak points and possible break at the junction. For security purposes, attach an additional steel pulley on top of the tower in case of the gin pole breaks. The rope or the steel wire will run through both pulley. You will probably not find this accessory to your do-it-yourself shop, and as it should be made of aluminium, very few amateurs have the adequate soldering system to built it. If you can't find one, the alternate is to build it with a long tubing at least 4 m long and to drill a hole 5 cm from one end to attach a quality pulley using a steel wheel instead of Teflon (too smooth to support a steel cable). Then pass the rope or the steel cable into the tubing to the pulley, and bolt in parallel a double system of U-bolts that you will attach on the tower to maintain the gin pole in position. Only constraint, you will have to unscrew one side of the U-bolts (the one attached to the tower) each time that you will have placed a section and you will have to bolt it again on the tower one section higher. You can also bolt a L or G-shape anchor on top of the gin pole, just above the pulley, that will help you to hang up the additional section on the top segment of the tower already erected. If you cannot borrow, build or even buy a gin pole, you must find a means to place a pulley using a steel wheel in height, in order to lift the differents elements. You can for example use the lift attached around your tower if you use one. You can also erect a narrow tower, 20-30 cm wide along your main tower and at least 3m longer, secured with guy wires. It will help you to lift all sections of the tower. Or a long telescopic pole (made of fiber glass or aluminium from 50 to 70 mm of diameter at the base and over 25 mm on top) could do the trick if it is very long, very wide and sturdy. Avoid in all case a pole made of wood. If the pole is your sole alternative, drive a small hole 30 cm dept (1 ft) in the ground and place the base of the pole inside. Then attach the pole with guy wires and one third, two-third and on top where you will also attach the steel pulley with its rope or steel wire. Check the security of the system in lifting a bag of sand of about 30 kg (60 lbs.) and let it hanged a few minutes. If it carries the load several times, go ahead, your system is safe. But for more security your gin pole should be made of a steel tube 40 mm of diameter or larger or of an unique length of aluminium tubing of at least 50 mm in diameter (or square section) and at least 2 mm thick, the larger the best to prevent it bends under the load. Indeed, remember well that if you cannot manually bend a gin pole made of aluminium tubing using your own strength, a few meters high, under the stress of a heavy load, a light tube showing a too small section can be at the limit of its resistance. Suddenly, without warning, it can bend and release or let drop the tower section that can hurt one of you if you cannot manage the situation. So take great care in selecting the quality of your gin pole and its fixings. Let's your friends be aware of this potential problem and of all the risks that they incur in doing the job themselves too. At last, if you can't find any gin pole or any other mean to lift your tower sections, if the assembling of your tower horizontally on the ground is not in your plans, you will have to call the services of ironworkers and of a crane, using a plaform attached to the shaft to assemble your tower, and behind it of a good gardener ! Next chapter The guy wires and the guy anchor
|
|||||||||||||||||||||||||||||