|
|
|
Don't be afraid of CCD
The calibration or image pre-processing (V) Once the tedious work of acquiring raw images is completed and images are downloaded in your computer, you are far to be at the end of your work. Like in the darkroom of your grand-parents, you only did the half of the job ! Indeed, the second part consists in improving your raw images with this supplementary constraint that electronic images are sensitive to electronic noises and other parasitic, as much signals that we have to remove. In this article we will give you a summary of the procedure to follow in order to process an image in presenting the key steps of the process. In other pages, we will review some specific steps. The digital processing of an astronomy picture is divided in two key steps : - The pre-processing during which images are calibrated - The post-processing during which images are digitally corrected and optimized. In both cases the pursuted objective is to remove parasitic effects induced by the photographic system, defects and other dominances visible in images, and to increase all features that can improve the overall quality of the document. The calibration or pre-processing The first step of our digital processing is the calibration or pre-processing, an essential step for photometric applications as well as for all pictures taken in conditions of low light : planetary and deep sky objects. This step is not mandatory if the subject brightness and contrast allow to take snapshots, if the quality of images does not suffer of electronic noise or if the subject moves quickly. Usually only high resolution pictures of the Moon satisfies these criteria (but images can nevertheless take advantage of a classic image processing as we will explain in other pages).
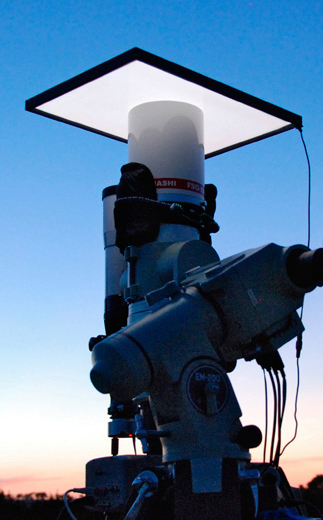
The calibration requires to take three additional frames (and usually multiplied) of the subject in order to remove all errors imputable to the electronic and in a lesser extent to the driving system. These images or frames consist of a dark frame, a flat-field frame and a bias frame while the original raw image containing the picture of the subject is called the light frame (or light image). - The dark frame : It is recorded in complete darkness with the shutter covering the CCD sensor in the same conditions, during the same duration and as close in time to the light frame as possible. This dark frame is the most important image processing function because, even maintained in a cold atmosphere the chip has a thermal response, a dark current and a readout noise that generate parasitic photons. This dark frame records thus also both bias noise caused by the systematic noise in the camera electronics, and thermal noise, described previously. The dark frame must be subtracted from the light image to eliminate these fixed patterns. - The flat-field frame (FFF) : It is an image showing the uniform distribution of light entering the scope. It is created in photographying a uniform light source using the same optical system (same scope, camera orientation, focus, filter, projection) as was used for the normal image frame). The objective of this frame is to correct normal images for all "mechanical" defects like vignetting (the obstruction of the light beams by parts of the instrument), possible differences in sensitivity between different areas of the CCD chip, dusts and their shadow on surfaces clsoe to the sensor (filters, etc) and any other difference that could affect the pixel sensitivity and modify the quantum efficiency of the CCD. As it is sometimes difficult to find a uniform light source, you can also picture a diffuse screen or a white surface uniformly illuminated tied in front of the scope as we see at left. Then the image resulting from the light frame minus the dark frame must be divided by the flat-field frame (some content of substracting it what is not exactly the same). For more information about the meaning of these functions, see the page Composites by Examples where we explain the fundamentals of unsharp masking and other LRGB composites, and among other concepts, the difference between a digital substraction and a division.
- The bias frame : This frame corrects for the base noise level in the camera. Its data are included in the dark frame, therefore some amateurs does not record it. The bias frame is created by recording a zero-length exposure (in practice an image exposed at the maximum shutter speed, in theory as close as possible to zero length) with the shutter closed. Although the bias frame remains constant over long period of time, it contains a small amount of readout noise. So, in theory a bias frame must be recorded each time that you create a new dark frame. Then this bias frame must be substracted from the dark image. After subtraction, the resulting image is the thermal frame that will be substracted from the light frame. At last, the resulting frame is divided by the field-field frame. Note that we can till optimize the resulting thermal frame in averaging 2 thermal frames (via the merge function). In theory we can also create a bias frame from each dark and flat-field frames so that they are also calibrated (what do some patient, brave and talented amateurs) CALIBRATED = (LIGHT - DARK) / FLAT or CALIBRATED = (LIGHT - THERMAL) / FLAT, with THERMAL = (DARK - BIAS)
After these operations, the result is what we call a calibrated frame corrected for all irregularities and noises recorded in the image. This step can however affects the pictorial quality of the image because the calibration frame contains random noise of their own. So for photometric applications or if you search for the image of the highest quality, the dark and flat-field frames used for calibration can be the means (average) of several dark and FFF too. Once averaged, these frames will be substracted from the light images to get better calibrated frames. This process should not be skipped because it improves dramatically your images quality. The post-processing Once you took possession of your precious calibrated frame(s), you can go to the third and last step consisting in the image processing strickly speaking. This consists to take profit of digital functions which actions are identical to the ones we used in old darkrooms, like stacking, compositing, unsharp masking or the gamma correction to enhance high spatial frequencies to improve features in both dim and bright areas of the picture. To
see : Convert Gray Images Into RGB Color Step By Step Complete Astrophotography Processing Guide To buy : Anti-Blooming Filter Software, by Kazuyuki Tanaka
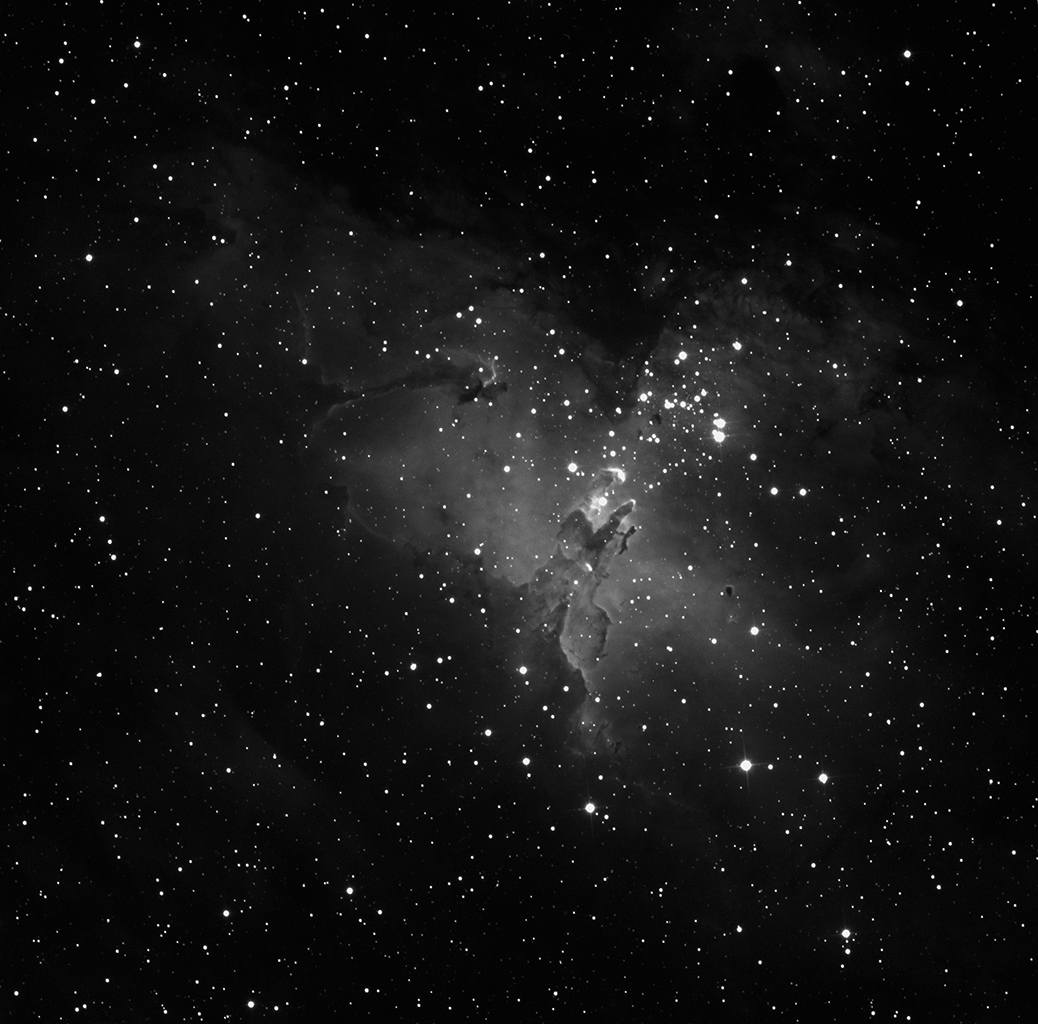
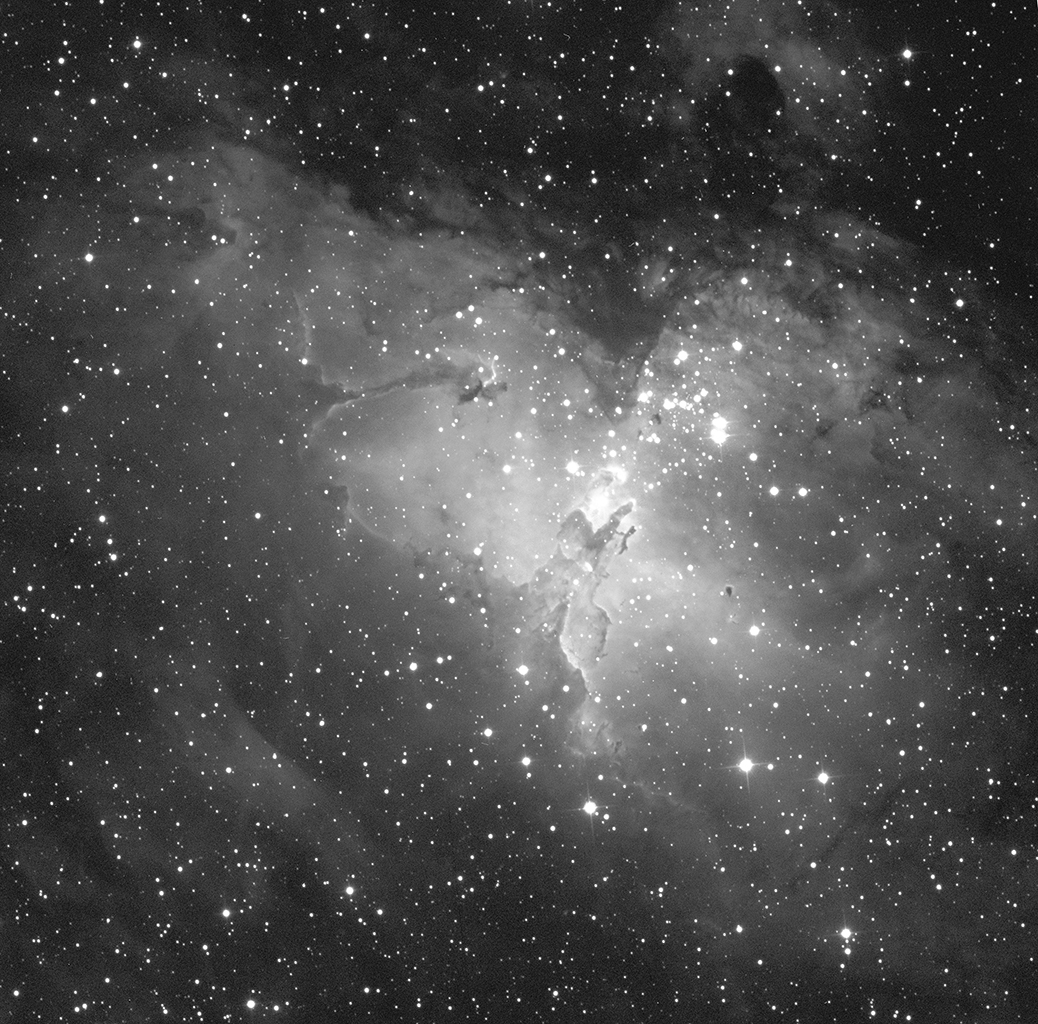
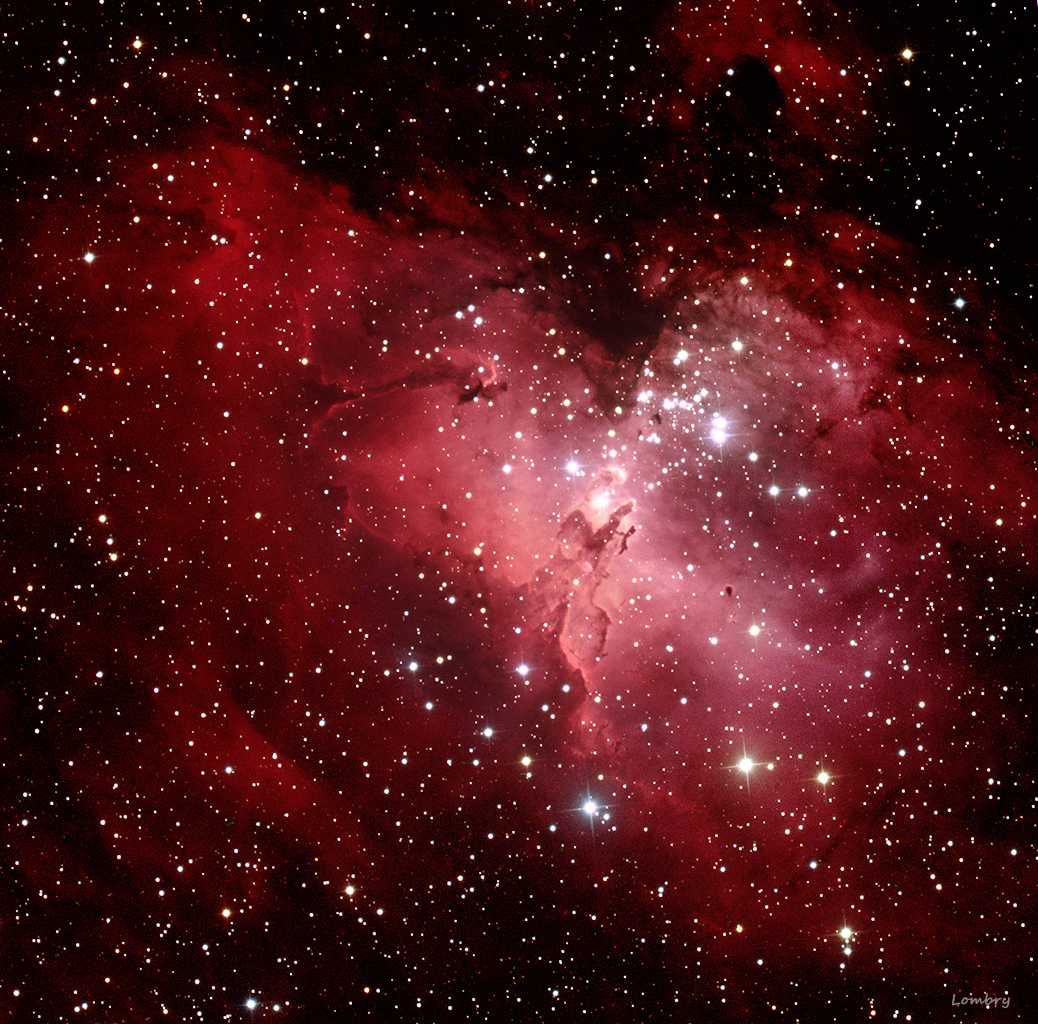
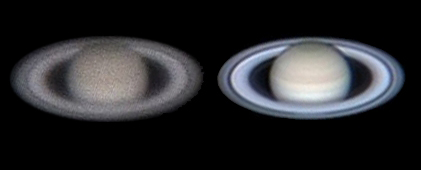
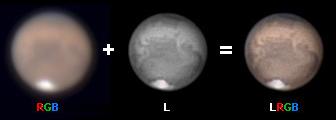
Images stacking To improve the image quality showing often a low contrast, noise and sometime fuzzy, after the recording you need to extract the best individual images or frames from a serie of a few hundreds frames recorded within a few minutes or from a short video, and to stack (add) them. Some CCD cameras (e.g. ZWO) are able to register up to 164 fps. This image stacking will increase the definition, and thus improve the quality of the resulting image as we see below. If in deep sky astrophotography we usually content with stacking a few individual frames (between 3 and a maximum of about 100 RGB images exposed for a long time for the bravierst), in high resolution planetary photography, good results require often to stack a great number of frames, sometimes exceeding 1000 individual frames. As we see below, the stacking is a major step in planetary imaging processing as it reduces the noise (residual noise is inversely proportional to the square root of the number of framed averaged) and averages out images shifts due to seeing. This is still truer in color. Indeed, as for an LRGB composite, it is not important that images extracted from RGB channels are a bit blur or shifted (the lesser the better of course hence the use of reference points in each frame to combine) because it is first of all the luminance that will give its contrast to the result, RGB images reducing only the electronic noise and averaging the seeing. To read : Planetary Astronomy, C.Pellier et al., Axilone, 2015
In working at e.g. 60 fps, in one minute we can record a HD 1080p sequence containing 3600 individual frames. The video being directly available in digital format, if needed we can easily extract the best frames of the sequence then stacking them to increase the signal-to-noise ratio and the image dynamic (range of colours and details) as we very well see on documents displayed above recorded with a Philips Vesta Pro webcam (659x494 pixels of 5.6 microns supporting color recordings between 5 and 30 fps). Among imaging software supporting the stacking of thousands of images, name Registax from Cor Berrevoets, DeepSkyStacker from Luc Coiffier, PixInsight from Pleiades Astrophoto, Astro Pixel Processor from Mabula Haverkamp, IRIS from Christian Buil, Avistack from Michael Theusner, Astrostack, AstroSurface, and HDRinstant from HDRlog among others. Thanks to these software, it is quite easy to convert filmed sequences of an object in a single picture resulting of the stacking of several hundreds to some thousands of individual frames extracted from the best sequences. In other words, if we take a small scope of 125 mm of aperture showing a theoretical resolution of 1.1" (Rayleigh limit), and reaching with difficulties a photographic resolution of 10" in eyepiece projection, the stacking of 1500 frames made under good conditions will offer a photographic resolution near 0.5", so 22 times higher than a raw image ! The most skilled can even create an animation showing the rotation of the planet (of the Sun) using WinJupos (cf. this Tutorial on YouTube). We will come back on the subject in other chapters, mainly dealing with the signal-to-noise ratio and the picturing of Mars during oppositions (this last in French). To
see : Astrophotography
Tutorials Creating my Image of the Andromeda Galaxy, David Woods Saturn before and after processing Canon EOS 450D on Celestron NexStar 5 SE XLT
Other image processing functions Among the useful post-processing functions, detiails in bright area can for example be enhanced with a high-pass filter, i.e. a Lucy-Richardson or Van Cittert algorithm (see Drückmuller's pages about his processing of solar total eclipse pictures or this page in French), while the Maximum Entropy and Convolution functions will be very useful to enhance features on pictures of dim objects displaying a low signal-to-noise level. At last, Wiener algorithm gives very good results on all DSO in increasing the image definition. Another trick is restoring the image to improve the sharpness of the image frame. At last, but it is mainly used in planetary imaging, you can extract the object from the background from all images. Now you can recenter the subject, accurately register references points (well identified points) so their data can be combined pixel for pixel to create a composite image (juxtaposition of high resolution images too big to hold on a single frame). You can also animate your individual frames or make an astrometry reduction. That said, the image processing includes tens of functions and can at the end become complex. But step by step, everybody can hopefully master these techniques. We will describe some of them like common artifacts, the unsharp mask, and how to create a RGB and LRGB composites in the next two pages : The Digital Darkroom and Composites by Examples. To download : HDRinstant, software by HDRlog FITS converter : FITSview (FITS to BMP) - FITS Liberator (FITS to TIFF)
Most software provided with CCD cameras allow to create the calibrated frame from the light image with the dark, flat-field and possible biais frames but include few advanced post-processing functions. As these last request a wide maneuver latitude and quite a lot of experience, we recommend you to get first a free imaging software and once you are used to work with it, go with a more performing tool like Adobe Lightroom, Photoshop or MaxIm DL among others. As explained in pages reviewing image processing software, some of these products are expensive but they have the merit to be powerful, relatively easy to use, they are compatibles with many images formats and are very complete. In addition, there is a community of amateurs ready to help you if you are in trouble (via social networks and forums among others). A last piece of advice. If you do not master IP techniques, a simple way to enter into the subject without having to read some books sometime austere and theoretical, is to ask advice to an advanced amateur - links are numerous on this website - who will give you steps to follow to process an image in a few keystrockes. There are also many tutorials on YouTube. From there, from meetings with friends or remotely, you will learn what is hidden behind sub-menus functions and settings of some filtering or functions. Once this basis won by practice you could tackle to more technical matters. By way of conclusion, if the CCD camera or the DSLR and the scope allow to record the image, it is till the image processing after the shooting session that will reveal the skills of the amateur. The documents presented herewith are nice examples. Now, it's your turn ! Close this article by reviewing some of the largest CCD cameras used by professional astronomers completed with a list of useful links. Last chapter |
||||||||||||||||||||||||||||||||||||||||||||||||||||||||||||||||||||||


